Advertisement
Quick Links
In the 1960s, Carroll Shelby's Cobras dominated racetracks worldwide, first winning races coast to coast
across North America, then in 1965, winning the World Manufacturer's GT Championship, achieving the
ultimate goal of defeating Ferrari. The Semi-Competitions were modified from full competition models
just enough to make them street legal. Only 29 models were produced, making them one of the most
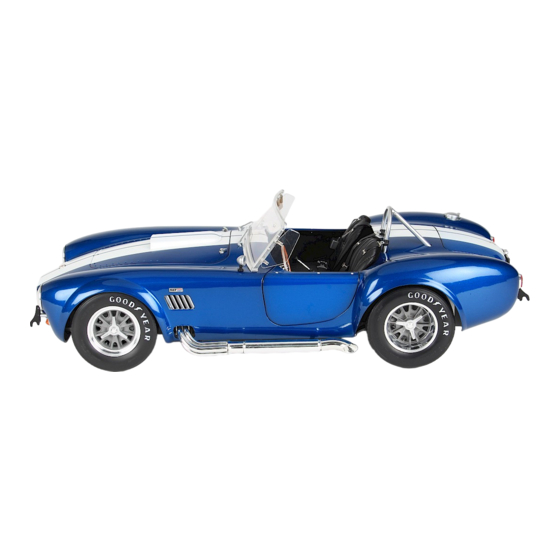
Your 1:8 model replicates the original 1965 Semi-Competition Cobra in intricate detail. From the detail on
the dashboard dials to the writing on the wheels, every piece is precisely reproduced.
In your 03 model pack, you will start to assemble the chassis and the right front wheel :
STAGE 16: LEFT LATERAL CHASSIS MAIN
FRAME BOTTOM SECTION
Cross-members 3 & 4 bottom section
STAGE 17: RIGHT LATERAL CHASSIS MAIN
FRAME BOTTOM SECTION
Cross-members 1 & 2 bottom section
STAGE 18: FRONT SUSPENSION SUPPORT
Cross-member No. 4 Top, Left Horn, Right Horn
STAGE 19: LEFT LATERAL CHASSIS MAIN
FRAME TOP SECTION
AGORAMODELS
Pack 03 | Build Instructions
sought-after American sports cars by collectors.
STAGE 20: RIGHT LATERAL CHASSIS MAIN
FRAME TOP SECTION
Cross-members 2 & 3 bottom top section
STAGE 21: REAR CHASSIS PART &
WISHBONE MOUNTING
STAGE 22: RIGHT FRONT INNER & OUTER
STAGE 23: TIRE & OUTER RIM
1
WHEEL RIM
SHELBY COBRA 427 S/C
Advertisement

Subscribe to Our Youtube Channel
Related Manuals for Agora Models 1965 SHELBY COBRA 427 S/C


Summary of Contents for Agora Models 1965 SHELBY COBRA 427 S/C
- Page 1 Pack 03 | Build Instructions In the 1960s, Carroll Shelby’s Cobras dominated racetracks worldwide, first winning races coast to coast across North America, then in 1965, winning the World Manufacturer’s GT Championship, achieving the ultimate goal of defeating Ferrari. The Semi-Competitions were modified from full competition models just enough to make them street legal.
- Page 2 Stage 16: Left Lateral Chassis Main Frame Bottom Section In stage 16, you will start to fix the cross-members to the left lateral main frame. S T A G E 1 6 P A R T S L I S T Name Quantity Left Lateral Chassis Main Frame Bottom (‘L’)
- Page 3 Stage 16: Left Lateral Chassis Main Frame Bottom Section S T E P 1 A T T A C H C R O S S - M E M B E R N O . 4 Take the Main Frame section and align the projecting screw hole (marked No.
- Page 4 Stage 16: Left Lateral Chassis Main Frame Bottom Section Stage 16 complete! AGORAMODELS SHELBY COBRA 427 S/C...
- Page 5 Stage 17: Right Lateral Chassis Main Frame Bottom Section In stage 17 you will continue to fix the cross-members to the lateral main frame. S T A G E 1 7 P A R T S L I S T Name Quantity Right Lateral Chassis Main Frame Bottom ‘R’...
- Page 6 Stage 17: Right Lateral Chassis Main Frame Bottom Section S T E P 1 A T T A C H C R O S S - M E M B E R N O . 2 Take the Left (‘L) Lateral Chassis Main Frame from stage 16 once again and align the projecting screw hole marked No.
- Page 7 Stage 17: Right Lateral Chassis Main Frame Bottom Section S T E P 3 A T T A C H T H E R I G H T L A T E R A L M A I N F R A M E T O T H E C R O S S - M E M B E R S Next, take the Right Lateral Chassis Main Frame and align the four projecting screw holes with the free ends of each of the four Cross-members.
- Page 8 Stage 18: Front Suspension Support In stage 18, you will add the front suspension support to the chassis main frame. S T A G E 1 8 P A R T S L I S T Name Quantity Front Suspension Support Cross-member Support No.
- Page 9 Stage 18: Front Suspension Support S T E P 1 A T T A C H C R O S S - M E M B E R N O . 4 T O P Take Cross-member No 4 Top and check the orientation of the number ‘4’...
- Page 10 Stage 18: Front Suspension Support Stage 18 complete! AGORAMODELS SHELBY COBRA 427 S/C...
- Page 11 Stage 19: Left Lateral Chassis Main Frame Top Section In stage 19, you will continue to build the chassis main frame. S T A G E 1 9 P A R T S L I S T Name Quantity Left Lateral Chassis Main Frame Top Screws TYPE OD05 Left Lateral Chassis Main Frame Top Screws...
- Page 12 Stage 19: Left Lateral Chassis Main Frame Top Section S T E P 1 A T T A C H T H E F R O N T S U S P E N S I O N S U P P O R T T O T H E L E F T L A T E R A L C H A S S I S M A I N F R A M E T O P S E C T I O N Take the Lateral Chassis Main Frame Top and place it on your work surface with the rounded...
- Page 13 Stage 20: Right Lateral Chassis Main Frame Top Section In stage 20, you will continue to build the chassis main frame. S T A G E 2 0 P A R T S L I S T Name Quantity Right Lateral Chassis Main Frame Top Cross-member No.
- Page 14 Stage 20: Right Lateral Chassis Main Frame Top Section S T E P 1 A T T A C H T H E F R O N T S U S P E N S I O N S U P P O R T T O T H E R I G H T L A T E R A L C H A S S I S M A I N F R A M E Mount the right side of the Front Suspension Support onto the Right Lateral Chassis Main...
- Page 15 Stage 20: Right Lateral Chassis Main Frame Top Section S T E P 3 A T T A C H C R O S S - M E M B E R N O . 3 T O P Align Cross-member No. 3 Top over Cross-member No.
- Page 16 Stage 20: Right Lateral Chassis Main Frame Top Section Stage 20 complete! AGORAMODELS SHELBY COBRA 427 S/C...
- Page 17 Stage 21: Rear Chassis Part & Wishbone Mounting In stage 21, you will attach the rear chassis part and the wishbone mounting to the chassis main frame. S T A G E 2 1 P A R T S L I S T Name Quantity Rear Suspension Wishbone Mounting...
- Page 18 Stage 21: Rear Chassis Part & Wishbone Mounting S T E P 1 A T T A C H T H E R E A R C H A S S I S P A R T T O T H E C H A S S I S A S S E M B LY Place the Rear Chassis Part on top of the assembly as shown.
- Page 19 Stage 21: Rear Chassis Part & Wishbone Mounting Stage 21 complete! AGORAMODELS SHELBY COBRA 427 S/C...
- Page 20 Stage 22: Right Front Inner & Outer Wheel Rim In stage 22, you will start to build the front right wheel. S T A G E 2 2 P A R T S L I S T Name Quantity Front Right Inner Rim Front Right Outer Rim Screws TYPE OP03 Front Right Outer Rim...
- Page 21 Stage 22: Right Front Inner & Outer Wheel Rim S T E P 1 F I X T H E I N N E R R I M T O T H E O U T E R R I M Hold the Inner Rim with the projecting screw holes uppermost.
- Page 22 Stage 23: Tire & Outer Rim In stage 23, you will continue to build the front right wheel. S T A G E 2 3 P A R T S L I S T Name Quantity Front Right Tire Front Right Outer Rim Screws TYPE OP03 Front Right Outer Rim Front Right Tire...
- Page 23 Stage 23: Tire & Outer Rim S T E P 1 F I X T H E O U T E R R I M T O T H E I N N E R R I M Fit the Outer Rim to the rim assembly from stage 22.
- Page 24 Stage 23: Tire & Outer Rim S T E P 2 C O N T I N U E D . . . AGORAMODELS SHELBY COBRA 427 S/C...
- Page 25 Stage 23: Tire & Outer Rim Stage 23 complete! AGORAMODELS SHELBY COBRA 427 S/C...
Need help?
Do you have a question about the 1965 SHELBY COBRA 427 S/C and is the answer not in the manual?
Questions and answers