
Related Manuals for SC&T Converter Series


Summary of Contents for SC&T Converter Series
- Page 1 Converter Series User Manual Model : AD001HD4-4K 4K HD-TVI/ AHD/ HDCVI/ CVBS to HDMI/ VGA/ CVBS Converter with Loop Out & Audio Embedder Smart Cabling & Transmission Corp. V1.0 V1.0...
- Page 2 User Manual AD001HD4-4K Introduction AD001HD4-4K is a CCTV HD converter that supports up to 8MP video input for HD-TVI/ AHD/ HDCVI/ CVBS; it allows surveillance video to be shown on 4K HDMI, VGA, and CVBS displays at the same time. If don’t have a 4K TV, you can watch surveillance videos on an existing display.
- Page 3 User Manual AD001HD4-4K 2 in 2 out Mode (Dual cameras with PIP) 2 in 3 out Mode (Dual cameras with manual switching Cam 1/ 2)
-
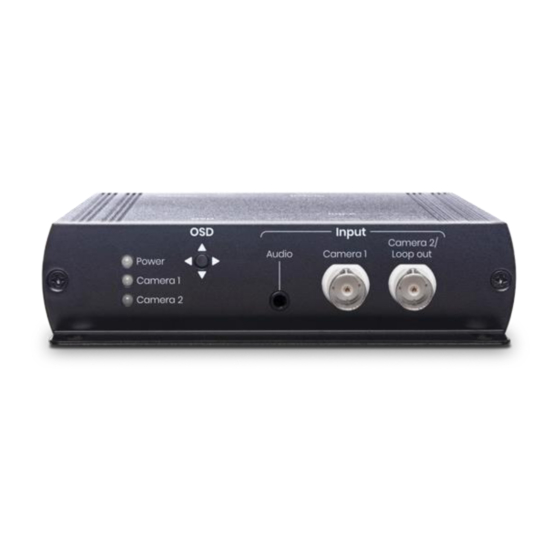
Page 4: Panel View
User Manual AD001HD4-4K Panel View Interface Function Power LED To indicate power status Camera 1 LED To indicate Camera 1 status Camera 2 LED To indicate Camera 2 status To control OSD menu To use a 3.5mm audio cable to connect an audio source from a Audio HD-TVI, AHD, HDCVI camera To use a coaxial cable to connect with a HD-TVI, AHD, HDCVI... -
Page 5: Led Indication
User Manual AD001HD4-4K LED Indication Interface LED Color Status Power Green ON/ OFF Power ON/ OFF Camera 1 Green ON/ OFF Signal Detected/ No Video Camera 2 Green ON/ OFF Signal Detected/ No Video Installation and Cabling Avoid being in areas with electrical interferences, such as mobile phones, microwaves and so on, ... -
Page 6: Osd Settings
User Manual AD001HD4-4K Video Format & Resolutions Video Input Format & Resolutions (Auto Define HD-TVI, AHD, HDCVI, CVBS Video Format) Resolutions HD-TVI HDCVI 8MP (4K) 12.5/15 FPS 15 FPS 15 FPS 20 FPS 12.5/20 FPS 20 FPS 25/30 FPS 25/30 FPS 25/30 FPS 2MP (1080p) 25/30 FPS... - Page 7 User Manual AD001HD4-4K Turn On OSD Menu Press● and enter OSD menu. Switch Modes Press▲▼ to select Single Camera (Default) and press to change modes Supported Modes 1 in 4 out mode (with UTC pass through/ control) 2 in 3 out mode 2 in 2 out mode (with PIP) Refer to the chart below to change modes: Interface...
- Page 8 User Manual AD001HD4-4K Change Resolutions Press▲▼to select “Resolution Out”, then press to select a desired resolution Refer to the chart below to switch the desired resolution: Switching Order Resolutions 480p 576P 720p@60Hz 720p@50Hz 1080p@60Hz 1080p@50Hz 2160p@30Hz 2160p@25Hz 4K2K@30Hz 4K2K@25Hz 1080i@60Hz 1080i@50Hz Turn On UTC In 1 in 4 out mode, press...
- Page 9 User Manual AD001HD4-4K Turn Off UTC In the semi-transparent OSD menu, select “Back to OSD MENU” and press to turn off UTC. Change Video Source In 2 in 2 out or 2 in 3 out modes, press▲▼to select “Source Select” and press to choose Camera 1 or 2. Turn on PIP In 2 in 2 out mode, press▲▼to select “PIP Background”...
- Page 10 User Manual AD001HD4-4K Change PIP Position Press▲▼ to select “PIP Position” and then press or to select position 1/ 2/ 3/ 4. Adjust PIP Size Press▲▼ to select “PIP Size” and press or to enlarge/ reduce picture size (Max 1/4 TV size). Perform Factory Reset Step 1 -Press and hold ●...
- Page 11 User Manual AD001HD4-4K Factory Default Default Mode 1 in 4 out Mode Default Resolution 480p Default Dual Video Camera 1 [1] Default PIP Background Camera 1 [1] Default PIP Position Upper Right [2] Default PIP Size Loop out for Daisy Chain Refer to the chart below to configure 75Ω...
- Page 12 User Manual AD001HD4-4K Turn ON/ OFF 75Ω Impedance Press▲▼ to select “Loop Out 75 ohm” and press to turn ON/ OFF. Caution Turn ON 75Ω impedance when AD001HD4-4K is not connected to a DVR; otherwise, turn OFF 75Ω ※ impedance when connected with a DVR.
- Page 13 User Manual AD001HD4-4K Package Item Amount AD001HD4-4K 1 pc DC 12V 500mA Power Adapter 1 pc SMT Self-tapping Screw 4 pcs Wall Plug 4 pcs Rubber Pad 4 pcs...
-
Page 14: Specification
User Manual AD001HD4-4K Specification Item No AD001HD4-4K Support Video Format HD-TVI, AHD, HDCVI, HDMI, VGA, CVBS Video Input Resolution 8MP@12/15Hz HDMI Resolution 480p、576p、720p/50/60、1080p/50/60、2160p/25/30、4K2K/25/30、 1080i/50/60 VGA Resolution 480p、576p、720p@50/60、1080p@50/60、1080i@50/60 CVBS Resolution NTSC、PAL Ports & Interfaces Video Input 1 x 75Ω BNC (1Vpp) Video Output 1 x HDMI Type A, 1 x VGA (D-SUB 15), 1 x 75Ω... - Page 15 User Manual AD001HD4-4K Installation Guide Item Wall Plug SMT Self-tapping Screw Rubber Pad Install On A Table Or A Wall Step 1: Evenly fix SMT screws on a platform and leave a 2mm high clearance.
- Page 16 User Manual AD001HD4-4K Step 2: Place AD001HD4-4K on the platform and fit its holes in the corresponding screw positions. Step 3: Move AD001HD4-4K until it gets fixed.
- Page 17 User Manual AD001HD4-4K Use Rubber Pads to Prevent the Product from Slipping down The Platform Fix each rubber pad at each corner of the product.
Need help?
Do you have a question about the Converter Series and is the answer not in the manual?
Questions and answers