Promise Technology SMARTSTOR NS4300N Product Manual
Hide thumbs
Also See for SMARTSTOR NS4300N:
- Product manual (186 pages) ,
- User manual (218 pages) ,
- Product manual (170 pages)
Table of Contents
Advertisement
Quick Links
Advertisement
Table of Contents

Subscribe to Our Youtube Channel
Related Manuals for Promise Technology SMARTSTOR NS4300N


Summary of Contents for Promise Technology SMARTSTOR NS4300N
- Page 1 MART NS4300N Product Manual Version 1.4...
- Page 2 You should back up all data before installing any drive controller or storage peripheral. Promise Technology is not responsible for any loss of data resulting from the use, disuse or misuse of this or any other Promise Technology product. Notice...
-
Page 3: Table Of Contents
Chapter 2: Installation and Setup ......5 Unpacking the SmartStor NS4300N ......5 Installing Disk Drives . - Page 4 SmartStor NS4300N Product Manual Chapter 4: One Touch Backup ......43 Enabling One Touch Backup ......43 Creating a Backup Schedule .
- Page 5 Contents Chapter 6: PASM, continued Managing Users and Groups, continued Creating a Group ........68 Adding Members to a Group .
- Page 6 SmartStor NS4300N Product Manual Chapter 6: PASM, continued Making Management Settings ......89 Viewing Service Status .
- Page 7 Contents Chapter 7: Technology Background, continued RAID Volume Migration, continued RAID 5 ......... .106 RAID 10 .
- Page 8 SmartStor NS4300N Product Manual viii...
-
Page 9: Chapter 1: Introduction To Smartstor
Client OS Support (page 4) • Browser Support (page 4) Promise Technology’s SmartStor NS4300N is a network attached storage (NAS) solution for external storage targeted for small and medium business (SMB) users and small office/home office (SOHO) users. With a NAS product, users can save their work and have access to files over the network without having to carry around a disk drive or memory stick. -
Page 10: Architecture
Architecture The SmartStor NS4300N’s architecture is based on the Freescale MPC8343 microprocessor and the Promise PDC40719 Serial ATA RAID Controller. The Gigabit Ethernet port is used for the data transfer and management. The USB ports are used for a printer, expansion drives, and Uninterruptable Power Supply (UPS). -
Page 11: Specifications
Chapter 1: Introduction to SmartStor • Setup Wizard Utility Specifications • Disk drive support: • Four 1.5 Gb/s or 3 Gb/s SATA 3.5-inch disk drives • Conforms to Serial ATA 1.0 specification and Serial ATA II: Extensions to Serial ATA 1.0 specification (SATA II, phase I specification) •... -
Page 12: Compatible Backup Software
Temperature • Power • Disk status • One-Touch button • Enclosure status Compatible Backup Software SmartStor NS4300N is compatible with the following backup software products: • VERITAS® NetBackup/Backup Exec™ • CA BrightStor™ARCserve/Enterprise • LEGATO® NetWorker™ • Syncsort Backup Express •... -
Page 13: Chapter 2: Installation And Setup
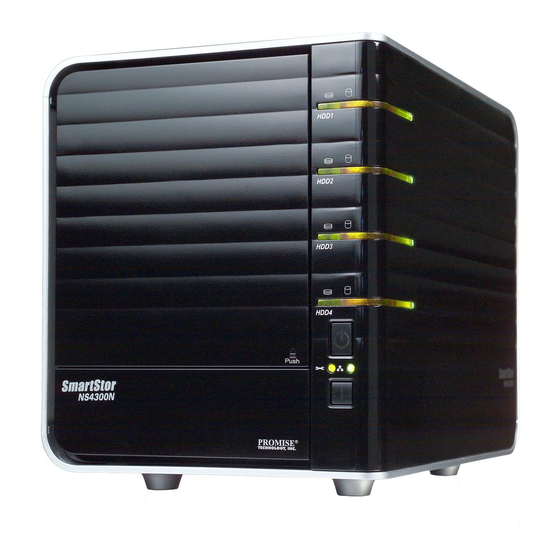
Optional. Selecting Your Network (page 12) • Setting up the SmartStor (page 13) • Connecting to PASM (page 17) Unpacking the SmartStor NS4300N The SmartStor NS4300N box contains the following items: • SmartStor NS4300N Unit • 1.5m (4.9 ft) Power cord •... - Page 14 SmartStor NS4300N Product Manual Figure 1. SmartStor NS4300N Front View Disk Drive Drive Carrier Disk Status Disk Activity Power Button System Status Ethernet Activity LED One Touch Backup Button Note: This SmartStor is shown without the front door. Figure 2. SmartStor NS4300N Rear View...
-
Page 15: Installing Disk Drives
Chapter 2: Installation and Setup Installing Disk Drives You can populate the SmartStor NS4300N with SATA 1.5 Gb/s or 3.0 Gb/s disk drives. For optimal performance, install disk drives of the same model and capacity. Your disk drives will become a RAID Volume on the SmartStor. -
Page 16: Connecting The Power
SmartStor NS4300N Product Manual Connecting the Power To power the SmartStor: Attach the power cord on the back of the SmartStor enclosure and plug the other end into the power source. See Figure 2. On the front of the SmartStor, press the power button. See Figure 1. - Page 17 Chapter 2: Installation and Setup Click the Next button to begin installation. The License Agreement screen appears. Click the “I accept the terms...” option, then click the Next button. The Customer Information screen appears. Type a user name and organization name into the respective fields or leave them unchanged to accept the default entries.
- Page 18 SmartStor NS4300N Product Manual Click the Install option for: • Anyone who uses this computer (all users) • Only for me (the current user) Click the Next button. The Ready to Install screen appears. Click the Install button to proceed with installation.
- Page 19 Chapter 2: Installation and Setup Click to Finish button to close the installer.
-
Page 20: Optional. Selecting Your Network
SmartStor NS4300N Product Manual Optional. Selecting Your Network If your PC has only one network connection, skip to “Setting up the SmartStor” on page 13. If your PC has multiple network connections, you must ensure that the SmartStor, NAS Setup Wizard, and SmartSYNC utility are all connected to the same network.
Need help?
Do you have a question about the SMARTSTOR NS4300N and is the answer not in the manual?
Questions and answers