Advertisement
Available languages
Available languages
DS4600
Package Contents
The SmartStor DS4600 box contains the following items:
•
SmartStor DS4600 Unit
•
Quick Start Guide
•
USB 2.0 cable, A to B
•
FireWire 800 (1394b) cable
•
Power cord
•
CD with SmartNAVI software, Product Manual and Quick Start
Guide
Warning
The electronic components within the SmartStor are
sensitive to damage from Electro-Static Discharge
(ESD). Observe appropriate precautions at all times
when handling the SmartStor or its subassemblies.
Warning
The fan contains hazardous moving parts. Keep
fingers and other body parts away.
Caution
Use of USB or FireWire cables longer than those
supplied with the SmartStor is not recommended.
Important
To configure the SmartStor, you must install
SmartNAVI.
See "Task 3: Installing the Software".
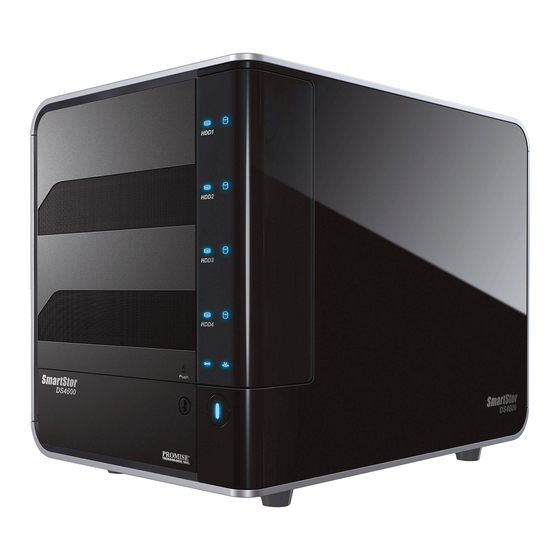
Figure 1.
SmartStor DS4600 Front View
Disk Drive
HDD1
Drive Carrier
HDD2
Disk Status
LED
HDD3
Disk Activity
LED
System Status
HDD4
LED
Volume Activity
SmartStor
LED
One Touch
Backup Button
Note: This SmartStor is shown without the front door.
Figure 2.
SmartStor DS4600 Rear View
Power Button
Disk Drive
Cooling Fan
USB type B
Connection
eSATA
Connection
FireWire 800
(1394b)
FireWire 400
(1394a)
Connection
Power
Connection
Task 1: Remove Anti-Shaking Cushion
1.
Open the door on the front of the SmartStor enclosure.
2.
Remove Anti-Shaking Cushion from the enclosure to prevent
damage to your disk. see Figure 3.
Figure 3.
Remove Anti-Shaking Cushion from the enclosure
USB
Be sure your USB connection is to a USB 2.0 port on your MAC. The
older USB 1.1 ports have a data transfer rate of only 12 Mb/s.
To connect the SmartStor to your MAC via USB 2.0:
1.
Attach the B connector of the USB cable to the USB connection
on the SmartStor. See Figure 2.
2.
Attach the other end of the USB cable to MAC.
FireWire
To use this option, your MAC must have an FireWire connector on the
motherboard or an FireWire HBA card installed. FireWire 800 and 400
cables have different connectors. Otherwise, the procedure is the same.
To connect the SmartStor to your MAC via FireWire:
1.
Attach the B connector of the FireWire cable to the FireWire
connection on the SmartStor. See Figure 2.
2.
Attach the other end of the FireWire cable to MAC.
Task 2: Connecting the Power
To power the SmartStor:
1.
Attach the power cord on the back of the SmartStor enclosure and
plug the other end into the power source. See Figure 2.
2.
On the back of the SmartStor, press the power button. See Figure 2.
It takes about a minute to boot the SmartStor. When fully booted:
•
The System Status LED turns blue. See Figure 1.
•
The buzzer beeps one time.
Set up the File System
1.
The MAC warning window appears if there is no file system on
your MAC. Click Initialize button to set up the file system.
2.
Choose a file system format from the dropdown menu. (The
HFS+ file system is recommended for MAC users.)
Task 3: Installing the Software
The SmartNAVI software sets up the SmartStor, performs backups,
and other management functions.
OS Support
The following operating systems support SmartNAVI:
•
Mac OS 10.4.x
•
Mac OS 10.5.x
•
Mac OS 10.6.x
Installation
1.
Please double-click the SmartNAVI.dmg file to
open and install the disk of SmartNAVI Image.
(right)
2.
Click the SmartNAVI Image to open the folder.
(right)
3.
Drag the SmartNAVI.app icon to
the right side Applications folder.
The SmartStor appears on your MAC as a hard disk drive. See Figure
4.
Figure 4.
SmartStor on a MAC
SmartStor appears as a
Hard Disk Drive
Opening SmartNAVI
To open SmartNAVI for SmartStor setup:
1.
Click the SmartNAVI icon in the
Macintosh Dock (right).
The SmartNAVI opens.
SmartNAVI in Mac
OS X
Figure 5.
Main Window
2.
Click the DS4600 in the Device list.
Figure 6.
Main Window
Advertisement
Table of Contents

Related Manuals for Promise Technology SmartStor DS4600


Summary of Contents for Promise Technology SmartStor DS4600
-
Page 1: Package Contents
USB type B Connection Choose a file system format from the dropdown menu. (The Package Contents HFS+ file system is recommended for MAC users.) eSATA The SmartStor DS4600 box contains the following items: Connection • SmartStor DS4600 Unit FireWire 800 •... - Page 2 圖 2. SmartStor DS4600 後視圖 設定檔案系統 開啟 SmartNAVI 若在您的 MAC 無檔案系統 , 會出現 MAC 警告視窗 。 單按 Initialize 若想開啟 SmartNAVI 進行 SmartStor 設定: 電源按鈕 ( 初始化 ) 按鈕,以設定檔案系統。 單按 Macintosh Dock ( 右圖 ) 中的 SmartNAVI 圖示。 DS4600 SmartNAVI 開啟。...
- Page 3 SmartNAVI 打开。 OS X 中 USB 型 B 连接 图 主窗口 请在下拉菜单中选择文件系统格式。(HFS+ 建议 MAC 用户使用的 套件内容 文件系统。 ) eSATA 连接 SmartStor DS4600 包装箱内包含以下项目: • SmartStor DS4600 单元 FireWire 800 • 快速入门指南 (1394b) • USB 2.0 电缆, A 至 B FireWire 400 •...
- Page 4 ウ ィ ン ド ウが表示 さ れます。 Initialize( 初期化 ) ボ タ ン を押 し て フ ァ イルシ ス テムを セ ッ ト ア ッ プ し ます。 SmartStor が 「ハー ド デ ィ eSATA 接続 SmartStor DS4600 の梱包には、 以下のものが含まれています : ス ク ド ラ イ ブ」 と し て表示 さ れます •...
- Page 5 USB 타입 B 드롭다운 메뉴에서 파일 시스템 포맷을 선택합니다. (MAC 사용자 포트 포장 내용물 에게 HFS+ 파일 시스템을 권장합니다 .) eSATA 포트 SmartStor DS4600 박스에는 다음 항목이 포함됩니다 : • SmartStor DS4600 장치 FireWire 800 • 빠른 시작 안내서 (1394b) •...
- Page 6 USB Typ B Packungsinhalt Anschluss Eine MAC Warnmeldung wird erscheinen, wenn kein Dateisystem auf Ihrem MAC gefunden wird. Klicken Sie auf die Schaltfläche Die SmartStor DS4600-Verpackung enthält die folgenden SmartStor erscheint als ein eSATA Festplattenlaufwerk Initialize (Initialisieren), um das Dateisystem einzustellen.
-
Page 7: Contenu Du Paquet
Connexion USB Contenu du paquet de Type B SmartStor apparaît comme Le carton du SmartStor DS4600 contient les éléments suivants : Connexion comme un disque dur eSATA • Dispositif SmartStor DS4600 •... -
Page 8: Contenido Del Paquete
Ilustracion 2. Vista posterior de la unidad SmartStor DS4600 aproximadamente un minuto en iniciarse. Cuando se haya Ilustracion 4. SmartStor en un MAC iniciado completamente: • La luz LED de estado del sistema se pondrá de color azul. Botón de Véase la Ilustración 1.
Need help?
Do you have a question about the SmartStor DS4600 and is the answer not in the manual?
Questions and answers