Advertisement
Quick Links
Assembly Instructions
This instruction booklet contains important safety information, please read and keep for future reference.
ITEM # HI404DR
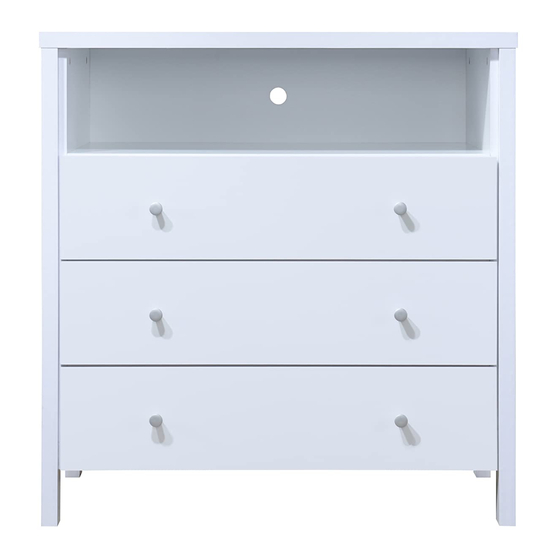
3 DRAWER DRESSERW / ONE OPEN SHELF
FRONT VIEW
Product Dimensions:
www.Hodedah.com
Height 36.81" x Width 35.4" x Depth 19.68"
Weight Capacity per drawer: 20 lbs.
BACK VIEW
2 people
90mins
1 YR LTD
1 Box
1 |
P a g e
Advertisement

Subscribe to Our Youtube Channel
Related Manuals for Hodedah HI404DR


Summary of Contents for Hodedah HI404DR
- Page 1 Assembly Instructions 2 people This instruction booklet contains important safety information, please read and keep for future reference. 90mins ITEM # HI404DR 1 YR LTD 3 DRAWER DRESSERW / ONE OPEN SHELF 1 Box BACK VIEW FRONT VIEW Product Dimensions: Height 36.81"...
-
Page 2: Warranty
______________________________________________ WARRANTY Hodedah warrants this product to be free from defects in materials and workmanship and agrees to remedy any such defect. This warranty covers one year from the date of original purchase. This is solely limited to replacement of defective parts and no assembly for labor is included. This warranty does not apply to any product that has been improperly assembled, subjected to misuse, abuse or which has been altered or repaired in any way. -
Page 3: Product Care And Maintenance
Never push, drag or pull your furniture, to move to a new location carefully with two or more people carry the unit to its new location. Avoid extreme changes in temperature by arranging furniture away from radiators, heat and air vents and air conditioning units. P a g e www.Hodedah.com... -
Page 4: Hardware List
1. Before you throw the package, please use the Check Box to identify the parts and hardware to ensure that you have everything you need. 2. Check and measure the bolts before applying them to parts. 3. Do not completely tighten all hardware until the entire assembly is complete, unless indicated otherwise. P a g e www.Hodedah.com... -
Page 5: Parts List
Side Panel 905x60x30mm 820x195x15mm 350x116x15mm Drawer Base 3Pcs Drawer – Right Drawer End 3Pcs 3Pcs Side Panel Supporting Panel Panel 350x116x15mm 335x50x15mm 745x116x15mm Drawer Base Back Panel Back Panel 3Pcs 2Pcs Panel 830x276x2.5mm 830x276x2.5mm 754x344x2.5mm P a g e www.Hodedah.com... - Page 6 The Breakdown… P a g e www.Hodedah.com...
- Page 7 On hardware list, you will find three bundles of drawer slide (F), left and right as shown in picture below. Left Drawer Slide(F) Flat Shaped - Left "L" Shaped - Left Right Drawer Slide(F) "L" Shaped - Right Flat Shaped - Right P a g e www.Hodedah.com...
- Page 8 Insert PVC dowels (A) to Panel 2, 3, 4, 5, 6, 7, 8, 9, 10, 12 and 13's non-thru holes as shown, using hammer to gently tap them in. Non-thru holes (are small indents in the wood that show you where the screws should be.) 8x25mm Dowel 52Pcs P a g e www.Hodedah.com...
- Page 9 (F) at the predrilled holes on the panel 2 as shown. Then tighten the drawer slide(F) with 3 screws (D). M3.5x16mm Screw 18Pcs Drawer Slide 300mm - Right 3Pcs Drawer Slide 300mm - Left 3Pcs P a g e www.Hodedah.com...
- Page 10 Step 3 *Place minifix (B) long piece onto the holes of panel 1 and 11. (You will use 13 pieces) Minifix 13Pcs 10 | P a g e www.Hodedah.com...
- Page 11 2. *Fasten screws (C) from the outside of panel 2 by using the predrilled holes to attach panel 4, 5, 7 and 8. M4x45mm Screw 7Pcs 11 | P a g e www.Hodedah.com...
- Page 12 Step 5 *Cover all the screws (C)' head with stickers (E) provided by stick up onto hole of screw (C)' heads one by one. Sticker 6Pcs 12 | P a g e www.Hodedah.com...
- Page 13 3. *Fasten screws (C) from the outside of panel 3 by using the predrilled holes to attach panel 4, 5, 7 and 8. M4x45mm Screw 7Pcs 13 | P a g e www.Hodedah.com...
- Page 14 Step 7 *Cover all the screws (C)' head with stickers (E) provided by stick up onto hole of screw (C)' heads one by one. Sticker 6Pcs 14 | P a g e www.Hodedah.com...
- Page 15 Step 8 *Attach panel 9 onto panel 2, align the position properly and slightly tap them in with hammer. 15 | P a g e www.Hodedah.com...
- Page 16 Step 9 *Flip the drawer chest over in order to fasten screws (K) onto the predrilled holes of panel 2 to fix panel 9. M4x32mm Screw 6Pcs 16 | P a g e www.Hodedah.com...
- Page 17 Step 10 *Cover all the screws (K)' head with stickers (E) provided by stick up onto hole of screw (K)' heads one by one. Sticker 2Pcs 17 | P a g e www.Hodedah.com...
- Page 18 Step 11 *Flip the drawer chest to other side, attach panel 10 onto panel 3, align the position properly and slightly tap them in with hammer. 18 | P a g e www.Hodedah.com...
- Page 19 Step 12 * Flip the drawer chest over again in order to fasten screws (K) onto the predrilled holes to strengthen the panel 10. M4x32mm Screw 6Pcs 19 | P a g e www.Hodedah.com...
- Page 20 Step 13 *Cover all the screws (K)' head with stickers (E) provided by stick up onto hole of screw (K)' heads one by one. Sticker 2Pcs 20 | P a g e www.Hodedah.com...
- Page 21 Step 14 *Insert nails (G) protection onto the bottom edge of panel 9 and 10, slightly tapping them in with a hammer. 5/8 Nail With Pin 4Pcs 21 | P a g e www.Hodedah.com...
- Page 22 * Gently tap the panel 1 to connect panel 2 and panel 3 firmly. *Insert minifix (B) nuts into both sides predrilled holes of panel 2 and 3, then tighten them clockwise in order to lock minifix up by going underneath panel 1. Minifix 4Pcs 22 | P a g e www.Hodedah.com...
- Page 23 Step 16 *Fix approximately 30 pieces of nails (J) into panel 17 and 18 using a hammer. 6/8 Power Pin 30Pcs 23 | P a g e www.Hodedah.com...
- Page 24 12 and 13 properly. (As shown) *Insert the minifix (B) nuts with the cross arrow mark facing upwards and aim to panel 12,13 and 15 's top thru holes.(As shown) Minifix 9Pcs 24 | P a g e www.Hodedah.com...
- Page 25 *Next tighten screws (C) to panel 13's upper thru holes to fix up to the panel 14. *Tighten screws (C) to panel 14's upper thru holes to fix up to the panel 15. M4x45mm Screw 15Pcs 25 | P a g e www.Hodedah.com...
- Page 26 Step 19 *Flip the drawer over. *Tighten 2 screws (I) from inner side of panel 11 into the handle (H) holes. Handle Knod 311 6Pcs M4x28mm Screw 6Pcs 26 | P a g e www.Hodedah.com...
- Page 27 11. Then tighten 3 screws (D) on each drawer slides (F). "L" shaped - left of the drawer slide stick to the end of drawer front panel 11. M3.5x16mm Screw 9Pcs Drawer Slide 300mm - Left 3Pcs 27 | P a g e www.Hodedah.com...
- Page 28 11. Then tighten 3 screws (D) on each drawer slides (F). "L" shaped - right of the drawer slide stick to the end of drawer front panel 11. M3.5x16mm Screw 9Pcs Drawer Slide 300mm - Right 3Pcs 28 | P a g e www.Hodedah.com...
- Page 29 *Take all drawers, and slide them (the white rollers at drawer slide at both side of drawers are to go into the track of the slide at each side panel.) All the way gently, one drawer by one drawer starting from bottom to the top accordingly. 29 | P a g e www.Hodedah.com...
- Page 30 30 | P a g e www.Hodedah.com...
- Page 31 Job Complete… Enjoy &Thank you for purchasing from Hodedah! 31 | P a g e www.Hodedah.com...
Need help?
Do you have a question about the HI404DR and is the answer not in the manual?
Questions and answers