Table of Contents
Advertisement
Quick Links
HODEDAH
Assembly Instructions
This instruction booklet contains important safety information, please read and keep for future reference.
ITEM # HI425-G
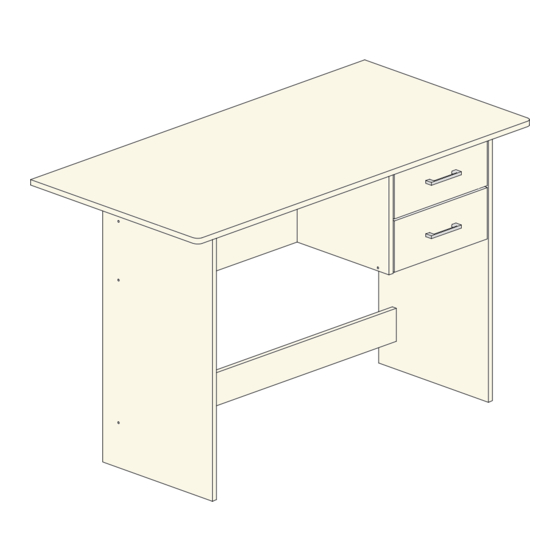
NIGHT TABLE
FRONT VIEW
Product Dimensions: Height 29.52" x Width 47.24" x Depth 23.62"
www.Hodedah.com
®
Weight Capacity Per Drawer 15lbs
BACK VIEW
2 peoples
30 mins
1 YR LTD
1 Box
Advertisement
Table of Contents

Related Manuals for Hodedah HI425WHITE


Summary of Contents for Hodedah HI425WHITE
- Page 1 HODEDAH ® Assembly Instructions 2 peoples This instruction booklet contains important safety information, please read and keep for future reference. 30 mins ITEM # HI425-G NIGHT TABLE 1 YR LTD 1 Box FRONT VIEW BACK VIEW Product Dimensions: Height 29.52" x Width 47.24" x Depth 23.62"...
-
Page 2: Warranty
FREE of charge within ONE YEAR of purchase! WARRANTY Hodedah warrants this product to be free from defects in materials and workmanship and agrees to remedy any such defect. This warranty covers one year from the date of original purchase. This is solely limited to replacement of defective parts and no assembly for labor is included. -
Page 3: Product Care And Maintenance
HODEDAH ® · Never open more than one drawer at a time. · The use of tip-over restranits may reduce but not eliminate the risk of tip-over. Let's get started… Helpful hints, read before beginning assembly · Make sure you receive all boxes. If your item is packed in one box, box count will read 1 of 1, likewise if your item is packed in two boxes, box count will read 1 of 2 and second box will read 2 of 2. -
Page 4: Hardware List
HODEDAH ® Hardware List 25 Pcs 2 Pcs 16 Pcs Pvc Dowel M3x16mm Screw Screw M3.5 x 14mm *For # 13 Drawer Slides 8 Pcs 8 Pcs 10 Pcs Screw M4 x 32mm Screw M6 x 40mm Screw M6.2 x 10mm... - Page 5 HODEDAH ® Accessories Drawer Slide - A 2 Sets * Fix On Side Panels Ⓐ *Fix On Side Panels * Fix On Side Panels Ⓕ * Fix On Drawer Side Panels Ⓙ 2 Sets Drawer Slide - B *Fix On Side Panels J * Fix On Drawer Side Panels Ⓚ...
-
Page 6: Parts List
HODEDAH ® Parts List Left Side Panel Back Strengthening Panel Back Panel 976 x 90 x 15mm 976 x 292 x 15mm 735 x 394 x 15mm 1 Pc 1 Pc 1 Pc Stand Panel Front Strengthening Panel Right Side Panel... - Page 7 HODEDAH HODEDAH ® ® The Breakdown The Breakdown www.Hodedah.com www.Hodedah.com...
- Page 8 HODEDAH ® A. Place the drawer slide A ⑫ Step 1 onto the 2 holes area shown at stand panel . Then tighten it with 2 screws ⑤ and 1 screw ③ . B. Insert the mini fix ⑨ (nuts) with the...
- Page 9 HODEDAH ® Step 2 Fix Panel onto Panels by inserting the dowels onto the non-thru holes at Panel Next, fix Panel onto panel by inserting the dowels onto the non-thru holes at Panel Use allen key ⑭ to tighten 2 screw ⑥ from the thru-holes of panel to non-thru hole of panels as shown.
- Page 10 HODEDAH ® Step 3 B, C & E Fix Panel onto Panels by inserting the dowels onto the non-thru holes at Panel B & C Next, fix Panel onto panel by inserting the dowels onto the non-thru holes at Panel Use allen key ⑭...
- Page 11 HODEDAH ® Step 4 A,C,D & F -Fix panel onto panels and align properly by inserting the 4 dowels of panels A & F onto the non thru holes of panel G. A, G & F -Pushing and light tapping of panel to have panel fix tightly.
- Page 12 HODEDAH ® Step 5 A. Insert the mini fix ⑨ (nuts) with the cross arrow mark facing upward and aim to panel & 's top thru holes. (As shown) B. Insert the PVC dowels ① to panel ’s non-thru holes as shown, using hammer to tap them in.
- Page 13 HODEDAH ® Assembly Of Drawers -Place panel on each side of panel with Panel 's PVC dowel insert to panel 's non-thru hole and Panel 's mini fix screws insert into Panel 's thru as shown. Then tighten mini fix on panel clockwise to lock mini fix up.
- Page 14 HODEDAH ® Step 6 Take drawers and slide them (the white rollers at drawer slide at both side of drawers are to go into the track of the slides at each side panel.) all the way gently, one drawer by one drawer starting from bottom one.
-
Page 15: Job Complete
HODEDAH ® Job Complete Enjoy & Thank you for purchasing from Hodedah! In the interest of our environment please dispose of all packaging thoughtfully. www.Hodedah.com...
Need help?
Do you have a question about the HI425WHITE and is the answer not in the manual?
Questions and answers