
Related Manuals for SICK NAV200


Summary of Contents for SICK NAV200
- Page 1 O P E R A T I N G I N S T R U C T I O N S NAV200 Laser Positioning System for Navigational Support...
- Page 2 SICK firmware for NAV200 Laser Positioning System V 4.1.X NAV200 Setup V 1.0.X SICK configuration software under Windows The NAV200 Laser Positioning System is intended for use only in industrial environments. Use in residential areas can cause RF interference. Copyright Copyright © 2006 SICK AG Waldkirch...
- Page 3 Overview of the device and its functions – Section 3 Product description, Page 17 – Section 6.2 Default settings of the NAV200 Setup configuration software, Page 47 – Section 6.5 NAV200 operating modes, Page 61 – Section 9 Technical data, Page 77 •...
- Page 4 3. Connect the NAV200 to the PC via the RS 232 data cable. 4. Connect the NAV200 to the 24 V DC power supply using the cable socket supplied. 5. Switch on the supply. The NAV200 initializes and changes to "Standby" mode.
-
Page 5: Table Of Contents
Ensure that you have all the required components........... 39 4.2.2 Preparing the accessories ................... 39 4.2.3 Selecting mounting position and installation location for the NAV200 ... 39 Mounting the device ....................40 8011502/R197/2007-02-12 © SICK AG · Division Auto Ident · Germany · All rights reserved... - Page 6 Updating the firmware....................71 Switching the NAV200 off ...................71 Maintenance ........................73 Maintenance during operation ...................73 7.1.1 Cleaning the front pane of the NAV200 ..............73 Maintenance ........................74 Disposal........................74 Troubleshooting.......................75 © SICK AG · Division Auto Ident · Germany · All rights reserved 8011502/R197/2007-02-12...
- Page 7 10.4.1 Replacing a NAV200 with backed-up configuration data........82 10.5 Reproduction of the EC Declarations of Conformity ..........83 10.5.1 EC Declaration of Conformity for NAV200............83 8011502/R197/2007-02-12 © SICK AG · Division Auto Ident · Germany · All rights reserved...
- Page 8 Overlapping of two reflectors with an angle of less than 1.26 °......30 Fig. 3-15: Minimum distance from reflectors to other reflective objects .......31 Fig. 3-16: Integration of the NAV200 in a navigation system .........33 © SICK AG · Division Auto Ident · Germany · All rights reserved 8011502/R197/2007-02-12...
- Page 9 Icons in the columns of the layer table ........ 60 ROJECT Fig. 6-11: Dialog box for loading data "Reflector data" text file in NAV200 Setup..63 Fig. 6-12: Activating edit mode for reflector data............64 Fig. 6-13: Dialog box: data entry for positioning operation..........65 Fig.
- Page 10 Figures and tables Operating Instructions NAV200 Laser Positioning System Information for designing the system The following sections are recommended for support in designing the NAV200 system: • Section 2 Safety information, Page 13 • Section 3 Product description, Page 17 •...
-
Page 11: About This Document
AGV, which steers the vehicle on the programmed route of the AGV. The NAV200 Laser Positioning System is configured with the NAV200 Setup configuration software or directly via the vehicle computer using software telegrams. -
Page 12: Symbols Used
TIPS Tips explain setting options in the NAV200 Setup configuration software. This font denotes a term in the user interface of the NAV200 Setup configuration software. OMMUNICATION This symbol denotes a section that describes the steps involved in using the NAV200 Setup configuration software. -
Page 13: Safety Information
To ensure that the NAV200 operates correctly and safely, it must be installed and operated by sufficiently qualified personnel. Repairs on the NAV200 must only be carried out by trained and authorized SICK AG service personnel. The operating instructions must be made available to the end user. The end user must be given expert instruction and encouraged to read the operating instructions. -
Page 14: General Safety Information And Protective Measures
2.3.2 Electrical installation work Danger of injury through electrical current! The NAV200 operates with a 24 V DC power supply. High voltage is produced in the device when it is operating. Do not open the housing. Observe the usual safety precautions when working on electrical systems. -
Page 15: Quick Stop And Quick Start
Laser warning label attached to the NAV200 Note If the NAV200 is mounted on an AGV such that the laser warning label is obscured, an additional warning label (not included in the scope of delivery) must be attached to the... -
Page 16: Environmental Aspects
Chapter 2 Operating Instructions NAV200 Laser Positioning System Environmental aspects The NAV200 is constructed in such a way that it causes the least possible damage to the environment. 2.5.1 Energy consumption The maximum power consumption of the NAV200 is 24 W. -
Page 17: Product Description
Section 10.2 Available accessories, Page 80 also gives an overview of the accessories available, e.g. the required RS 232 data cable. 8011502/R197/2007-02-12 © SICK AG · Division Auto Ident · Germany · All rights reserved... -
Page 18: System Requirements
NAV200 Laser Positioning System 3.1.2 System requirements As part of a navigation system, the NAV200 is controlled by a supervisory unit - the vehicle computer. Application-specific software that enables communication between vehicle computer and NAV200 is required for this task. -
Page 19: Applications
Power supply ("Power Supply 24 V DC" connection): 8-pin chassis-mount plug on device 3.1.4 Applications Typical applications for the NAV200 are: • Shuttle systems • Self-propelled stackers • Automated guided transport systems generally 8011502/R197/2007-02-12 © SICK AG · Division Auto Ident · Germany · All rights reserved... -
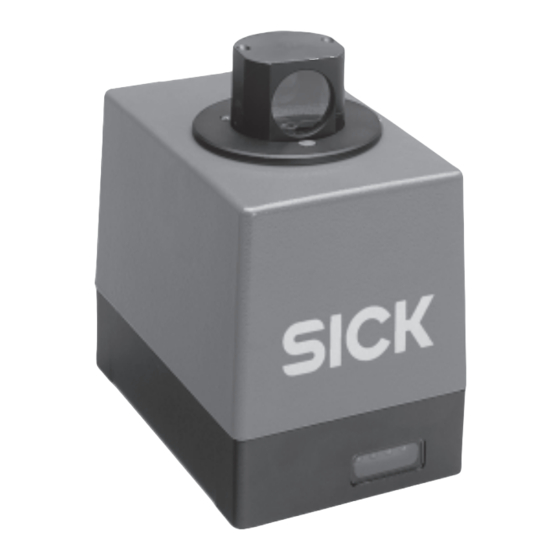
Page 20: View Of The Device
Tapped holes in baseplate (4 x) Host/PC connection (not visible here) 14-pin cable socket for Laser warning label 8-pin cable socket Fig. 3-2: Arrangement of the NAV200 © SICK AG · Division Auto Ident · Germany · All rights reserved 8011502/R197/2007-02-12... -
Page 21: How The Nav200 Works
AGV. The vehicle computer steers the AGV along the programmed and hence preset route and — using the NAV200 — corrects any course deviations that occur. On each request, the vehicle computer informs the NAV200 of the current speed of the AGV on the course. -
Page 22: Operating Conditions
NAV200 must not be more than 120°. At positions where the NAV200 is brought on to the route, at least 4 to 6 reflectors must fall within the range of the NAV200. In addition, the angular difference between 2 reflectors measured by the NAV200 must not be more than 120°. -
Page 23: Fig. 3-4: Detection Angle With 100 Mm (3.88 In) Wide Reflector Strips Made Of Diamond Grade 3000X Reflective Film (0° = Vertical Striking Of The Measurement Beam)
The measure- ment beam of the NAV200 diverges by 16 mm (0.63 in) per metre of measuring distance. Appropriate consideration must be given to possible tilting of the AGV due to uneven floors. -
Page 24: Fig. 3-5: Alignment Of Diamond Grade 3000X Reflective Film, Production Date Before July 2002
Alignment of Diamond Grade 3000X reflective film, production date after July 2002 (version currently supplied) Reference points of the reflectors In order to determine the co-ordinates of a reflector unambiguously with the NAV200, the reflector area must be reduced to a reference point. •... -
Page 25: Designing Layers
AGV. The memory of the NAV200 can record a maximum of 40 different layers. A minimum of 3 and a maximum of 32 fixed reflectors are fitted within a layer. -
Page 26: Fig. 3-9: Common Use Of Reflectors Of Two Adjoining Layers
Physically separate areas should be implemented in different layers. A layer should be set up so that the NAV200 can detect as many reflectors of this layer as possible, but as few as possible from other layers. Ideally, the transition points between layers should be selected so that they lie on straight areas of the route. -
Page 27: Reflector Arrangements Within A Layer
3.3.5 Reflector arrangements within a layer The NAV200 identifies a reflector arrangement by assigning the stored reflector co- ordinates to the individual reflector measurements. The NAV200 needs a recognizable, i.e. an asymmetrical pattern, so that it can identify a reflector arrangement unambiguously. In such an asymmetrical pattern, all the distances from the reflectors to one another differ by at least 500 mm (19.7 in). -
Page 28: Measurement Accuracy
• Reducing the radius of action of the NAV200 by means of a vehicle computer software telegram (radii of action). While doing so, it must be ensured that at least 3 reflectors are visible within the restricted radius of action from every position of the NAV200. -
Page 29: Fig. 3-13: Example: Higher Positioning Accuracy With The "N Closest" Function And With The "Radius Of Action" Function
2 reflectors must not be more than 120°. • At positions where the NAV200 is brought on to the route, at least 4 to 6 reflectors must fall within the range of the NAV200. In addition, the angle between 2 reflectors must not be more than 120°. -
Page 30: How The Nav200 Deals With Sources Of Error
NAV200. Assuming that the reflectors are at least 300 mm (11.8 in) apart viewed in the direction of the beam, the NAV200 detects such a situation and automatically suppresses the use of overlapping reflectors. -
Page 31: Fig. 3-15: Minimum Distance From Reflectors To Other Reflective Objects
Subsequent movement of reflectors Movement of reflectors that still lie within the measuring range of the NAV200 even after being moved will corrupt the measurement result and must be corrected. To correct this situation, the reflector must be put back in its original position or the co-ordinates of the new reflector position must be re-measured with the function „mapping“... -
Page 32: Measurement And Entry Of The Reflector Co-Ordinates
The error increases continuously with distance covered. The NAV200, on the other hand, provides absolute positional data on the course. Based on these absolute positions, the vehicle computer of the AGV can minimize the error from the odometry. -
Page 33: Data Interface
The vehicle computer uses the odometry data to calculate the speed and turning speed of the AGV. It transmits this speed data in the position request to the NAV200. The NAV200 extrapolates its measured positional data at the time of the data transfer, based on this speed data. -
Page 34: Measurement Quality As An Indicator Of The Reliability Of The Positional Data
The system integrator can use it to specify the extent to which the positional data of the odometry is to be corrected by the positional data of the NAV200. The influence of the positional data of the NAV200 on the correction is application-specific and depends on the quality of the odometry and the permissible positioning tolerances in the plant. -
Page 35: Position Measurement ("Positioning Operation" Mode)
The vehicle computer has activated the associated layer for the current area in the NAV200. • There are at least 3 reflectors of the current layer in the visible range of the NAV200. Depending on the number of measured reflectors and reflectors in the current layer, a Fullmap can take several seconds. -
Page 36: Reflector Co-Ordinates" Mode
In this mode, the NAV200 generates an image of its current reflector environment within one revolution of the scanner head. The NAV200 measures a maximum of 32 visible reflec- tors at this time and determines the reflector co-ordinates relative to its own position (local co-ordinate system, see Fig. -
Page 37: Displays And Controls
3.7.1 Controls The parameters of the NAV200 are set once only via the RS 232 data interface, using the NAV200 Setup configuration software. The supply voltage is applied with a main switch (supplied by the client). The system starts automatically in Standby operation. - Page 38 Product description Chapter 3 Operating Instructions NAV200 Laser Positioning System Notes: © SICK AG · Division Auto Ident · Germany · All rights reserved 8011502/R197/2007-02-12...
-
Page 39: Installation
NAV200. The way the support is fitted on the AGV varies with the type of construction of the vehicle The NAV200 has four tapped fixing holes in the baseplate. Four matching holes are required in the support for the NAV200 in order to mount the NAV200. -
Page 40: Mounting The Device
Section 4.2 Preparation for installa- tion of the NAV200, Page Risk of damage to the equipment! The four tapped holes of the NAV200 have a maximum screw-in depth of 10 mm (0.39 in). Longer screws will damage the equipment. Use the right length screws. -
Page 41: Electrical Installation
The electrical connections of the NAV200 consist of the terminal for the functional earth, and the two chassis-mount plugs for the power supply and data interface. Note IP 65 protection of the NAV200 is only achieved when the RS 232 data cable and the power supply cable are securely screwed on. 5.2.1... -
Page 42: Pin Assignment Of The Connections
– n. c. – n. c. – Case – Shield Tab. 5-2: Pin assignment of the 14-pin chassis-mount plug for connecting the RS 232 data cable © SICK AG · Division Auto Ident · Germany · All rights reserved 8011502/R197/2007-02-12... -
Page 43: Power Cord
– n. c. – n. c. – n. c. – n. c. – Tab. 5-4: Pin assignment of the RS 232 data cable 9-pin D-Sub socket 8011502/R197/2007-02-12 © SICK AG · Division Auto Ident · Germany · All rights reserved... -
Page 44: Preparations For Electrical Installation
Use screened cable to prevent interference. 5.4.2 Power supply The NAV200 needs a 24 V DC ± 25 % supply (functional extra low voltage in accordance with IEC standard 364-4-41) for operation. Observe the permissible cable lengths in Section 5.2.1 Conductor cross-sections, Page 41 here. -
Page 45: Carrying Out The Electrical Installation
The NAV200 is configured from a PC with the NAV200 Setup configuration software. In operation, the NAV200 is linked to a vehicle computer (host) via an RS 232 data cable. The RS 232 serial data interface of the PC (COM 1, COM 2, ...) is selected after the NAV200 Setup configuration software is started. - Page 46 Electrical installation Chapter 5 Operating Instructions NAV200 Laser Positioning System Notes: © SICK AG · Division Auto Ident · Germany · All rights reserved 8011502/R197/2007-02-12...
-
Page 47: Operation
1. Install the NAV200 Setup configuration software on the PC and start it. 2. Connect the NAV200 to an RS 232 data interface of the PC, possibly via a USB serial converter if the PC does not have a built-in serial data interface. -
Page 48: Quick Start
Section 5.5 Carrying out the electrical installation, Page 4. Connect the NAV200 to the 24 V DC power supply, switch on the supply. The NAV200 initializes and changes to "Standby" mode. The scanner head starts to turn. 5. Install the CD-ROM-based NAV200 Setup configuration software (supplied) on the PC... -
Page 49: Fig. 6-1: Quick Start With Mapping Operation
– The initial position of the NAV200 has been measured. • Download NAV200 Setup transfers the reflector co-ordinates measured during Mapping from the PC to the NAV200 as a layer. Up to 40 layers, each with a maximum of 32 reflectors, are possible. • Positioning operation The NAV200 continuously measures its position and orientation in the current layer. -
Page 50: Nav200 Setup Configuration Software
Configuring the NAV200 with the NAV200 Setup software To configure the NAV200, the NAV200 Setup configuration software must be installed on a PC. The PC is then connected to the NAV200 via the serial data cable. Connection of the PC to the NAV200 is described in Section 5.5 Carrying out the electrical installation, Page... -
Page 51: Software Functions (Overview)
ROGRAM ETUP ETUP When NAV200 Setup starts, a new, blank project file with no layer or reflector data opens at the same time. There is no link to the NAV200 (offline state). Offline state and online state In the offline state, project files with reflector data can be opened, changed and saved. To configure the NAV200 for position measurement, to change between modes, or to transfer reflector data, the user must establish data communication between NAV200 and PC. -
Page 52: Fig. 6-2: Interface Parameters In The Status Bar Of Nav200 Setup
NAV200. Appropriate error messages appear if the NAV200 device is not correctly linked to the PC or is not switched on. As soon as there is a link to the NAV200, the user interface shows the parameters of the RS 232 data interface in the status bar at the bottom: Fig. -
Page 53: User Interface Of The Nav200 Setup Configuration Software
Fig. 6-3: Program window of the NAV200 Setup configuration software The user interface of the NAV200 Setup is orientated towards the usual Windows standard and consists of the following elements: • Title bar showing the current configuration file (project file), the name of the program and the software version •... -
Page 54: Fig. 6-4: Selecting The Three Types Of Display Of The Graphics Window
The position of the NAV200 is given by polar co-ordinates: – The distance to the zero point of the absolute co-ordinate system – The angle between the connecting line from the NAV200 zero point to the X-axis of the absolute co-ordinate system The reflector positions appear at the same positions in the graphics window as with the Cartesian display. -
Page 55: Fig. 6-5: The Same Reflector Arrangement Displayed In The Cartesian Co-Ordinate System And In The Polar Co-Ordinate System
Distance Angle Fig. 6-6: Data display: "Distance against angle" (extract from the layer table and part of the graphics window) 8011502/R197/2007-02-12 © SICK AG · Division Auto Ident · Germany · All rights reserved... -
Page 56: Toolbar Commands
NAV200 via an RS 232 data interface NAV Terminates communication between the NAV200 and LOSE SERIAL INTERFACE TO NAV200 Setup Tab. 6-2: NAV200 Setup: Function of the buttons in the toolbar © SICK AG · Division Auto Ident · Germany · All rights reserved 8011502/R197/2007-02-12... -
Page 57: Project Files And Reflector Data
Project files and reflector data The reflector data assigned to the individual layers can be saved in a project file and/or a "Reflector data" text file. By default, NAV200 Setup offers the "Data" sub-directory of the Installation directory for saving these files. -
Page 58: Fig. 6-8: "Reflector Data" Text File
Tab spaces are not permitted here. NAV200 Setup ignores data lines with tab spaces when the data is transferred. © SICK AG · Division Auto Ident · Germany · All rights reserved... -
Page 59: Fig. 6-9: Layer Selection For Data Transfer
Layer selection for data transfer Note When data is transferred from the NAV200 to the PC, the reflector data of the layers to be transferred held in the current project file is overwritten with no advance warning. We recommend backing up the project file and making a copy if necessary before the data transfer. -
Page 60: Closing The Nav200 Setup Configuration Software
ROJECT A green check mark means that the data in the NAV200 Setup configuration software and in the project file and in the NAV200 device is identical. A red cross in the NAV column means that the data in the configuration software and in the device is different. -
Page 61: Nav200 Operating Modes
NAV200 Setup displays the transferred data on screen in tabular and graphical form. The data can then be saved in a file and/or transferred to the NAV200 as reflector data sets. The buttons in the right-hand area of the screen can be used to zoom in and out of the graphical display in the middle area of the screen. -
Page 62: Reflector Co-Ordinates
NAV200’s own position. The NAV200 measures a maximum of 32 reflectors visible at this time and determines the reflector co-ordinates relative to its own position (local co-ordinate system, see Fig. -
Page 63: Performing And Testing The Configuration
• Measuring and reading the reflector co-ordinates using the NAV200 Mapping (less accurate but quicker method) The following instructions assume that NAV200 Setup has been started on the PC and that communication is available to the NAV200 (online state). 6.6.1... -
Page 64: Fig. 6-12: Activating Edit Mode For Reflector Data
OMMUNICATION OAD ALL ATA FROM layer data held on file in the NAV200 to the PC, to check the current configuration of the NAV200, for example. © SICK AG · Division Auto Ident · Germany · All rights reserved 8011502/R197/2007-02-12... -
Page 65: Fig. 6-13: Dialog Box: Data Entry For Positioning Operation
This command activates the position measurement. As a result, it is now possible to test the positioning operation on the basis of the previously transferred reflector co- ordinates. A precondition for this is that the PC is on online and linked to the NAV200. Positioning operation requires data entry as shown in Fig. -
Page 66: Fig. 6-14: Program Window During Positioning Operation ("Positioning Operation" Mode)
NAV200. The radial line here points in the direction of the X-axis of the local co-ordinate system of the NAV200. The black circles mark the reflector positions saved in the NAV200. The small green circles display the measurement results from the type of reflector measurement and transfer that can be chosen as an option. -
Page 67: Measuring And Reading The Reflector Co-Ordinates Automatically Using The Nav200'S Mapping
61) is quicker than measurement by a land surveyor, but not as exact. 1. Position the NAV200 - mounted on an AGV - at a suitable initial position. As many reflectors as possible, but with a minimum of three, must be visible at this position. -
Page 68: Fig. 6-16: Information Box During Mapping
Mapping results The following options are available: – A option and selection of a required layer: DD TO LAYER the NAV200 adds the co-ordinates of the detected reflectors to the selected layer as new reflectors. – R option: EPLACE LAYER replaces the old reflector co-ordinates in the mapped layer completely with the new reflector co-ordinates. -
Page 69: Fig. 6-18: Program Window After Completion Of Mapping
NAV200 – SEND DATA IMMEDIATELY TO NAV NAV200 Setup simultaneously transfers all the data of the affected layer to the NAV200 (immediate download). This is particularly useful if the NAV200 has to teach-in additional reflectors using Mapping. 7. Confirm the dialog box with OK. - Page 70 NAV200 Setup transfers the reflector data sets from the PC to the NAV200. They are then available for further Mapping sweeps. 9. Move the NAV200 to a new position in the same layer. The NAV200 must be able to see at least 3 already mapped reflectors from its new position.
-
Page 71: Logging The Data Communication (Log File)
4. Switch off the power supply for NAV200. The NAV200 retains the permanently stored configuration in its memory. Current measurement data on the RS 232 data interface is lost if the NAV200 is switched off during data transfer, or NAV200 Setup is closed during data transfer. - Page 72 Operation Chapter 6 Operating Instructions NAV200 Laser Positioning System Notes: © SICK AG · Division Auto Ident · Germany · All rights reserved 8011502/R197/2007-02-12...
-
Page 73: Maintenance
Use for other than the intended purpose can lead to the laser class being exceeded. Observe the latest version of the laser protection regulations. Damage to the NAV200! The NAV200 provides IP 65 protection and is only protected against the ingress of liquids in that respect. Do not immerse the device in liquids. -
Page 74: Maintenance
Apart from the routine cleaning described above, the NAV200 is maintenance free. The NAV200 outputs device and functional errors as they occur in the form of a special error telegram, in the reply to any vehicle computer software telegram, see... -
Page 75: Troubleshooting
Chapter 8 NAV200 Troubleshooting The NAV200 reports all error conditions to the AGV vehicle computer in the form of error messages via the RS 232 data interface. They can be interpreted by the supervisory control software there. The structure of the error telegrams and the possible types of error are described in the “NAV200 Telegram Listing”... - Page 76 Troubleshooting Chapter 8 Operating Instructions NAV200 Laser Positioning System Notes: © SICK AG · Division Auto Ident · Germany · All rights reserved 8011502/R197/2007-02-12...
-
Page 77: Technical Data
*) Positioning accuracy after minimum 30 minute run up, 6 reflectors, smoothing depth 4, requirements for the reflector arrangement in accordance with Section 3.3 Operating conditions taken into account. Tab. 9-1: NAV200 technical specifications 8011502/R197/2007-02-12 © SICK AG · Division Auto Ident · Germany · All rights reserved... -
Page 78: Nav200 Dimensional Drawing
0.43 0.59 15.5 0.61 0.75 57.5 2.26 2.36 3.39 4.53 137.5 5.41 6.22 6.93 7.01 All dimensions in mm Fig. 9-1: Dimensional drawing of the NAV200 © SICK AG · Division Auto Ident · Germany · All rights reserved 8011502/R197/2007-02-12... -
Page 79: Appendix
Overview of the appendices The appendix includes the following additional information: • Available accessories • Supplementary documentation • Replacing a NAV200 • Reproduction of the EC Declaration of Conformity 8011502/R197/2007-02-12 © SICK AG · Division Auto Ident · Germany · All rights reserved... -
Page 80: Available Accessories
2030334 As no. 6024723, but longer 6.5 m (21.3 ft) 6024722 8-pin cable socket for power supply to NAV200 Tab. 10-3: Available accessories Cables and connectors © SICK AG · Division Auto Ident · Germany · All rights reserved 8011502/R197/2007-02-12... -
Page 81: Supplementary Documentation
Description of the command strings for the functions of the System NAV200, together with an overview of possible error messages Tab. 10-4: Supplementary documentation for the NAV200 8011502/R197/2007-02-12 © SICK AG · Division Auto Ident · Germany · All rights reserved... -
Page 82: Replacing A Nav200
4. Transfer the current configuration to the NAV200 ("Download" mode). 5. Close the NAV200 Setup configuration software 6. If necessary, disconnect the NAV200 RS 232 data cable from the PC and connect it to the vehicle computer again. The replacement device is now ready for operation. Position measurement (“Positioning operation”... -
Page 83: Reproduction Of The Ec Declarations Of Conformity
EC Declaration of Conformity (Page 1). Full version of the EC Declaration of Conformity available on request. Fig. 10-1: Reproduction of the EC Declaration of Conformity for NAV200 (Page 1, reduced) 8011502/R197/2007-02-12 © SICK AG · Division Auto Ident · Germany · All rights reserved... - Page 84 Great Britain Taiwan Phone +44 (0)1727 831121 Phone +886 2 2365-6292 E-Mail info@sick.co.uk E-Mail sickgrc@ms6.hinet.net India Türkiye Phone +91–22–2822 7084 Phone +90 216 587 74 00 E-Mail info@sick-india.com E-Mail info@sick.com.tr Italia USA/Canada/México Phone +39 02 27 43 41 Phone +1(952) 941-6780 E-Mail info@sick.it 1 800-325-7425 – tollfree E-Mail info@sickusa.com Japan Phone +81 (0)3 3358 1341 E-Mail support@sick.jp Nederlands Phone +31 (0)30 229 25 44 E-Mail info@sick.nl Norge More representatives and agencies Phone +47 67 81 50 00 in all major industrial nations at E-Mail austefjord@sick.no www.sick.com SICK AG | Waldkirch | Germany | www.sick.com...
Need help?
Do you have a question about the NAV200 and is the answer not in the manual?
Questions and answers