Table of Contents
Advertisement
Quick Links
journal
Installation Guides
Section:
INSTALLATION SEQUENCE
Description:
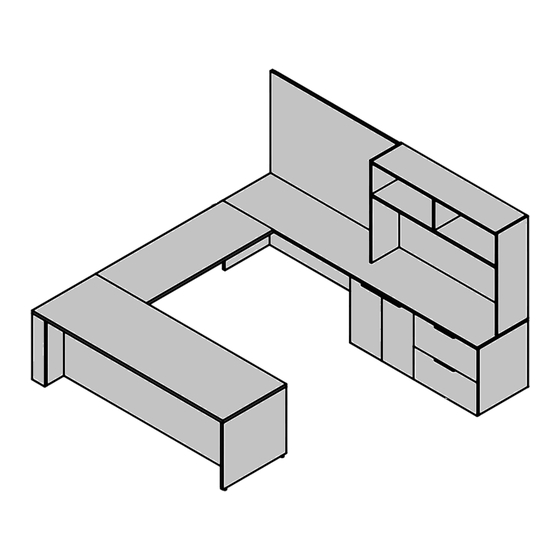
TYPICAL LAYOUT 2
Desk with Gables (CJDG), Bridge with Modesty (CJBM), Extended L Gable (CJGE), Credenza Top for Freestanding Storage
(CJCT), Wall Panel, Whiteboard (CJWW), Closed Storage, unfinished Top, 2H (CJCC), Pedestal, Unfinished Top 2H (CJPC),
C - Extended L Gable
(CJGE) x1
G - Bridge with
Modesty
(CJBM)x1
Hutch, Open Storage Finished Top (CJHO)
D - Credenza Top for
Freestanding Storage
(CJCT)x1
H - Desk with Gables
(CJDG)x 1
E - Wood Wall Panel
(CJWW)x1
B - 2H Unfinished Top
Closed Storage (CJCC)x1
Date:
May 2019
Page No:
1 of 5
JNL_602
Rev. No: 01
F - Hutch Open Storage
Finished Top (CJHO)x1
A - 2H Unfinished Top
Box/File Pedestal (CJPC)x1
Advertisement
Table of Contents

Related Manuals for Teknion CJDG


Summary of Contents for Teknion CJDG
- Page 1 JNL_602 Rev. No: 01 Desk with Gables (CJDG), Bridge with Modesty (CJBM), Extended L Gable (CJGE), Credenza Top for Freestanding Storage (CJCT), Wall Panel, Whiteboard (CJWW), Closed Storage, unfinished Top, 2H (CJCC), Pedestal, Unfinished Top 2H (CJPC), Hutch, Open Storage Finished Top (CJHO)
- Page 2 journal Installation Guides Section: INSTALLATION SEQUENCE Date: May 2019 Page No: 2 of 5 Description: TYPICAL LAYOUT 2 JNL_602 ALIGH PEDESTALS DRAWER REMOVAL STEP 1: Align Credenzas & Extended L Gable against the wall. STEP 2: Remove Drawer and open Storage Unit Doors for access to Levelers. Please refer to installation guide JNL_501a or JNL_501b for Drawer removal instructions.
- Page 3 journal Installation Guides Section: INSTALLATION SEQUENCE Date: May 2019 Page No: 3 of 5 Description: TYPICAL LAYOUT 2 JNL_602 LEVEL PEDESTALS CREDENZA TOP INSTALLATION LEVELER STEP 3: Level all Pedestals, and adjust levelers if necessary. Please refer to JNL_501a or STEP 4: Please refer to installation guide JNL_102a for Credenzas to Worksurface and to JNL_501b to re-install drawers.
- Page 4 journal Installation Guides Section: INSTALLATION SEQUENCE Date: May 2019 Page No: 4 of 5 Description: TYPICAL LAYOUT 2 JNL_602 WALL PANEL ASSEMBLY HUTCH OPEN STORAGE INSTALLATION STEP 5: Install Wall Panel. Please refer to JNL_204a for Wall Panel installation procedures. STEP 6: Install Hutch on Credenza Top.
- Page 5 journal Installation Guides Section: INSTALLATION SEQUENCE Date: May 2019 Page No: 5 of 5 Description: TYPICAL LAYOUT 2 JNL_602 BRIDGE WITH MODESTY INSTALLATION DESK ASSEMBLY STEP 7: Attach Bridge with Modesty to Credenza Top. Please refer to installation guide STEP 8: Bring Desk to Bridge and attach Bridge with modesty to Desk Worksurface. Please JNL_104c for Bridge with Modesty to Worksurface Installation procedures.
Need help?
Do you have a question about the CJDG and is the answer not in the manual?
Questions and answers