Table of Contents
Advertisement
Quick Links
Advertisement
Chapters
Table of Contents

Related Manuals for Optimum THERMOCOOK ESSENTIAL


Summary of Contents for Optimum THERMOCOOK ESSENTIAL
- Page 1 QUALITY YOU CAN TRUST USER’S MANUAL THERMOCOOK ESSENTIAL...
-
Page 2: Table Of Contents
CONTENTS WELCOME TO YOUR NEW KITCHEN ASSISTANT! IMPORTANT GETTING TO KNOW YOUR THERMOCOOK ESSENTIAL BEFORE FIRST USE ASSEMBLING COMPONENTS AND USE OF ACCESSORIES HOW TO USE YOUR THERMOCOOK ESSENTIAL HOW TO USE THE APP SUGGESTED SPEED AND CAPACITY FOR EACH ACCESSORY... -
Page 3: Welcome To Your New Kitchen Assistant
The addition of the mobile application will allow you to save your own recipes to the app as well. You can download the Thermocook Essential app by searching for "Smart Life" in the Apple Store or Google App Store. -
Page 4: Important
WARNING: Keep ventilation openings clear of obstruction. Your Optimum ThermoCook is not a toy. Do not allow children to use it; and keep it and the cord that comes with it out of their reach. - Page 5 36. When the steamer is operating, the handles are the only safe place to touch it. Touching it anywhere else may result in injury. After using your Optimum ThermoCook, please keep it and any of its parts that are still hot well out of children’s reach.
- Page 6 40. The appliance is not intended for use by persons (including children) with reduced physical, sensory or mental capabilities, or lack of experience and knowledge, unless they have been given supervision or instruction concerning use of the appliance by a person responsible for their safety Never let the appliance run unattended.
- Page 7 58. Injury can result if moving blades accidentally become exposed. 59. Do not leave the appliance unattended when running. 60. Do not use the jar for storing foods or beverages. Do not use appliance for mixing paints or other flammable liquids or in a location contaminated with flammable gases or vapours.
- Page 8 PART WHEN YOU ASSEMBLE, REMOVE AND CLEAN THE BLADE. FAILURE TO FOLLOW THESE SAFETY INSTRUCTIONS AND WARNINGS COULD RESULT IN SERIOUS INJURY. ONLY USE YOUR THERMO COOKER FOR ITS INTENDED DOMESTIC USE. ADDITIONALLY, MISUSING YOUR OPTIMUM THERMOCOOK ESSENTIAL MAY DAMAGE IT AND VOID YOUR WARRANTY.
-
Page 9: Getting To Know Your Thermocook Essential
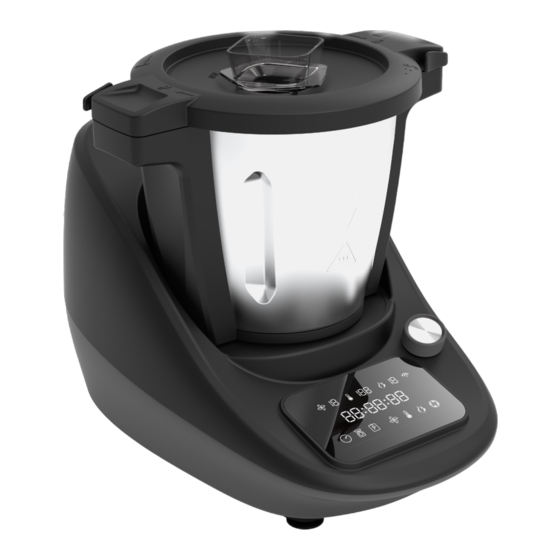
GETTING TO KNOW YOUR THERMOCOOK ESSENTIAL COMPONENTS Steamer Lid Saute Blade Steamer Tray Measuring Cup Steamer Base Jar Lid Strainer / Steamer Basket Butterfly Whisk Main Body with Non Slip Feet Spatula LED Touch Display Kneading Blade Control Knob with Button Multifunction Blade... -
Page 10: Before First Use
BEFORE FIRST USE UNPACKING • Remove all packaging materials and dispose of properly and thoughtfully. • Before using your appliance and accessories, it is strongly advisable to clean them thoroughly. Refer to “Clean” section for instructions. METHODS OF SAFE INSTALLATION •... -
Page 11: Assembling Components And Use Of Accessories
ASSEMBLING COMPONENTS AND USE OF ACCESSORIES DRIVE COUPLING If not already fitted to the bottom of the jar, the drive coupling and rubber sealing gasket must be fitted and secured properly. To do this, take the drive coupling and ensure the rubber gasket is fitted over the bottom of the coupling as shown below. - Page 12 MULTIFUNCTION BLADE The Multifunction Blade is used primarily for chopping food items. IMPORTANT: Take extra care when handling this accessory as the blades are very sharp and may cause injury if mishandled. To install the Multifunction Blade, follow the steps below: Place the jar onto the main body in the correct orientation and secure it properly.
- Page 13 To remove the Multifunction Blade, follow the steps below: Place the jar onto the main body in the correct orientation and secure it properly. Grasp the top of the blade post, push down firmly and rotate clockwise, then pull it straight up and out.
- Page 14 KNEADING BLADE The Kneading Blade is used primarily for kneading dough. IMPORTANT: Do not use the Kneading Blade above speed setting 3. To install the Kneading Blade, follow the steps below: 1. Place the jar onto the main body in the correct orientation and secure it properly. 2.
- Page 15 To remove the Kneading Blade, follow the steps below: 1. Place the jar onto the main body in the correct orientation and secure it properly. 2. Grasp the top of the blade post, push down firmly and rotate clockwise, then pull it straight up and out.
- Page 16 SAUTE BLADE The Saute Blade is used primarily for sauteing and mixing . IMPORTANT: Do not use the Saute Blade above speed setting 2. To install the Saute Blade, follow the steps below: 1. Place the jar onto the main body in the correct orientation and secure it properly. 2.
- Page 17 To remove the Saute Blade, follow the steps below: 1. Place the jar onto the main body in the correct orientation and secure it properly. 2. Grasp the top of the blade post, push down firmly and rotate clockwise, then pull it straight up and out.
- Page 18 BUTTERFLY WHISK The Butterfly Whisk is used primarily for stirring and whisking food items. IMPORTANT: Do not use the Butterfly Whisk above speed 4. Do Not add ingredients into the jar when the appliance is working with the butterfly whisk, as the butterfly whisk may get jammed and damaged.
- Page 19 JAR AND LID ASSEMBLY There are jar capacity marks on one side, inside the jar. The Max capacity for blending and heating is 3L. To attach the lid, position the lid on the top of the jar, press the lid down firmly so that it sits flat on the jar edge, then rotate the lid clockwise to lock the lid onto the jar.
- Page 20 MEASURING CUP Measuring Cup not only prevents food and liquids from being ejected from the hole in the lid, it is also a convenient measuring cup. To assemble the Measuring Cup to the lid, place the measuring cup into the hole, rotate clockwise to lock in place.
- Page 21 STRAINER / STEAMER BASKET The Strainer / Steamer Basket can be used to strain out the fruit / vegetable juice after processing. Insert the Strainer into the jar and hold in place while you pour out the juice. It can also be used to hold soft food such as pasta or noodles while cooking, and can be used to cook side dishes, such as rice and potatoes.
-
Page 22: How To Use Your Thermocook Essential
HOW TO USE YOUR THERMOCOOK ESSENTIAL NOTE: When first using the Thermo Cooker, you may notice an electrical smell from the motor which is quite normal. After a period of uses, this smell will gradually disappear. IMPORTANT: Before use, READ ALL the notes under the headings “Important Safeguards” and “Methods of Safe Installation”. - Page 23 CONTROLS Timer Function Touch Button Wi-Fi Function Button Scale Function Touch Button* Heating Power Digital Read-out Pre-Programmed Option Touch Button Temperature Digital Read-out Speed Function Touch Button Speed Digital Read-out Temperature Setup Touch Button Time Digital Read-out Heating Function Touch Button Control Knob with Button Turbo Function Touch Button Note: The Scale Function Button will not show if the Jar with the lid fitted and locked has been...
- Page 24 AUTO OFF TIMER The switch is on the back of appliance. Use this switch to switch the appliance on of off. This part of the Digital Display shows hour: minute: seconds. To set the desired operation time, touch the Timer Touch Button to enter the Minute Setting and the Minute Digits will blink.
- Page 25 SPEED This part of the Digital Display shows the Speed. To set the desired speed, touch the Speed Touch Button at the bottom of display to enter the Speed Setting, and the Speed Digit will blink. NOTE: You will have approximately 5 seconds to set the speed required before the display returns to normal.
- Page 26 HEATING POWER This part of the Digital Display shows the Heating Power from level 0 to 10. (10 is the highest setting which means it will heat quicker). To set the desired Heating Power, touch the Heat Function Touch Button at the bottom of display to enter the Heating Power Setting, and the Heating Power Digits will blink.
- Page 27 SCALES This Thermo Cooker has inbuilt weighing scales and can weight from 1 to 4,999 grams in 1-gram increments. NOTE: The Scale Function will only function when the jar lid is not fitted to the jar and locked in place. The Scale Touch Button Icon will not be displayed if the jar lid is fitted and locked.
- Page 28 P01: Clean: This is a cleaning program for the inside of the jar. • Assemble the butterfly whisk. • Add 500ml of clean water and 1 - 2 drops of dishwashing liquid. • Attach and ensure the jar lid and measuring cup are secure and locked in place. •...
- Page 29 Default Settings Default Settings Adjustable Adjustable Accessories Accessories Remark Remark Speed Level 4 - 7 Multifunction Blade and Basket Temperature (°C) Power Level 1 - 10 Time - minutes 1 - 5 P04: Thick soup: Slow cooking for absolute control over temperature and time for perfectly cooked and tender results.
- Page 30 Step 3: Default Settings Adjustable Adjustable Accessories Accessories Remark Remark Default Settings Speed Level Multifunction Blade Temperature (°C) Power Level Time - Minutes Refer note following Note: Step 3 will continue to run until the ingredients have reduce temperature to 90C or less and will then change automatically to Step 4.
- Page 31 Step 7: Default Settings Adjustable Adjustable Accessories Accessories Remark Remark Default Settings Speed Level Multifunction Blade Temperature (°C) Power Level Time - Seconds Step 8: Default Settings Adjustable Adjustable Accessories Accessories Remark Remark Default Settings Speed Level Multifunction Blade Temperature (°C) Power Level Time - Minutes P05: Chop: Chops all kinds of ingredients, from meat or fish to fruit or vegetables.
- Page 32 Default Settings Adjustable Adjustable Accessories Accessories Remark Remark Default Settings Speed Level 1 - 2 Saute Blade Temperature (°C) Power Level Time - Minutes 1 -30 P07: Stir: Stirs food stuffs as it cooks them to ensure uniform heating and to achieve professional textures.
- Page 33 P09: Steam: This function is ideal for steaming the healthiest recipes. It allows saving time thanks to its 2-level steamer, as you can cook more than 1 dish at once. • Assemble the Steamer. • Add your ingredients. • Add no more than 1.5 Litres of cool (not hot and not fridge cold) water to the Jar. •...
- Page 34 Step 2: Default Settings Adjustable Adjustable Accessories Accessories Remark Remark Default Settings Speed Level Multifunction Blade Temperature (°C) Power Level Time - Hours No limit 1 - 12 P11: Warm: Keeps your food warm until they are served. After cooking your food, just set the Thermo Cooker cooking temperature to 65ºC (default) for solid foods or 80°C for liquid foods (i.e., Soups) for the desired amount of time.
- Page 35 P13: Boil: Pour enough water into the jar so as to cover all the ingredients. • Add your ingredients to the jar. • Attach and ensure the jar lid and measuring cup are secure and locked in place. • Press the Start Button to begin. Default Settings Adjustable Adjustable...
- Page 36 Step 2 Default Settings Adjustable Adjustable Accessories Accessories Remark Remark Default Settings Speed Level Multifunction Although the chopping Blade blade is not needed for Temperature (°C) Step 2, it is left inside so that the program does not Power Level need to be paused.
-
Page 37: Step 1
P16: Porridge: Use this setting to make softer foods such as beans or porridge. This is ideal for foods that require milk or water to be cooked. • Assemble the Multifunction Blade. • Add your ingredients to the jar • Attach and ensure the jar lid and measuring cup are secure and locked in place. -
Page 38: Speed Level N/A
Step 2: Default Settings Default Settings Adjustable Adjustable Accessories Accessories Remark Remark Speed Level Multifunction Blade Temperature (°C) Power Level Time - Minutes 30 - 60 P18: Quick Soup: Crush firstly, then cook. • Assemble the Multifunction Blade. • Attach and ensure the jar lid and measuring cup are secure and locked in place. •... - Page 39 Step 3 : Default Settings Default Settings Adjustable Adjustable Accessories Accessories Remark Remark Speed Level Multifunction Blade Temperature (°C) Power Level Time - Minutes 15 - 60 WI-FI Touch Wi-Fi Function Button to connect the Thermo Cooker with your smart phone to review all recipes and easy cooking.
-
Page 40: How To Use The App
App must be downloaded to a smart device in order to control the Thermo Cooker remotely. The application requires an active Wi-Fi connection to operate the Thermo Cooker. Note: The device does not support 5G connection or networks with WEP encryption. Thermocook Essential INSTALL APP Open the Apple® App Store or Google Play Store. - Page 41 Enter a valid email address or mobile number to create an account name and press the “Get Verification Code” option for a verification code to be sent to your email address. A verification code will be sent to you by email or SMS. Enter the code to continue. Create a password which must have a minimum of 6 characters and contain at least one letter and one number.
- Page 42 The app will begin adding the device and may take up to 2 minutes, you will get a notification saying “added successfully” once completed, Once the control application has finished loading, you will now be able to control the Thermo Cooker via your smart device. Thermocook Essential...
- Page 43 Note: Only one smart device can be connected at a time to the Thermo Cooker. Note: Thermo Cooker will only operate via the control application when the smart device is connected to the Wi-Fi. Note: The Thermo Cooker and the app have to use the same Wi-Fi network. Note: The Thermo Cooker is only compatible with 2.4Ghz networks.
- Page 44 Press one of the category options to begin scrolling through the cloud recipes. Once you have selected your category, a line of headings will appear above the recipes. You can flick through the different categories or alternatively select the “all” option to display all of the recipes at once.
- Page 45 HISTORY The History section is located on the home screen which displays your previous cloud recipes made. It will display the time and date that the recipe was made. SIMPLE CHEF Simple Chef is where you can find your preset cooking programs. It has 18 programs available, 16 cooking and 2 cleaning programs.
-
Page 46: Temperature (°C) 100 N/A
Clean: This is a cleaning program for the inside of the jar. • Assemble the butterfly whisk • Add 500ml of clean water and 1 - 2 drops of dishwashing liquid. • Attach and ensure the jar lid and measuring cup are secure and locked in place. •... -
Page 47: Speed Level
Default Settings Default Settings Adjustable Adjustable Accessories Accessories Remark Remark Speed Level Multifunction Blade Temperature (°C) Power Level Time - Hours Refer to the above note Step 3 Default Settings Adjustable Adjustable Accessories Accessories Remark Remark Default Settings Speed Level Multifunction Blade Temperature (°C) Power Level... - Page 48 Default Settings Adjustable Adjustable Accessories Accessories Remark Remark Default Settings Speed Level Multifunction Blade Temperature (°C) Power Level Time - Hours 1 - 12 Fresh Recovery (Washing): Scientific refresh cleaning method at 50°C can clean away meat blood foam and vegetable / fruit pesticide residue, etc.
- Page 49 Quick soup: Crush firstly, then cook. • Assemble the Multifunction Blade. • Attach and ensure the jar lid and measuring cup are secure and locked in place. • Press the Start button to begin. Note: There are three steps to this program. The unit will automatically change to the next Step after the previous step has completed.
- Page 50 Boil: Pour enough water into the jar so as to cover all the ingredient. • Add your ingredients to the jar • Attach and ensure the jar lid and measuring cup are secure and locked in place. • Press the Start button to begin. Default Settings Adjustable Adjustable...
- Page 51 Step 1 Default Settings Default Settings Adjustable Adjustable Accessories Accessories Remark Remark Speed Level Multifunction Blade Mix yoghurt or Temperature (°C) starter into milk Power Level then stir for half an hour Time - Minutes Refer to above note Step 2: Default Settings Adjustable Adjustable...
- Page 52 Step 1 Default Settings Default Settings Adjustable Adjustable Accessories Accessories Remark Remark Speed Level Multifunction Blade Temperature (°C) Power Level Time - Minutes Will turn to Step 2, after temperature reaches 900C Step 2: Default Settings Adjustable Adjustable Accessories Accessories Remark Remark Default Settings...
- Page 53 Default Settings Default Settings Adjustable Adjustable Accessories Accessories Remark Remark Speed Level 1 - 2 Multifunction Blade Temperature (°C) Power Level Time - Minutes 10 - 30 Knead: For preparing bread dough. • Assemble the Kneading Blade. • Add your ingredients. •...
- Page 54 Step 2: Default Settings Default Settings Adjustable Adjustable Accessories Accessories Remark Remark Speed Level Multifunction Blade Temperature (°C) Power Level Time - Minutes 30 - 60 Steam: This function is ideal for steaming the healthiest recipes. It allows saving time thanks to its 2-level steamer, as you can cook more than 1 dish at once.
- Page 55 Step 1: Default Settings Adjustable Adjustable Accessories Accessories Remark Remark Default Settings Speed Level Multifunction Blade Temperature (°C) Power Level Time - Will turn to Step 2, 1–2 Minutes minutes after boiling. Step 2: Default Settings Default Settings Adjustable Adjustable Accessories Accessories Remark...
- Page 56 Step 4: Default Settings Adjustable Adjustable Accessories Accessories Remark Remark Default Settings Speed Level Multifunction Blade Temperature (°C) Power Level Time - Seconds Step 5: Default Settings Adjustable Adjustable Accessories Accessories Remark Remark Default Settings Speed Level Multifunction Blade Temperature (°C) Power Level Time - Seconds Step 6:...
- Page 57 Step 8: Default Settings Adjustable Adjustable Accessories Accessories Remark Remark Default Settings Speed Level Multifunction Blade Temperature (°C) Power Level Time - Minutes DIY COOKING (MANUAL COOKING) The DIY cooking section is located on the home screen which allows you to manually adjust the timer, speed, temperature and heating power when operating the appliance.
- Page 58 Speed: The display will allow you to adjust the speed of the blades in the cooking. Press the SPEED option to select your desired speed. When you press the speed function, the screen will display a scroll down menu from 0-10. “0” being low and “10”...
-
Page 59: Suggested Speed And Capacity For Each Accessory
SUGGESTED SPEED AND CAPACITY FOR EACH ACCESSORY DO NOT ASSEMBLE OR USE THE KNEADING BLADE AND THE STRAINER / STEAMER BASKET AT THE SAME TIME Operation Accessory Image Function Speed Capacity time 2 L max, Food Items Chop (+) 1 Minute 1 - 2cm in size before Multifunction Chopping... -
Page 60: Cleaning
CLEANING Wipe the Motor Base over with a slightly damp cloth and mild detergent and then dry off, ensuring the electrical contact area is perfectly dry. Dry with a dry soft cloth. Cleaning the parts immediately after use ensures a faster clean up time, and this will prolong the life of your appliance &... -
Page 61: Troubleshooting
TROUBLESHOOTING Error code Description Possible reason Solution Safety switch Jar lid is not fitted correctly Ensure the Jar Lid is fitted not activated to the Jar or Locked in position. correctly and locked in place. Jar is not seated correctly into Ensure the Jar is seated the base correctly into the base. -
Page 62: Product Specifications
PRODUCT SPECIFICATIONS The device complies with the European Directives 2014/35/EU, 2014/30/EU and 2009/125/EC At the end of its service life, this product may not be disposed of in the normal household waste, but rather must be disposed of at a collection point for recycling electrical and electronic devices. -
Page 63: Warranty Terms & Conditions
Effective as of 1st January 2014 Optimum® (“we”) warrants this appliance to be free from defects in materials and workmanship. As long as you use it according to this instruction book, Optimum® warrants that it will perform satisfactorily in household use for a period of 1 year. - Page 64 Please contact the distributor located in the country where you made your original purchase for all Support, Servicing and Warranty...
- Page 65 ThermoCook Essential...
Need help?
Do you have a question about the THERMOCOOK ESSENTIAL and is the answer not in the manual?
Questions and answers