Advertisement
Advertisement
Table of Contents

Subscribe to Our Youtube Channel
Related Manuals for Optimum THERMOCOOK PRO M


Summary of Contents for Optimum THERMOCOOK PRO M
- Page 1 QUALITY YOU CAN TRUST USER’S MANUAL THERMOCOOK PRO M...
-
Page 2: Table Of Contents
CONTENTS WELCOME TO YOUR NEW KITCHEN ASSISTANT! IMPORTANT GETTING TO KNOW YOUR THERMOCOOK PRO M HOW TO INSTALL BUTTON FUNCTION INTRODUCTION HOW TO USE FAULT CODES PROCESSING GUIDE WARRANTY TERMS AND CONDITIONS CONTACTING US... -
Page 3: Welcome To Your New Kitchen Assistant
“your new kitchen assistant”. From the first time you use your Optimum ThermoCook Pro M, it will become your “secret ally”, helping you to cook like a five-star chef. Its many diverse functions will help you to prepare healthy, nutritionally balanced meals in half the time you’d expect. -
Page 4: Important
Optimum ThermoCook clearly understands how to operate it safely to avoid potential hazards. 5. Your Optimum ThermoCook is not a toy. Do not allow children to use it; and keep it and the cord that comes with it out of their reach. - Page 5 24. When the steamer is operating, the handles are the only safe place to touch it. Touching it anywhere else may result in injury. 25. After using your Optimum ThermoCook, please keep it and any of its parts that are still hot well out of children’s reach.
-
Page 6: Getting To Know Your Thermocook Pro M
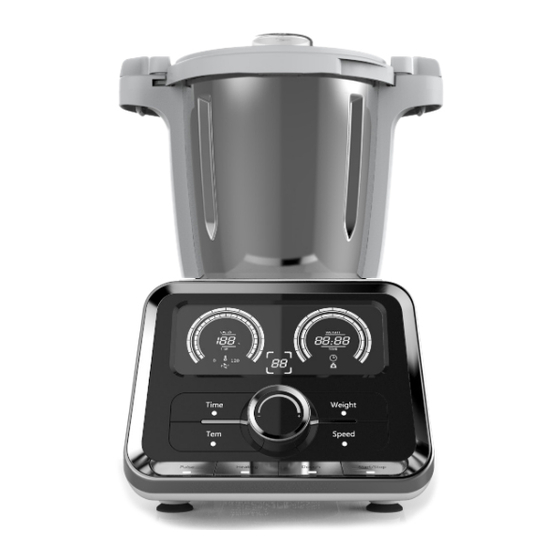
GETTING TO KNOW YOUR THERMOCOOK PRO M This section introduces you to the key components of your new Optimum ThermoCook Pro M. PARTS NAME: A. Measuring cup (Max. 100ml) 1. “Speed/ Temperature” display B. Bowl lid 2. “Time” button C. Airproof ring 1 3. - Page 7 THE BOWL The Maximum capacity of the bowl is 2 litres. Don’t process the food more than 2 litres! Caution: “Hot surface” logo marked on the bowl: To indicate that the marked item can be hot and should not be touched without taking care! HOW TO INSTALL THE AIRPROOF RING 1...
-
Page 8: How To Install
HOW TO INSTALL THE BLADE: 1. Put the airproof ring on the blade. Push the blade through the opening in the bottom of the bowl. 2. Hold the upper part of the blade with one hand, and put the spanner with the other hand. And then insert the spanner on the bottom of the blade. - Page 9 HOW TO INSTALL THE BOWL 1. Put the bowl lid on the bowl. And rotate the bowl lid clockwise to lock it on the bowl. Sound “click” will be heard at this time, which means lid is correctly installed. 2. Insert the bowl onto the bowl socket. Be sure to make place Z1 point to place Z2. Sound “click” also will be heard at this time, which means the bowl is well in position.
-
Page 10: Button Function Introduction
STAND-BY STATE: Plug in and power on, the appliance goes into stand-by state. The number of “speed/temperature” display on LCD is the current temperature of the bowl. BUTTON FUNCTION INTRODUCTION: 1.“Speed/Temperature” display: denotes the speed (range: 01-12), or denotes the temperature (range: 30-1200C). 2.”Time”... - Page 11 5.”Heating” button: Heat-preservation function. The factory default has been set at 370C. Usage: Press “Heating” button, the appliance will start to keep the temperature of the bowl at 370C. If you want to change the heat preservation temperature, Please follow below steps: 1) Press “Heating”...
- Page 12 HOW TO USE THE STEAMER: The steamer is perfectly suited for preparing some food such as vegetables with meat, sausages, steamed bread, steamed fish etc. You can use the steamers in either of the following two combinations: Combination 1: Lid (M)+ steamer (Tray) (N) + Steamer (O) Use this combination for cooking different foods.
-
Page 13: How To Use
Caution: 1. Danger of scalding by hot steam and hot condensed water. 2. Never heat up the bowl when it is empty. 3. If the lid is not fitted properly, the steam will escape and food inside steamer will not cook properly. 4. - Page 14 6. Set the time and the speed (1-4) you need. Press “Start/Stop” button, the appliance starts to working and the timer is counting down. If you skip the timer setting, the timer is counting. 7. Sound “Beep” will be heard while the working time is left 5 seconds. 8.
- Page 15 8. Sound “Beep” will be heard while the working time is left 5 seconds. 9. When the time is up, the appliance stops running and “Start/Stop” button light keeps flashing. “Start/Stop” button light will be out if you don’t perform any operation in 5 seconds. All the settings are cleared.
-
Page 16: Fault Codes
FAULT CODES: Code Status Solution Something goes wrong with the appliance. It “E01” on LCD is flashing. must be sent to the approved service centre for repairing. Install the bowl according to the operating “E02” on LCD is flashing. The bowl wasn’t installed. instruction. -
Page 17: Processing Guide
You make an important contribution to protecting our environment by reusing, recycling or utilizing old devices in other ways. Please ask the municipal administration where the appropriate disposal facility is located. Optimum ThermoCook Pro M Model : TCPROM Voltage... -
Page 18: Warranty Terms And Conditions
Effective as of 1st January 2014 Optimum® (“we”) warrants this appliance to be free from defects in materials and workmanship. As long as you use it according to this instruction book, Optimum® warrants that it will perform satisfactorily in household use for a period of 1 year. - Page 19 Please contact the distributor located in the country where you made your original purchase for all Support, Servicing and Warranty...
- Page 20 ThermoCook Pro M V9...
Need help?
Do you have a question about the THERMOCOOK PRO M and is the answer not in the manual?
Questions and answers