Advertisement
Table of Contents
- 1 Table of Contents
- 2 Welcome to Your New Kitchen Assistant
- 3 Safety First
- 4 Getting to Know Your Optimum Thermocook
- 5 Accessories
- 6 Quick Start
- 7 Using the Control Pad
- 8 Cleaning and Maintenance
- 9 Trouble Shooting
- 10 Specifications
- 11 Warranty Terms and Conditions
- 12 Contact Us
- Download this manual
Advertisement
Table of Contents

Related Manuals for Optimum ThermoCook


Summary of Contents for Optimum ThermoCook
- Page 1 ThermoCook PROFESSIONAL COOKING ASSISTANT USER’S MANUAL Manual...
-
Page 2: Table Of Contents
CONTENTS WELCOME TO YOUR NEW KITCHEN ASSISTANT! SAFETY FIRST GETTING TO KNOW YOUR OPTIMUM THERMOCOOK ACCESSORIES QUICK START USING THE CONTROL PAD CLEANING AND MAINTENANCE TROUBLE SHOOTING SPECIFICATIONS WARRANTY TERMS AND CONDITIONS CONTACT US Manual... -
Page 3: Welcome To Your New Kitchen Assistant
Optimum ThermoCook, it will become your “secret ally”, helping you to cook like a five-star chef. The Optimum ThermoCook features over 20 convenient functions designed to help you to create a range of impressive, nutritious and preservative-free meals your whole family will love. Here’s just a selection of its functions: chopping, whipping, mixing, emulsifying, milling, kneading, cooking, blending, stirring, steaming, weighing, precise heating and much more. -
Page 4: Safety First
• Your Optimum ThermoCook is not a toy. Do not allow children to use it; and keep it and the cord that comes with it out of their reach. • The cutting blades on your Optimum ThermoCook are extremely sharp, and can injure you. Take care when you handle them, e.g. when you empty the bowl or clean it. - Page 5 • Poor ventilation can also damage your Optimum ThermoCook. To avoid this, ensure that the vents on the back of the main body are clear of any blockages. •...
-
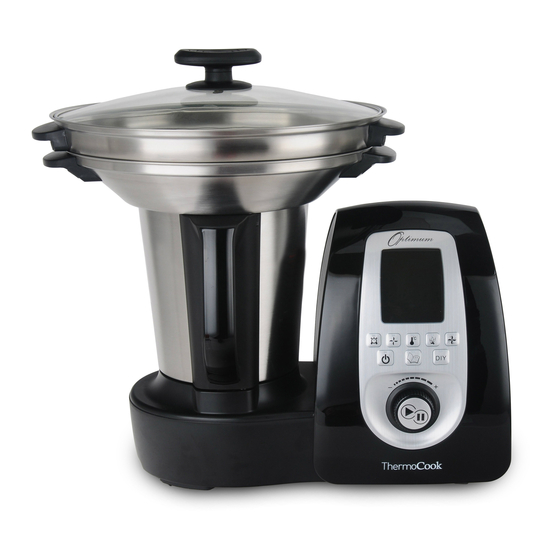
Page 6: Getting To Know Your Optimum Thermocook
GETTING TO KNOW YOUR THERMOCOOK This section introduces you to the key components of your new Optimum ThermoCook Multi-Function Appliance. 1. Blending bowl Handle base Handle Metal gasket Glass Silicon gasket Screw 5. Steamer Lid 2. Blade assembly 3. Bowl lid 4. - Page 7 Do not put more than 2.0L of food into the bowl. • Your Optimum ThermoCook will not operate if the bowl is not securely affixed to the main unit. To fix it correctly, place the bowl on the main unit body with its handle pointing to the front.
- Page 8 GETTING TO KNOW YOUR THERMOCOOK (CONTINUED) 3. BOWL LID Your Optimum ThermoCook will only operate if both the bowl and lid are properly secured. To secure the lid, turn it clockwise until it clicks into place. Important: • Do not open the lid to your Optimum ThermoCook until the food in the jar stops rotating.
-
Page 9: Accessories
2. Mixing tool The cooking basket serves many functions: • Sieving fruit and vegetable juices. After using your Optimum ThermoCook to grind fruit or vegetables, or making fruit puree, put the basket into the bowl to help pour out the juice. •... - Page 10 To remove the mixing tool, simply turn it clockwise to unhook it from the blade, and pull it off. Important: • Do not start your Optimum ThermoCook until the mixing tool is fully fixed in place. • Do not use above speed 4 when using the mixing tool.
- Page 11 • Your Optimum ThermoCook will become very hot during steaming, and may burn you if you touch it incorrectly. The handles on each side of the steamer attachment are the only place that is safe to touch while the steamer is operating.
-
Page 12: Quick Start
QUICK START 1. Place your Optimum ThermoCook on a clean, stable and even surface. Do not position it too close to the edge of the surface 2. Thoroughly clean the appliance before using it (See the Cleaning and Maintenance section) 3. - Page 13 Press the timer button a third time to adjust the hours. Turn the knob to adjust between 1-12 hours. For more information about the timer setting refer to page 13. Speed To adjust the speed at which your Optimum ThermoCook operates, press the speed button during the stand by mode or the operating process. •...
- Page 14 QUICK START (CONTINUED) Temperature and Heat Power To adjust the temperature of your Optimum ThermoCook press the temperature button either during the stand by mode or the heating process. • The icon will flash on the LCD screen, indicating that you can adjust the temperature. Turn the knob to select your desired temperature, ranging from 37 120°C.
-
Page 15: Using The Control Pad
• If you do not set a time or choose an auto programme, your Optimum ThermoCook will operate for 1 hour before automatically stopping. If you choose an auto programme, the maximum working time will be up to 12 hours. - Page 16 You can adjust the speed between Levels 1-10 during both the blending and heating processes. However, if the temperature is set to – or reaches – over 60°C, you can only adjust the speed up to Level 4. If your Optimum ThermoCook was working at a higher speed, it will drop to Level 4 automatically when it reaches this temperature.
- Page 17 • When a DIY programme is operating, your Optimum ThermoCook will stop for 10 seconds at the end of each step and beep. This allows you to PAUSE the machine and add any ingredients you need for the next step. If you leave it idle during these 10 seconds, your ThermoCook will continue with the next step in the programme.
- Page 18 Once the programmes QUICK SOUP, THICK SOUP, STIR, STEW, REHEAT, BOIL, RICE, or PORRIDGE finish, “End” will appear on the LC screen. If you leave your Optimum ThermoCook idle for 5 minutes after this, it will automatically enter WARM mode for up to 12 hours until you manually stop it.
-
Page 19: Cleaning And Maintenance
CLEANING AND MAINTENANCE Before you use your Optimum ThermoCook for the first time, and again after each use, clean the machine, its components and any accessories thoroughly. • To clean the blending bowl, first dismantle the blending bowl and blade assembly (refer to page 5). -
Page 20: Trouble Shooting
TROUBLE SHOOTING Error Description Possible reasons Solution Safety switch not fixed The jar or jar lid is not fixed in place properly Re-assemble the jar and jar lid, making sure all the parts are into place assembled properly and tightly Temperature sensor missing The jar is not in place, or the temperature sensor Re-assemble the jar, and make sure it is fixed properly and connection at the jar base is damaged... -
Page 21: Specifications
SPECIFICATIONS Product Optimum ThermoCook Multi-Function Appliance Model TC00WF, TC00BF, TC00RF Rating 220-240V~, 50/60Hz, 1500W Motor Power 500W; Heating element Power 1000W; Steamer Two layer steamer, stainless steel Maximum capacity of blender jar 2 litre Maximum capacity of the lower steamer 3.0L Maximum capacity of the upper steamer... -
Page 22: Warranty Terms And Conditions
WARRANTY TERMS & CONDITIONS Effective as of 1st January 2014 This warranty as outlined below solely covers distributors. Please contact your distributor for full product warranty. Athena Solutions® (“we”) warrants this appliance to be free from defects in materials and workmanship. As long as you use it according to this instruction book, Athena Solutions®... -
Page 23: Contact Us
CONTACT US Please contact the distributor located in the country where you made your original purchase for all Support, Servicing and Warranty. Your distributor is: Call to speak to one of our friendly Customer Service Representatives during business hours. Australia 1300 309 900 New Zealand 0800 741 369 United Kingdom 0800 0789 055 United States 187 766 11851... - Page 24 ATH ThermoCook Manual Landscape v8 Manual...
Need help?
Do you have a question about the ThermoCook and is the answer not in the manual?
Questions and answers