
Subscribe to Our Youtube Channel
Related Manuals for Leica HistoCore Water Bath


Summary of Contents for Leica HistoCore Water Bath
- Page 1 HistoCore Water Bath Water Bath Instructions for Use English Order No.: 14 0607 80101 - Revision A Always keep this manual with the instrument. Read carefully before working with the instrument. Version 1.0, Revision A - 09.2022...
- Page 3 Only in this way is it possible to continuously improve the technology and manufacturing techniques used in our products. This document is protected under copyright laws. All copyrights to this documentation are held by Leica Biosystems Nussloch GmbH.
-
Page 4: Table Of Contents
Table of contents Important information ....................5 Naming conventions ........................5 Symbols and their meanings ....................... 5 Instrument type ......................... 8 Intended purpose ........................8 1.5 Qualification of personnel ......................8 Safety ........................9 Safety notes ..........................9 Warnings ..........................10 2.2.1 Markings on the instrument itself ....................10 2.2.2 Transport and installation......................10 2.2.3 Operating the instrument ......................11 Instrument components and specifications .............. -
Page 5: Important Information
Important information Important information Naming conventions Note • The full name of the device is HistoCore Water Bath. The device is called the water bath to ensure that the Instructions for Use are well legible. Symbols and their meanings Symbol:... - Page 6 Important information Symbol: Title of the symbol: Consult Instructions for Use Description: Indicates the need for the user to consult the Instructions for Use. Symbol: Title of the symbol: Caution Description: Indicates the need for the user to consult the Instructions for Use for important cautionary information such as warnings and precautions that cannot, for a variety of reasons, be presented on the device itself.
- Page 7 Indicates the temperature range permitted for transporting the package. Symbol: Title of the symbol: Temperature limit for storage Description: Indicates the temperature range permitted for storing the package. Symbol: Title of the symbol: Humidity limitation for transport and storage HistoCore Water Bath...
-
Page 8: Instrument Type
Instructions for Use. Qualification of personnel • The HistoCore Water Bath must be operated by trained laboratory personnel only. The instrument is intended for professional use only. • All laboratory personnel designated to operate this instrument must read these Instructions for Use carefully and must be familiar with all technical features of the instrument before attempting to operate it. -
Page 9: Safety
• The protective devices located on the instrument and the accessories must not be removed or modified. Only qualified service personnel authorized by Leica Biosystems may repair the instrument and access its internal components. • If the instrument is to be returned to Leica Biosystems for repair, it must be cleaned and decontaminated in the appropriate manner (→ p. 27 – A1. Decontamination Confirmation). Note For current information about applicable standards, please refer to the CE Declaration of Conformity and UKCA Certificates on our Internet site: http://www.LeicaBiosystems.com... -
Page 10: Warnings
Safety Warnings The safety devices installed in this instrument by the manufacturer only constitute the basis for accident prevention. Operating the instrument safely is, above all, the responsibility of the owner, as well as the designated personnel who operate, service or repair the instrument. To ensure trouble-free operation of the instrument, make sure to comply with the following instructions and warnings. -
Page 11: Operating The Instrument
The water bath base is exposed when the water tray is taken away for exchange of water. The heated surface of the water bath base hurts the user. • Be careful of the hot surface of the water bath base during exchange of water. HistoCore Water Bath... -
Page 12: Instrument Components And Specifications
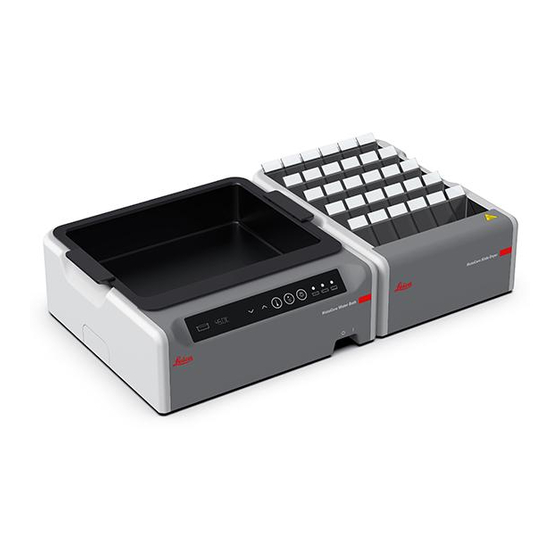
Instrument components and specifications Instrument components and specifications Overview 3.1.1 Instrument components Fig. 1 Water bath Control panel Water tray Slide dryer (ordered separately) 3.1.2 Rear view Fig. 2 Mains power inlet LED illumination Cable connectors Heating sensor (under the water tray) Two fuses Water slot (under the water tray) Version 1.0, Revision A... -
Page 13: Main Features Of The Instrument
• Black rack to provide good visibility and contrast; • 45° angeled heated rack, easy for slides pick up and placement; • Accessory to HistoCore Water Bath; • No need for power socket, get power supply via HistoCore Water bath; • Dimension: 200 mm x 280 mm x 98 mm; • Heating temperature: up to 75°C. - Page 14 Instrument components and specifications Environmental specification Operating altitude Up to 2000 m (meters above sea level) (min/max) Temperature (operation) (min/max) 15 - 40°C Relative humidity (operation) (min/max) 20% - 80% Temperature (transit) (min/max) -29°C - 50°C Temperature (storage) (min/max) 5°C - 50°C Relative humidity (transit/storage) 20% - 85% Minimum distance to walls (mm) 10 cm...
-
Page 15: Setting Up The Instrument
14 0607 80001 data carrier 14 0607 80200) If the supplied local power cord is defective or lost, please contact your local Leica representative. Note • Please check all delivered parts against the packing list and against your order to verify whether the delivery is complete. Should you find any discrepancies, please contact your Leica Biosystems... -
Page 16: Unpacking The Instrument
Setting up the instrument Unpacking the instrument 1. Set the carton on a flat surface, cut through the adhesive tape and open the carton. Fig. 3 2. Remove the accessories and carefully lift the instrument out of the carton. Fig. 4 3. Remove the plastic cover. Note • The transport carton and included retaining elements should be kept in case a return shipment is necessary later. -
Page 17: Setting Up The Instrument
Fig. 12 One slide dryer is connected at the left side, and One slide dryer is connected at the right side, and the other one is at the rear end. the other one is at the rear end. HistoCore Water Bath... - Page 18 Setting up the instrument Connecting the slide dryer(s) to the water bath 1. Remove the corresponding covers (→ Fig. 13-1) on the bottoms of the wather bath and the slide dryer by loosening screws (→ Fig. 13-2). Fig. 13 2. Pull out the cables from two devices. Connect the cables together (→ Fig. 14-1). You will hear a click sound and feel the connectors fitting into each other. If two slide dryers are to be installed in parallel at the same side of the water bath, use the extension cable to connect the water bath and the outer slide dryer (→ Fig. 14-2).
-
Page 19: Switching On/Off The Instrument
You do not have to switch the main switch on or off each time for everyday routine use. Moving the instrument The instrument must be switched off and disconnected from the power supply. The water tray must be empty. The instrument must have cooled down before moving. HistoCore Water Bath... - Page 20 Setting up the instrument Warning The water bath or slide dryers fall off while being lifted by the user. The instrument or accessories fall or drop to the user, which leads to people injury. The user prepares sections with potentially damaged instrument or accessories, which may lead to tissue damage.
-
Page 21: Operation
• Increasing target temperature - Touch and hold the button till the target temperature of the present module is displayed. Touch once, and the temperature is increased by 0.1°C. Touch and hold the button, and the temperature is increased by 1.0°C after the first integer number is reached. HistoCore Water Bath... -
Page 22: Setting The Temperature
Operation Buttons Description Set button Touch and hold the button for more than 1 second, and the target temperature of the present module is displayed. Run/Stop button • Touch once - switch on/off the heating to the whole system. • Touch and hold - switch on/off the heating to slide dryer(s). LED illumination on/off Please note that adding the hot water, whose temperature is higher than the target temperature in the water tray, could delay the use of the instrument. -
Page 23: Power On/Off The Slide Dryer
To turn on the slide dryer(s), touch either of the upwards or downwards button till the target module incon occurs. Touch and hold the run/stop button till temperature value is displayed. HistoCore Water Bath... -
Page 24: Cleaning And Maintenance
Cleaning and maintenance Cleaning and maintenance Cleaning the instrument • Before cleaning the instrument, turn it off using the main switch and disconnect it from the power supply. • Empty the water tray. • The instrument must have cooled down for cleaning. • Use wet, lint-free tissue paper to clean the instrument. -
Page 25: Troubleshooting
1. Check the fuses integrity and replace both of them. 2. If the problem cannot be solved by fuses replacement, contact customer service. • Water leakage on table. Check the water tray to see if there's water leakage and contact customer service. HistoCore Water Bath... -
Page 26: Ordering Information
Ordering information Ordering information Part description Order No. HistoCore Slide Dryer 14 0607 010C0 Extension cable accessories 14 0607 03001 Removable water tray 14 0607 03002 Version 1.0, Revision A... -
Page 27: A1. Decontamination Confirmation
Decontamination Confirmation A1. Decontamination Confirmation Any product that is to be returned to Leica Biosystems or serviced on site must be properly cleaned and decontaminated. The associated decontamination certificate template can be found on our website www. LeicaBiosystems.com in the product menu. This template must be used to enter all required data. If a product is returned, a copy of the completed and signed decontamination certificate must either be enclosed or handed over to a service technician. The user shall be responsible for products that are returned without a completed decontamination certificate or with a missing decontamination certificate. -
Page 28: A2 Warranty And Service
A2. Warranty and Service Warranty Leica Biosystems Nussloch GmbH guarantees that the contractual product delivered has been subjected to a comprehensive quality control procedure based on the Leica in-house testing standards, and that the product is faultless and complies with all warranted technical specifications and/or agreed-upon characteristics. The scope of the warranty is based on the contents of the contract concluded. The warranty terms of your Leica sales organization or the organization from which you have purchased the contractual product shall apply exclusively. - Page 30 Leica Biosystems Nussloch GmbH Heidelberger Strasse 17 - 19 69226 Nussloch Germany Tel.: +49 - (0) 6224 - 143 0 Fax: +49 - (0) 6224 - 143 268 Web: www.LeicaBiosystems.com...
Need help?
Do you have a question about the HistoCore Water Bath and is the answer not in the manual?
Questions and answers