
Related Manuals for Leica MICA


Summary of Contents for Leica MICA
- Page 1 From Eye to Insight MICA User Manual Leica Microsystems CMS GmbH. User Manual, 11xxxxxx, revision 1.0, 2021-12-15...
- Page 2 (in whole or in part) by print, photocopy, microfilm or other method (including electronic systems) is not allowed without ex- press written permission from Leica Microsys- tems CMS GmbH. The instructions contained in the following doc- umentation reflect state-of-the-art technology.
-
Page 3: Table Of Contents
4.1 Transport ............15 4.2 Ambient Conditions ........15 4.3 Installation Location ........16 4.4 Disposal ............17 Overview of the Instrument ......18 5.1 Mica 18 5.1.1 Status LED ............18 5.2 Supply Unit .............20 5.3 Incubator ............21 5.4 Auto Immersion ..........21 5.5 CORR objectives ...........21... -
Page 4: Important Notes About This Manual
1. Important Notes about this Manual 1. Important Notes about this Manual Caution! This User Manual includes important instruc- This User Manual is an essential component tions and information related to the operating of the product; it must be read carefully be- safety and maintenance of the instrument. - Page 5 1. Important Notes about this Manual Warning of hazardous electrical voltage! Danger of electric shock! Warning of optical radiation! Never look directly into the light beam! Wear safety goggles! Warning of electromagnetic field Warning of UV radiation! Wear safety goggles! Warning of hazardous laser radiation –...
-
Page 6: Function
Reasonably Foreseeable Misuse The entire system of which this User Manual is part is intended for research applications. The The following are prohibited: Leica microscope Mica is an inverted light mi- • To system purpose croscope and intended for use as a general lab... - Page 7 (eye injury in par- ticular). For use of the microscope with lasers, Leica Microsystems CMS GmbH offers special mi- croscope variants with additional safety fea- tures. Laser couplings require corresponding safety devices that have to be inspected and installed by trained personnel.
- Page 8 2. Function CAUTION If the hood to the specimen area is open and the UV LED (365nm) is switched on with maximum configured intensity, a distance between the eye and light outlet interface on the objective of <10cm may result in a hazard to the eye.
-
Page 9: Safety Notes
Caution! or repaired by persons other than authorized In order to maintain this condition and to en- Leica service representatives. sure safe operation, the user must follow the instructions and warnings contained in this User Manual. -
Page 10: Electrical Safety
90 % up to 30 °C, served! non-condensing Protection class: The system may be set up, installed and put Overvoltage category: into operation only by authorized Leica per- Pollution degree: sonnel! Caution! The microscope may be operated by autho- rized personnel only. - Page 11 For connections with- out a ground protection conductor, Leica Caution! Microsystems CMS GmbH Service must be Do not plug in or unplug data lines and con- consulted.
- Page 12 3. Safety Notes If the hood to the specimen area is open and WARNING the UV LED (365nm) is switched on with con- figured intensity, a distance between the eye Only use power cables, or alternative cables and light outlet interface on the objective of with VDE/HAR codes that minimally fulfill the <10cm may result in a hazard to the eye.
-
Page 13: Specifications Of The Lasers Installed In The Supply Unit
The user is not permitted to open the instru- The lasers used correspond to laser class 3B. ment! The overall MICA system meets the requirements The laser system is encapsulated. It may be of Laser Class 1. repaired or replaced by personnel authorized by Leica CMS only. - Page 14 Leica Microsystems CMS shall nosepiece must be closed using the supplied not assume any liability. covers. WARNING Never disconnect a fiber optic cable. Caution! Only persons authorized by Leica CMS are per- mitted to open the supply unit.
-
Page 15: Transport And Storage
In this case, hold the supply unit at its bottom. can damage the electrical and optical com- ponents. • Mica including antivibration table 190 kg Operating temperature: 15 – 35 °C. • Supply unit 40 kg... -
Page 16: Installation Location
4. Transport and Storage 4.3 Installation Location Work with the system should be performed in Caution! a dust-free room that is free of oil vapors, other Do not use this instrument near sources of chemical vapors and extreme humidity. At the high electromagnetic radiation (for example, workstation, large temperature fluctuations, di- unshielded, intentionally operated ultra-high... -
Page 17: Disposal
Do not cover the ventilation slots. Risk of overheating 4.4 Disposal Once the product has reached the end of its service life, please contact Leica Microsystems GmbH Service or Sales about disposal. Please observe and comply with the national and federal laws and regulations implementing the WEEE EC directive, for example. -
Page 18: Overview Of The Instrument
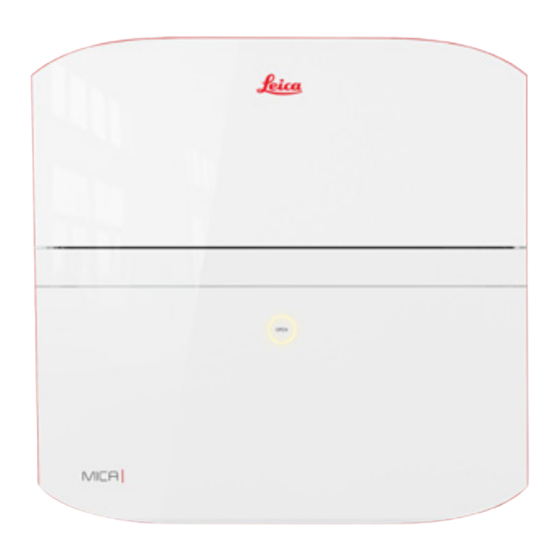
5. Overview of the Instrument 5. Overview of the Instrument 5.1 Mica Abb. 1 Overview of the Instrument Mica 1 Hood 2 Status indicator 3 SmartMove 5.1.1 Status LED Status of LED Status Instrument switched off White All components are initialized White 2 sec. - Page 19 5. Overview of the Instrument • Mica without antivibration table 100 kg • MICA including antivibration table 190 kg • Supply unit 40 kg...
-
Page 20: Supply Unit
5. Overview of the Instrument 5.2 Supply Unit 1. Power on/off: Press switch once to switch on. Press and hold for 3 seconds to switch off. Before you can switch on the instrument using 2. Interlock key: When the lasers are not needed, the Power on/off push button on the side, make the key can be switched off. -
Page 21: Incubator
5. Overview of the Instrument 5.3 Incubator 5.4 Auto Immersion Time for warm-up and CO supply approximately If you have removed the water cap and replaced 8 hours it, check the cap to make sure it fits correctly. If the cap is attached correctly, it clicks into place, is not tilted and the specimen protector is not jammed. -
Page 22: Antivibration Table
5. Overview of the Instrument 5.6 Antivibration Table The table has built-in antivibration properties. Do not lock the black baseplate, do not bridge it with other objects that could transmit vibrations and do not touch during imaging. Up to three bottles can be stored in the legs of the table. -
Page 23: Instrument Setup
When changing the configuration, installing that a gas spring is damaged, contact Leica updates, switching to a new PC etc., individual Service and stop using the instrument components have to be reconfigured and adjust- •... -
Page 24: Operation
Via the Help menu Click the Help menu on the menu bar. The menu Start the software by clicking the Mica symbol on drops down and reveals the following search-re- the desktop: lated options: LAS X symbol on the desktop Mica is ready to operate. -
Page 25: The User Interface
7. Operation 7.4 The User Interface A) Sample Definition: Entering information about the specimen B) Live & Acquire: Image acquisition After the software is started, the user interface of C) Results: View and management of the results the system is visible. It is structured into including analysis of the images using structure interface tabs, following the workflow, from left detection or classic image processing grouped... - Page 26 7. Operation A) Sample Definition Pressing the "Prefocus" key starts only the fo- cusing function of the Sample Finder and can be Each experiment begins with the "Sample Defi- used if (for example) the overview is not to be nition". The entries made here are necessary to generated.
- Page 27 7. Operation B) Live & Acquire The controls The "Live & Acquire" operating window is select- For easier navigation through the controls, the ed by pressing and is divided as follows: most important functions are on a Workflow line • The controls on the left (red, left edge from top to bottom) •...
- Page 28 7. Operation • Fluorescence Setting: Enables the fluores- cence axis. Individual fluorophores can be switched on or off by clicking in the middle. Likewise, the signal of individual fluorophores can be changed compared to the overall slid- er (Protection – Quality, see Intelligent Im- aging).
- Page 29 • Tools: Functions that are run once but do not Viewer participate in the experiment. These include: Mica allows you to choose whether to select the One-time running of the Autofocus or Smart- specimen in the Navigator or in the multichannel CORR software, Live Analysis and FluoSync viewer.
- Page 30 7. Operation C: Results / Automatic D) Process This area is structured into "Review" and "Anal- ysis". Review • In the left-hand area, select an image to be dis- played in the viewer. If the image has already been analyzed, the results are displayed on the right-hand side.
- Page 31 7. Operation D) Process E) Learn Within the Process tab, you have access to various image processing tools, such as Crop or Merge. • You can adjust the contrast, brightness and gamma using "Adjust". • Within "Noise Reduction", tools such as Medi- an Filter or "Blur"...
- Page 32 7. Operation E) Learn Enables you to train the machine learning feature and is subdivided into the following areas: • Create/Choose Model: Create a new model or open an existing one to add more training ma- terial. • Annotation Tools: The image processing tools for drawing in examples for the classes con- figured above •...
-
Page 33: First Experiment
8. Care 7.5 First Experiment 1st step: Filling out the "Sample Definition" • Assign a project and a specimen name. • Enter the specimen holder concerned. • Enter the properties of your specimen. • Specify all fluorophores present in the speci- men. -
Page 34: Care
8. Care 8. Care 8.2. Cleaning WARNING Caution: Unplug the power plug before performing cleaning and maintenance work! Residual fiber and dust can create unwanted Protect electrical components from moisture! background fluorescence during fluorescence microscopy. Instruments in warm and warm-damp climatic Cleaning Coated Parts zones require special care in order to prevent fungus contamination. -
Page 35: Eu-Declaration Of Conformity
Download: http://www.leica-microsystems.com Search for your instrument here. If you have any further questions or require technical support, please contact your country's Leica branch office or your local contact person directly. The appropriate contacts can be found on the Internet at:... - Page 36 有害物质标记表 Hazardous Substance Marking Table 有害物质 Hazardous Substances 部件名称 Part Name 多溴联苯 多溴二苯醚 铅 汞 镉 六价铬 (Pb) (Hg) (Cd) (Cr(VI)) (PBB) (PBDE) 印刷电路板 ⃝ ⃝ ⃝ ⃝ ⃝ × Printed circuit boards 电子元器件 ⃝ ⃝ ⃝ ⃝ ⃝ × Electronic components 机械部件...
- Page 38 Copyright © Leica Microsystems CMS GmbH · Ernst-Leitz-Strasse · 35578 Wetzlar · Germany 2021 Phone +49-6441-29-0 · Fax +49-6441-29-2599 LEICA and the Leica logos are registered trademarks of Leica IR GmbH. Order nos. of the editions in: English/German/French XXX XXX · Printed on chlorine-free bleached paper.
Need help?
Do you have a question about the MICA and is the answer not in the manual?
Questions and answers