Akuvox X915 Series Quick Manual
Hide thumbs
Also See for X915 Series:
- Administrator's manual (145 pages) ,
- Installation manual (16 pages) ,
- Quick installation manual (8 pages)
Advertisement
Quick Links
Unpacking
Before you being using the device, please check the version you obtained and ensure that the following items are included in the
shipped box:
Mainframe Accessories :
X915 x 1
Rubber Plug(Large)x2
Torx Wrench x 1
2 x 6 PIN Terminal Blockx 1
Diode x 3
Flush-mounting Accessories (Please find in In-Wall Installation Kit box):
Flush-mounting box x 1
Wall-mounting Accessories (Please find in On-Wall Installation Kit box):
Wall-mounting box x 1
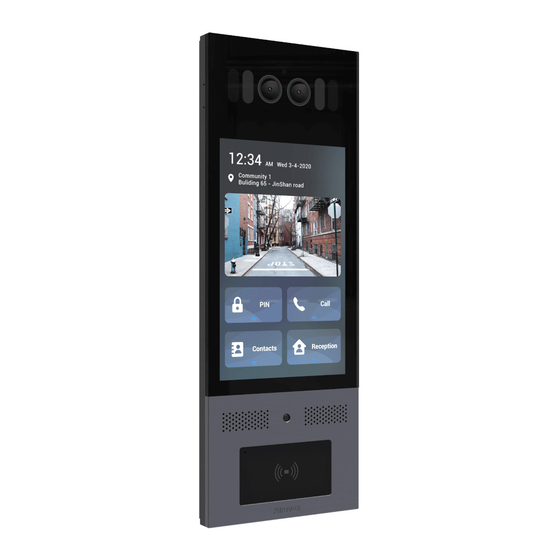
Product Overview
Rubber Plug(Small)x 2
Silicon Rubber Sealing Ring x 1
Card Reader Touch Plate x 1
2 x 5 PIN Terminal Blockx 1
ST4 x 35 screw x 4
M4 x 30 Screw x 2
Face-liveness detection camera
Infrared LED
White light LED
MIC
Rubber Plug(Medium)x 2
M3x4 Screw x 6
Plate Removal Key x 1
2 PIN Terminal Block x 1
Plastic Wall Anchor x 4
ST4 x 20 screw x 4
Main camera
Infrared LED
White light LED
MIC
Touch screen
IR sensor
Loudspeaker
Card reader
X915X
X915X
Back Cover x 1
Torx Screw x 2
Rope x 1
Pry barx 1
Plastic Wall Anchor x 4
Advertisement

Related Manuals for Akuvox X915 Series


Summary of Contents for Akuvox X915 Series
- Page 1 X915X Unpacking Before you being using the device, please check the version you obtained and ensure that the following items are included in the shipped box: Mainframe Accessories : X915 x 1 Rubber Plug(Small)x 2 Rubber Plug(Medium)x 2 Back Cover x 1 Rubber Plug(Large)x2 M3x4 Screw x 6 Torx Screw x 2...
- Page 2 X915X Installation Environment Indoor and outdoor installation are supported. If installing the device outdoors, please do not place device under direct sunlight. If installing the device indoors, please keep device at least 2 meters away from light, and at least 3 meters away from window and door . Backlight Direct sunlight Indirect sunlight...
- Page 3 X915X 2. Flush-Mounting Cut out a square hole Insert the flush-mounting box in to Break off the round knock-out Make sure that the flush-mounting with the dimension the hole and mark the the wiring holes and lead the wires box are well tightened and its upper (height*width*depth positions of the four holes of the through the corresponding hole in...
- Page 4 Information contained in this document is believed to be accurate and reliable at the time of printing. This document is subject to change without notice, any update to this document can be viewed on Akuvox’ s website: http://www.akuvox.com © Copyright 2020 Akuvox Ltd. All rights reserved.
Need help?
Do you have a question about the X915 Series and is the answer not in the manual?
Questions and answers