inVENTer iV-Compact Installation Instructions Manual
Ventilation device with heat recovery
Hide thumbs
Also See for iV-Compact:
- Installation and operating instructions manual (25 pages) ,
- Maintenance manual (2 pages) ,
- Manual (2 pages)

Related Manuals for inVENTer iV-Compact


Summary of Contents for inVENTer iV-Compact
- Page 1 Installation instructions iV-Compact Ventilation device with heat recovery www.inventer.de...
-
Page 2: Table Of Contents
Safety instructions ......................5 The copyright to this document remains with the manufacturer. System overview: iV-Compact ventilation device ..............8 Rights to all content and images: © inVENTer GmbH 2022. Construction ........................9 Function ......................... 10 All trademarks used in this document are the property of their respective manufacturers and are Control elements ...................... -
Page 3: User And Safety Instructions
User and safety instructions Safety instructions The installation instructions are part of your iV-Compact ventilation device and must be available Thank you for purchasing this high-quality product from inVENTer! at all times (see www.inventer.de/downloads). When handing the system to a third party, the infor- mation regarding access to the installation instructions must be handed over also. - Page 4 For the fan BUS, use a cable cross-section of at least 0.75 mm² (stranded wire). Use wire ferrules with collars to connect the strands. iV-Compact ventilation device | Installation instructions iV-Compact ventilation device | Installation instructions...
-
Page 5: System Overview: Iv-Compact Ventilation Device
The operating instructions for the controller are not part of this documentation. Pollen and activated charcoal filter options available In connection with the inVENTer Connect controller platform, it is mandatory to use the Connect inner cover. iV-Compact ventilation device | Installation instructions... -
Page 6: Function
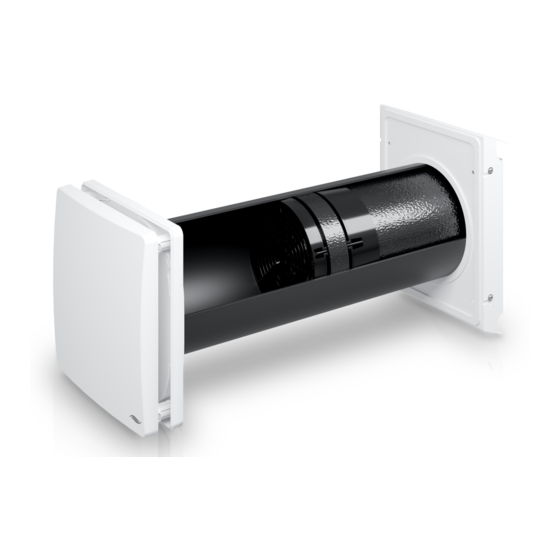
SYSTEM OVERVIEW: IV-COMPACT VENTILATION DEVICE Function iV-Compact ventilation device The iV-Compact ventilation devices are used to provide ventilation for living rooms and bedrooms. Decentralised ventilation They were specially developed for the requirement of very thin walls. An integrated ceramic ther- mal accumulator ensures optimum heat recovery. -
Page 7: Control Elements
SYSTEM OVERVIEW: IV-COMPACT VENTILATION DEVICE SYSTEM OVERVIEW: IV-COMPACT VENTILATION DEVICE Control elements Multi-zone control The ventilation device is operated via an inVENTer system controller. Depending on the controller, different operating modes and functions can be set. Designation MZ-Home inVENTer Connect... -
Page 8: Preparing For Installation
NOTICE: Malfunction due to incorrect positioning of the ventilation device. • Note insulation thickness and possibly shutters! Figure 2: Dimensional drawing of the iV-Compact wall opening (exterior view) 1,2 m • Do not install near radiators! • Observe minimum distance of 1.2 m to adjacent air openings! 1 Wall opening (Fig. -
Page 9: Sectional Drawings Of The Ventilation Device
Compact XL version ≥ 140 ≥ 90 Figure 3: Sectional drawing of the iV-Compact ventilation device with Compact weather protection hood Figure 4: Sectional drawing of iV-Compact ventilation device with Compact XL weather protection hood A Interior plaster/ interior structure... -
Page 10: Dimensional Drawings Of Components
2 Thermal accumulator bracket min. 50 mm deep (4 x) 3 Cover fixing boreholes (4x) 6 Fixing screws for guides (4x) 4 Bottom drip edge 7 Protective grid iV-Compact ventilation device | Installation instructions iV-Compact ventilation device | Installation instructions... -
Page 11: Installation And Assembly
4 a: Inner cover base plate 4 b: Inner cover panel 4 c: ISO coarse 60 % dust filter 4 d: Inner cover fixing material WPH = Weather protection hood iV-Compact ventilation device | Installation instructions iV-Compact ventilation device | Installation instructions... -
Page 12: Laying The Cables To The Wall Opening Of The Ventilation Device
House distributor [otherwise radio]) Operating unit: Control unit: Control unit: Easy Connect e16 Connect inner cover Connect inner cover Ventilation device n Ventilation device 1 iV-Compact ventilation device | Installation instructions iV-Compact ventilation device | Installation instructions... -
Page 13: Installing The Wall Sleeve
• Before foaming the free space between the wall sleeve and masonry, insert Styrofoam discs. ► Insert the Styrofoam discs into the wall sleeve from the inside and outside. iV-Compact ventilation device | Installation instructions iV-Compact ventilation device | Installation instructions... -
Page 14: Installing The Weather Protection Hood's External Termination
(blue arrows) on both sides of the weather protection hood base plate. Do not damage the connection cables on the inside wall. The wall sleeve is installed. iV-Compact ventilation device | Installation instructions iV-Compact ventilation device | Installation instructions... - Page 15 These are not included in the scope of supply, they are available as an option. iV-Compact ventilation device | Installation instructions iV-Compact ventilation device | Installation instructions...
-
Page 16: Inserting The Thermal Accumulator Insert
Electrical connection of the reversible fan NOTICE The function of the iV-Compact ventilation system requires the simultaneous operation of two Do not store/stack the thermal accumulator insert outside the wall sleeve iV-Compact ventilation device in push-pull mode. This chapter therefore describes the connection as doing so will damage the thermal accumulator's ceramic. -
Page 17: Check The Function Of The Reversible Fan
2 Plug-in connector on the fan cable connector 3 Plug-in connector on the controller cable 6 Clamping screws on the fan plug-in connector 4 Fan BUS [to controller] iV-Compact ventilation device | Installation instructions iV-Compact ventilation device | Installation instructions... -
Page 18: Installing The Inner Cover
The position arrows on the back of the inner cover panel point upwards. ► Drill the four holes with Ø 6 mm, min. 40 mm deep. Check: The inVENTer logo is located at the ø = 6 mm bottom right. -
Page 19: Technical Data
Wall thickness (incl. plaster) [mm] > 90 Wall opening [mm] Diameter 180 Wall sleeve Diameter 160 Conformity ENERGIA · ЕНЕРГИЯ · ΕΝΕΡΓΕΙΑ · ENERGIJA · ENERGY · ENERGIE · ENERGI 2016 1254/2014 iV-Compact ventilation device | Installation instructions iV-Compact ventilation device | Installation instructions... -
Page 20: Specifications According To Erp Directive, Regulation 1254/2014
Specifications according to ErP Directive, Regulation 1254/2014 iV-Compact ventilation device, demand-controlled: iV-Compact ventilation device, manually controlled: iV-Compact product data sheet according to EU Ordinance 1254/2014 iV-Compact product data sheet according to EU Ordinance 1254/2014 dated 11 July 2014 dated 11 July 2014... -
Page 21: Scope Of Supply
Connect controller platform and replaces the Flair or Undercover manual inner cover. The controller is operating Select heat recovery mode on the in unidirectional ventilation controller. mode. iV-Compact ventilation device | Installation instructions iV-Compact ventilation device | Installation instructions... -
Page 22: Guarantee And Warranty
Please contact the distributor for your country. Warranty: inVENTer GmbH provides a five-year warranty for all electrical components and the wall sleeve, as well as a 30-year warranty on the ceramic component of the thermal accumulator. This covers premature product wear. - Page 23 GmbH Ortsstraße 4a 07751 Löberschütz Germany www.inventer.de Subject to modifications. No liability for printing errors. Item number: 5006-0002 Version: 2.0 – 10/2022...
Need help?
Do you have a question about the iV-Compact and is the answer not in the manual?
Questions and answers