
Related Manuals for Emerson Rosemount ET310C


Summary of Contents for Emerson Rosemount ET310C
- Page 1 Quick Start Guide MS-00825-0100-4224, Rev AA September 2022 Rosemount Wireless Permasense ™ ET310C Corrosion Transmitter...
- Page 2 This could be intentional or unintentional and needs to be protected against. Physical security is an important part of any security program and fundamental to protecting your system. Restrict physical access by unauthorized personnel to protect end users’ assets. This is true for all systems used within the facility. Emerson.com/Rosemount...
-
Page 3: Table Of Contents
September 2022 Quick Start Guide Contents Product overview......................... 5 Wireless considerations........................8 Physical installation........................9 Commissioning the sensor......................14 Maintenance..........................18 Product certification........................19 Quick Start Guide... - Page 4 Quick Start Guide September 2022 Emerson.com/Rosemount...
-
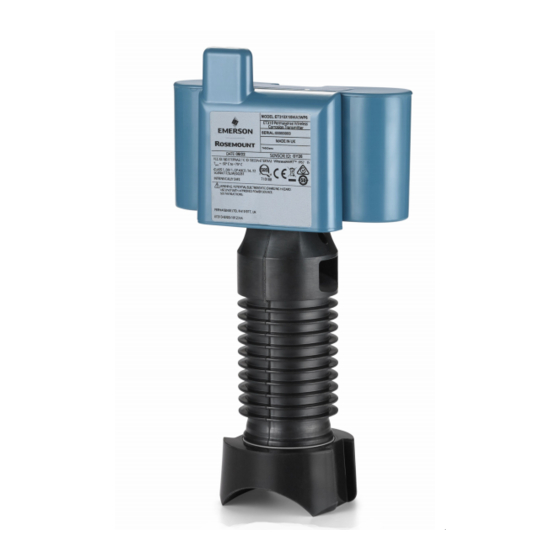
Page 5: Product Overview
September 2022 Quick Start Guide Product overview Figure 1-1: E310C Sensor A. Antenna B. Power Module C. Head D. Lanyard Hole E. Strap Slot F. Foot G. Shoe Quick Start Guide... - Page 6 3.3 ft (1 m) strap for pipes up to 8 in diameter • BP20E power module • A silicone rubber shoe for installations on pipes size NPS 2 or 3 • A silicone rubber shoe for installations on pipes size 4 in to 8 in Emerson.com/Rosemount...
- Page 7 September 2022 Quick Start Guide Required equipment In order to install a sensor, you need the following equipment from an IK220 installation kit: • Tablet PC with installation application software • CC21 interface CAUTION The tablet PC is not intrinsically safe A site specific permit may be required for its use.
-
Page 8: Wireless Considerations
Wireless considerations Power up sequence The Emerson Wireless Gateway should be installed and functioning properly before commissioning the Rosemount ET310C and powering it with a BP20E power module. Note Wireless devices should be powered up in order of proximity from the Gateway, beginning with the closest device, then working outward from the Gateway. -
Page 9: Physical Installation
September 2022 Quick Start Guide Physical installation The sensor is mounted onto the pipe in the location of desired measurement. Preparation Procedure 1. Identify the location where the sensor is to be installed. 2. Ensure all cladding and insulation is removed around the circumference of the pipe at the sensor location. - Page 10 2. Remove the protective cap from the sensor. CAUTION Once the protective cap is removed, the strong magnetic field at the end of the sensor can suddenly attract other objects, such as tools. Figure 3-1: Sensor with Protective Cap Emerson.com/Rosemount...
- Page 11 September 2022 Quick Start Guide CAUTION This can cause injury as well as damage to the sensor. Only remove the protective cap when necessary and then take great care. Ensure tools and fastenings are kept away from the sensor when the cap is removed. 3.
- Page 12 When it is not possible to wrap the lanyard around a pipe, find an alternative attachment point for the lanyard. 9. Thread the bare end of the wire through the loop in the lanyard to secure it to the pipe. Emerson.com/Rosemount...
- Page 13 September 2022 Quick Start Guide 10. Feed the bare end of the lanyard into the gripple and push the gripple 6 in (15 cm) up from the bare end. Need help? The lanyard wire can be released from the cable lock using the release key.
-
Page 14: Commissioning The Sensor
C. USB cable D. Rosemount Wireless Permasense Sensor 2. Double-click the Permasense installation application desktop icon. Within approximately 10 seconds, the Permasense installation tool software should open. 3. Attach the CC21 to the sensor. 4. In the installation application software: Emerson.com/Rosemount... - Page 15 September 2022 Quick Start Guide a) Verify that the sensor ID is displayed at the top of the screen within 10 seconds. b) Select the Provision tab. c) Enter the 5-digit network ID and the 32-hexadecimal (numbers 0-9 and letters A -F) join key. d) Click the Provision button.
- Page 16 Overtightening the strap will deform the shoe and could damage the sensor. 5. Wait for a new waveform to display and check the ultrasonic waveform quality is still good after tightening the strap 6. Cut off any unnecessary strap. Emerson.com/Rosemount...
- Page 17 September 2022 Quick Start Guide 7. Press the Complete button. Verify that the Install State is Off and Installed is ticked in the footer on the right side of the application. Figure 4-3: Installation Tool Screen: Fully Provisioned 8. Remove the CC21 and fit the power module, tightening the two power module retaining bolts.
-
Page 18: Maintenance
Quick Start Guide September 2022 Maintenance Service and maintenance The sensor is a sealed unit with no user-serviceable parts. Reference the Rosemount BP20E Power Module for Wireless Corrosion Transmitter Quick Start Guide if the power module requires changing. Emerson.com/Rosemount... -
Page 19: Product Certification
All wireless devices require certification to ensure that they adhere to regulations regarding the use of the RF spectrum. Nearly every country requires this type of product certification. Emerson is working with governmental agencies around the world to supply fully compliant products and remove the risk of violating country directives or laws governing wireless device usage. - Page 20 CLASS I, DIV 1, GP ABCD, T4…T2, Tamb = –50 °C to +75 °C, IP67 Canada 6.8.1 I6 Canada Intrinsically Safe (IS) Certificate: SGSNA/17/SUW/00281 Standards: CAN/CSA C22.2 No. 157-92 (R2012) +Upd1 +Upd2 Markings: CLASS I, DIV 1, GP ABCD, T4…T2, Tamb = –50 °C to +75 °C, IP67 Emerson.com/Rosemount...
- Page 21 September 2022 Quick Start Guide Europe 6.9.1 I1 ATEX Intrinsic Safety Certificate: Baseefa17ATEX062X Standards: EN IEC 60079-0:2018 EN 60079-11: 2012 Markings: II 1 G, Ex ia IIC T4…T2 Ga, Tamb = –50 °C to +75 °C, IP67 Special Condition for Safe Use (X): 1.
- Page 22 6.13.1 I2 INMETRO Intrinsic Safety (IS) Certificate UL-BR 21.1297X Standards ABNT NBR IEC 60079-0:2020 ABNT NBR IEC 60079-11:2013 Markings Ex ia IIC T4...T2 Ga (-50 °C ≤ Tamb ≤ +75 °C) Special Conditions for Safe Use(X) See certificate for special conditions of safe use. Emerson.com/Rosemount...
- Page 23 September 2022 Quick Start Guide 6.14 EU Declaration of Conformity Figure 6-1: Declaration of Conformity Quick Start Guide...
- Page 24 Quick Start Guide September 2022 6.15 China RoHS Emerson.com/Rosemount...
- Page 25 September 2022 Quick Start Guide Quick Start Guide...
- Page 26 Quick Start Guide September 2022 Emerson.com/Rosemount...
- Page 27 September 2022 Quick Start Guide Quick Start Guide...
- Page 28 Emerson.com Emerson.com © 2022 Emerson. All rights reserved. Emerson Terms and Conditions of Sale are available upon request. The Emerson logo is a trademark and service mark of Emerson Electric Co. Rosemount is a mark of one of the Emerson family of companies.
Need help?
Do you have a question about the Rosemount ET310C and is the answer not in the manual?
Questions and answers