Table of Contents
Advertisement
Quick Links
Alarm.com Flex IO™ sensor (ADC-FLEX-100) - Installation Guide
Overview
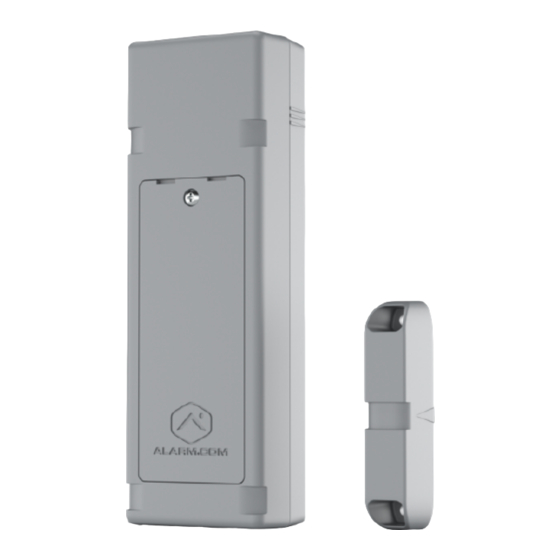
The Alarm.com Flex IO™ sensor enables new levels of flexibility for monitoring valuable property and assets anywhere
that LTE connectivity is available. Whether used with a backyard gate or a remote storage unit, the Alarm.com Flex IO™
sensor empowers users to keep an eye on what matters most. It can be used with the included magnet to monitor doors,
gates, and other entryways. It also comes equipped with input and output options for integrating compatible devices that
lack long-range connectivity.
Important: The Alarm.com Flex IO™ sensor is a monitoring device that is not intended for life safety use cases.
For a video guide about installing the Alarm.com Flex IO™ sensor, see
Alarm.com Flex IO™ sensor - Installation
Videos.
Installation for each supported use case
This article contains general information about installing the Alarm.com Flex IO™ sensor. For more information about
installation depending on how the Alarm.com Flex IO™ sensor will be used, see the specific use case installation guide.
https://answers.alarm.com/Partner/Installation_and_Troubleshooting/Cellular_Sensors/Alarm.com_Flex_IO%E2%84%A2_sen...
Updated: Mon, 10 Oct 2022 23:21:36 GMT
1
Advertisement
Table of Contents

Related Manuals for Alarm.Com Knowledge Base Flex IO ADC-FLEX-100


Summary of Contents for Alarm.Com Knowledge Base Flex IO ADC-FLEX-100
- Page 1 The Alarm.com Flex IO™ sensor enables new levels of flexibility for monitoring valuable property and assets anywhere that LTE connectivity is available. Whether used with a backyard gate or a remote storage unit, the Alarm.com Flex IO™ sensor empowers users to keep an eye on what matters most. It can be used with the included magnet to monitor doors, gates, and other entryways.
- Page 2 Alarm.com Flex IO™ sensor - the connected gate controller. Mighty Mule MM371W Installation Guide For more information about use cases, see Alarm.com Flex IO™ sensor - Supported Use Cases. Expand all Equipment In the box: • Alarm.com Flex IO™ sensor •...
-
Page 3: Step 1: Determine Location
• Phillips head screwdriver • Zip ties (up to 3 recommended: 2 for the Alarm.com Flex IO™ sensor and 1 for magnet) • #8 Phillips screws (4x) • Paper clip (to press the sensor's diagnostic button; see Cellular signal strength) Loop input tools and supplies (if required, not included): •... - Page 4 • DC power requirements • Cellular signal strength Contact (reed switch) position Like a standard door/window contact, the Alarm.com Flex IO™ sensor can be installed with the accompanying magnet to detect activity at potential entryways. To determine your installation orientation, consider the following: •...
-
Page 5: Mounting Options
• Using zip ties: Use cutouts at the top and bottom of the device to make sure the Alarm.com Flex IO™ sensor is mounted flush to the install surface. Important: A mounting tamper is located on the back of the Alarm.com Flex IO™... -
Page 6: Input Wiring
Alarm.com Flex IO™ sensor - Wired Contact (Loop Input) Installation Guide. DC Power Requirements In addition to battery power, the Alarm.com Flex IO™ sensor can be powered with a DC converter. DC power is optional for reed switch or input installations. • Anything from 6-15VDC is acceptable. -
Page 7: Cellular Signal Strength
1. Using a screwdriver, remove the battery door and temporarily insert batteries. Leave the battery cover off. The device LED should now be active. 2. Hold the Alarm.com Flex IO™ sensor in the desired installation location. 3. Using a paper clip, push the diagnostic button for 5 seconds, then release. - Page 8 8. Enter the Device IMEI number and follow the on-screen instructions to set up the device. Note: Want to add an Alarm.com Flex IO™ sensor to an account without a Security System? Use the Partner Portal or MobileTech to Create New Customer. For the Account Type, select Standalone (Video and/or Cellular Sensor).
- Page 9 Step 3: Mount the Alarm.com Flex IO™ sensor Important: If wiring any devices into the screw terminals, it is recommended to do so before mounting the Alarm.com Flex IO™ sensor. https://answers.alarm.com/Partner/Installation_and_Troubleshooting/Cellular_Sensors/Alarm.com_Flex_IO%E2%84%A2_sen… Updated: Mon, 10 Oct 2022 23:21:36 GMT...
-
Page 10: Using Screws
The Alarm.com Flex IO™ sensor can be mounted using either screws or zip ties. Using screws • Screw mounting holes are located in the battery compartment. To avoid damaging the batteries, it is recommended to remove them before installing screws. -
Page 11: Step 4: Insert The Batteries
Mounting tamper A mounting tamper is located on the back of the Alarm.com Flex IO™ sensor. This tamper button must be fully pressed (until you hear a clicking sound) to avoid reporting a mounting tamper malfunction, as indicated by an alternating single Red and Yellow LED pattern. -
Page 12: Post-Installation Checklist
Troubleshooting. Post-Installation Checklist • The Alarm.com Flex IO™ sensor is installed flush to the mounting surface. If the mounting tamper is enabled, the tamper button on the back of the device should be pressed in. • LED is not blinking. -
Page 13: Regulatory Information
• 2+ years of battery life, depending on battery chemistry and operating temperature. Regulatory Information Important: The Alarm.com Flex IO™ sensor is a monitoring device that is not intended for life safety use cases. https://answers.alarm.com/Partner/Installation_and_Troubleshooting/Cellular_Sensors/Alarm.com_Flex_IO%E2%84%A2_sen… Updated: Mon, 10 Oct 2022 23:21:36 GMT... -
Page 14: Contact Information
2. L'utilisateur de l'appareil doit accepter tout brouillage radioélectrique subi, même si le brouillage est susceptible d'en compromettre le fonctionnement. Contact Information If you are experiencing difficulties with an Alarm.com Flex IO™ sensor installation, contact Alarm.com Technical Support at 866-834-0470 and we’ll be happy to assist you further. https://answers.alarm.com/Partner/Installation_and_Troubleshooting/Cellular_Sensors/Alarm.com_Flex_IO%E2%84%A2_sen…...
Need help?
Do you have a question about the Knowledge Base Flex IO ADC-FLEX-100 and is the answer not in the manual?
Questions and answers