Table of Contents
Advertisement
Quick Links
Advertisement
Table of Contents

Related Manuals for Showven FXcommander


Summary of Contents for Showven FXcommander
- Page 1 USER MANUAL FXcommander V1.0 2022/06/06 Showven Technologies Co., Ltd.
-
Page 2: Table Of Contents
CONTENT Product Description ................2 Features ..................... 2 Technical Specifications ..............3 Safety Considerations ..............3 Structure ................... 4 1.Operation Area ................4 2.Rear Panel ..................5 3.Main Interface ................5 Super DMX ..................6 Add Device ..................7 Super DMX Edit Example ............. 8 Example 1: Edit a scene .............. -
Page 3: Product Description
FX operators edit a show in a few minutes, everything in the system are intuitively designed, no lighting console operation background needed. Large scales shows with special effects and fireworks can be sync with music precisely through our professional windows software FXcommander _Editor. The FXcommander is setting the safety standard for the special effects control. -
Page 4: Technical Specifications
Safety Considerations Δ Necessary precautions should be taken when using FX products to ensure the safety of the operator, crew, and audience. Do not operate FXcommander , or any special effects product without proper knowledge and training. Install the FXcommander on a firm and level surface. -
Page 5: Structure
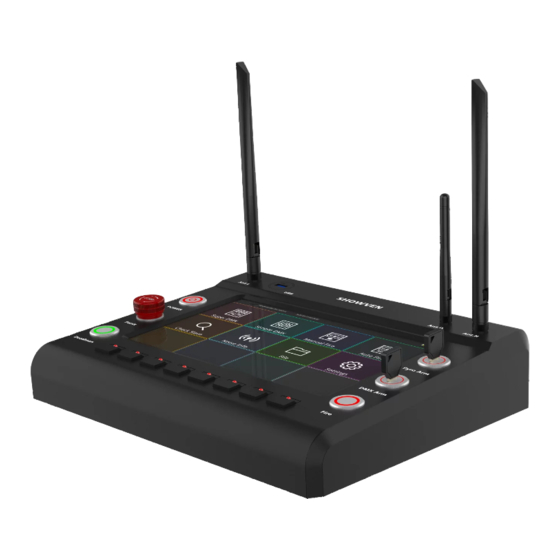
Structure Δ 1. Operation Area Ant.L: 433M Low Frequency Antenna for Pyro Signal. USB: USB Port. Ant.D: 2.4G DMX Antenna. Ant.H: 868M High Frequency Antenna for Pyro Signal. Pyro Arm. DMX Arm. Fire. Power: Power switch. Panic: Emergency Stop. Deadman: anchor before firing. KEY1-KEY8: CUE Firing and Stop, lights on when firing. -
Page 6: Rear Panel
Super DMX: DMX device programming, capable of programming complex effects. Simple DMX: Equal to a simple DMX console, 128 channels DMX value output. Manual Fire: Pyro manual programming and firing. Auto Fire: Cooperate with FXcommander _Editor to realize effects synchronization with music. Support both DMX and Pyro. -
Page 7: Super Dmx
SCENE0, SCENE1, SCENE2, SCENE3: different scene may use different device and CUE, according to different performance scene requirements operator can switch easily. Check: Check Temp. Pressure etc parameters of SHOWVEN device on FXcommander Select Even, Select Odd, Select Same, Clear Select: Select or Clear select of device, only for the same category device. -
Page 8: Add Device
Add Device Δ "Add Device" interface Region 1 ® ® LIB_SHOWVEN: Library file of SHOWVEN device, it can be download from SHOWVEN website. Not support edit. LIB_USER: User defined device library. -
Page 9: Super Dmx Edit Example
Press "Add" to add the edit device to Device List, if successful it will show "Added successfully". Super DMX Edit Example Δ Example 1: Edit a scene with SHOWVEN device ® ® Programming a show with 4 units of SHOWVEN... - Page 10 Press “SUPER DMX”, Select "SCENE0"; Press "Add Device" to enter add device interface as shown below; ® Press LIB_SHOWVEN ® Select “SPARKULAR ”; Set the start DMX address for the device; Set the device quantity;...
- Page 11 Press "Add", will shown "Added successfully!" on top of screen; Click "Back" to super DMX interface; Select the position where you want to put the Cue in Cue list table; Select the preset firing rule " "; Select the devices in "Device List"; Set the parameters at “CUE setting”, For example, the setting in above picture is effect of “Height 10”, firing duration “2s”, trigger delay is 3s, repeat period is 15s, repeat counts 2 times, CUE group repeat counts is 1;...
- Page 12 ® Now a whole Cue is ready as show in above picture. “Sparkular ” is the device name; "1.Height 10" is effect; "1-4/Y/" means device 1-4 are all in the Cue (if there are device which is not selected in the Cue, it will show “N” instead of “Y”; " " is firing rules (from left to right).
- Page 13 Press and hold key1 enter personalize interface; Select “Picture” or “Character”, here we select “Character”; ® Enter “SPARKULAR ” in the textbox; Select font color; Set font size; Click “OK” to save the change and exit the interface;...
- Page 14 Set the personalize icon “Clear” as show in about picture; After those setting, please switch the “DMX Arm” to ON status, press Key1 keypad on ® FXcommander panel, 4 units of SPARKULAR will firing from left to right; when press Key8 ®...
- Page 15 Check the machine status on FXcommander Click “Check” enter the device status monitoring interface; Switch the “DMX Arm” to ON status, “DMX ARMED” will display on top of screen; As we can see from above picture, the device in device list turn into blue background.
-
Page 16: Example 2: Edit Flamer Cue Group
Example 2: Edit flamer Cue group Press “SUPER DMX”, Select "SCENE0"; and press "Add Device" to enter add device interface as shown below; ® Select LIB_SHOWVEN ® Select the device CIRCLE FLAMER X-F1800 6CH; Set the start DMX address (can’t overlap with the address which have occupied in previous settings). - Page 17 Select the position where you want to put the Cue in Cue list table; ® Select CIRCLE FLAMER , can only select the same category device at the same time; ® Set up parameters in “CUE Setting”, click “OK” to save the setting. For CIRCLE FLAMER step sequence or wave sequence the effect duration is fixed, when set the duration please just input 1s;...
- Page 18 Operator can edit “effect” of each device here; Click “OK” to exit;...
- Page 19 Select another vacant Cue position. Only the upper row already set Cue can operator select the vacant Cue position in lower row; Select device; We can set the same effect for all selected device here. For example “BIG Wave 1-15", after finish all parameter setting, click “OK”...
- Page 20 Press and hold “key2” enter personalize interface; Select “Picture” or “Character”, here we select “Picture”; Click “Draw” can draw whatever operator’s like, the colors can also change; Click “Back ground” can change the colors of the background; Click “OK” to save the change and exit the interface; Select the scene you need, click “more”...
-
Page 21: Running Cue Group
Arm” should stay at OFF status; It will show “DMX ARMED” on top of the screen after switch the “DMX Arm” on panel. Then operator can firing the Cue; ® Tap “key1” keypad on FXcommander panel will firing the “SPARKULAR ” Cue group; ®... -
Page 22: User Lib Device And Effect Adding
User Lib Device and Effect Adding Δ Example 3: Create a device First get the DMX channel information of the device you want to create in User_Lib. For example here we want to create a flamer with 2 channels. Click “LIB_USER”. Click “Create”... - Page 23 Input Product Name; Input Manufacturer; Set safety channel and related DMX value; Select the effect you want to edit; Modify the effect name if needed;...
-
Page 24: Example 4: Create A Device With Independent Safety Channel
Set DMX value according to DMX control information of the device. For safety channel, please not change the default value “0” ; Click “Save” to save the setting; NOTE: The duration at Edit Effect, if it is the effect with fixed firing time then set the exact duration, if it is random then set it to 0.00. - Page 25 Input Product Name; Input Manufacturer; Select the effect you want to edit; Modify the effect name if needed; Set DMX value according to DMX control information of the device; Click “Save” to save the setting;...
- Page 26 Exit “Super DMX” menu, enter “Setting” menu, set “Global Channel”DMX address, for example we set 510 here; Set safety channel DMX value, here we set 128.
-
Page 27: Simple Dmx
128 DMX address. Slide the white block of each column will output the related DMX value of the corresponding DMX address. Press the keypad on FXcommander panel will output DMX value of 255, release the DMX value back to 0. -
Page 28: Manual Fire
Insert: Insert a cue in current position. Delete: Delete current selected Cue. Delete All: Delete all Cue file. Region 2: Cue list area. Up / Down: press the corresponding keypad on FXcommander panel will help to switch and select Cue. Cue: sequence No. of Cue. - Page 29 There are 16 ignition position on our slave. Below 3 setting example will help to understand the Address start, Address end, Point start and Point end. Example 1: Parameters Setting: Address start=0; Address end=2; Point start=4; Point end=5; Triggered firing position: include Slave 0 position 4 to F, Slave 1 position 0 to F, Slave 2 position 0 to 5.
-
Page 30: Edit Manual Fire File
Edit Manual Fire File Δ Enter manual fire interface as below. Select “SCENE0” Click “Add” to add Cue file. - Page 31 Set Start address; Set End address; Set Point Start; Set Point End; Set effect (firing running rules) ; Set interval time; Set Group. Cue 1, 2, 3 are set in the same group, so it will be triggered together; The setting CUE can be fired by switch ON “Pyro Arm”, hold “Deadman” then press “Fire”.
-
Page 32: Auto Fire
Auto Fire Δ Auto Fire interface and explanations. All music project file are programmed on WINDOWS software FXcommander _Editor, download to FXcommander via USB disc or USB download cable; A complete music project file consist of three files: DOT file (control the device); CSV file (display CUE list); WAVE file (play music). -
Page 34: Run Auto Fire
Run Auto Fire Δ Click “Reset” to reset the running time to start point. Select music project file. Select trigger source. Here we select “Manual”. Switch ON “DMX Arm” if there are DMX device. Switch ON “Pyro Arm” if there are PYRO device. Press and hold “Deadman”... - Page 35 Address range for igniter 00~FF. Check Slave interface Note: Keep “customer ID” of FXcommander and Slave in accordance with the signal channel. If there is no signal, please set in “settings” interface. Check the Slave igniter status need to switch ON “Pyro Arm”.
-
Page 36: Noise Info
Noise Info Δ Check interference of pyro wireless signal. The shorter the blue bar the weaker the signal interference, the better the signal. Noise Info Interface File Δ File menu interface. File interface... - Page 37 User device from other manufacturer. Note for downloading lib files: ® Lib file name prefix can only be "dev_ SHOWVEN " and "dev_ USER ", otherwise it can’t be recognized and downloaded. When there are multiple lib file with the same prefix are selected for download to FXcommmander , only the last file will be downloaded.
-
Page 38: Settings
Settings Δ Parameters setting interface. Settings interface Region 1: Settings for software appearance. Characters: modify color and size of font. (size range 10~18). Background1: modify the color of the background that can operate. Border: modify the frame color and rounding (rounding value range is 0~8, the large the value the rounder the frame). - Page 39 Wireless DMX id: set wireless DMX transmitter module ID, receiver ID should be same with transmitter module ID for functioning. There are all together 7 different ID. Wireless settings: pyro wireless module parameter setting to match with pyro slave. Channel: channel modify, there are four channels optional, ensure the same channel as pyro slave.
-
Page 40: Battery
Battery Δ FXcommander use 3 pcs flat end 18650 lithium battery at the bottom of device as below picture shows. Tips for battery: Please install battery in the right direction; After installing the battery, connect it to AC power supply to activate it;... -
Page 41: Warranty Instructions
(except for the instrument damage caused by human factors) in warranty period. Please don't repair machine without factory permission Below situations NOT included in warranty service: ® Damage caused by use other type of consumable which is not from SHOWVEN ® SHOWVEN authorized distributor. - Page 43 Showven Technologies Co., Ltd. Tel: +86-731-83833068 Web: www.showven.cn E-mail: info@showven.cn Add: No.1 Tengda Road, Liuyang Economic & Technical Development Zone, 410300, Changsha, Hunan, P.R.China...
Need help?
Do you have a question about the FXcommander and is the answer not in the manual?
Questions and answers