
Related Manuals for Munters Platinum Touch


Summary of Contents for Munters Platinum Touch
- Page 1 Platinum Touch User Manual /Rotem Platinum Touch/Rotem One Standard Mode Climate Controllers Ag/MIS/UmGb-2636-10/18 Rev 1.3 P/N: 117550...
- Page 2 Platinum Touch / Rotem One Standard Mode User Manual Revision: N.1.3 of 06.2021 Ag/MIS/UmGb-2636-10/18 Rev 1.1 (MIS) Product Software: 7.22 This manual for use and maintenance is an integral part of the apparatus together with the attached technical documentation. This document is destined for the user of the apparatus: it may not be reproduced in whole or in part, committed to computer memory as a file or delivered to third parties without the prior authorization of the assembler of the system.
-
Page 3: Table Of Contents
Index chapter page INTRODUCTION ------------------------------------------------------------------------------------------------------------------------------------------ 8 Disclaimer ---------------------------------------------------------------------------------------------------------------------------------------------------------------------------- Introduction ------------------------------------------------------------------------------------------------------------------------------------------------------------------------- Notes -------------------------------------------------------------------------------------------------------------------------------------------------------------------------------------- INTRODUCTION TO THE PLATINUM TOUCH ---------------------------------------------------------------------------------- 9 Main Screen ----------------------------------------------------------------------------------------------------------------------------------------------------------------------- Menu Elements -------------------------------------------------------------------------------------------------------------------------------------------------------------- Version -------------------------------------------------------------------------------------------------------------------------------------------------------------------------------- Selecting the Mode ----------------------------------------------------------------------------------------------------------------------------------------------------- CONTROL MENU ------------------------------------------------------------------------------------------------------------------------------------- 12 Temperature Curve ------------------------------------------------------------------------------------------------------------------------------------------------------ 3.1.1 Temperature Curve Help | Set Definitions ................. - Page 4 Scheduling the Flush ........................4.9.2 Flushing Order ..........................Nipple Flushing by Temperature 4.9.3 .................... 4.10 Water on Demand ------------------------------------------------------------------------------------------------------------------------------------------------------ 4.10.1 Relay Control ..........................4.10.2 Sensor Control ..........................4.10.3 Water on Demand Help | Set Definitions ................© Munters AB, 2018...
- Page 5 Time & Date --------------------------------------------------------------------------------------------------------------------------------------------------------------------- Variable Speed Fan Setting ----------------------------------------------------------------------------------------------------------------------------------- 6.5.1 1 1 1 B V ariable Speed Fan Help | Set Definitions ................ Relay Layout -------------------------------------------------------------------------------------------------------------------------------------------------------------------- 6.6.1 Output Function List ........................Sensors ------------------------------------------------------------------------------------------------------------------------------------------------------------------------------- 6.7.1 Analog Sensors ..........................© Munters AB, 2018...
- Page 6 Toggle Switches ......................... APPENDIX C: DEVICE SETUP SUMMARY---------------------------------------------------------------------------------------- 112 Stir Fans -------------------------------------------------------------------------------------------------------------------------------------------------------------------------- Attic Ventilation ---------------------------------------------------------------------------------------------------------------------------------------------------------- Heaters Control --------------------------------------------------------------------------------------------------------------------------------------------------------- APPENDIX D: KEYBOARD FUNCTIONS ------------------------------------------------------------------------------------------ 114 10.1 Service Menu -------------------------------------------------------------------------------------------------------------------------------------------------------------- 10.1.1 Temperature Calibration ......................10.1.2 Humidity Calibration ........................ © Munters AB, 2018...
- Page 7 ........................11.8.2 Bird Weight History ........................11.9 Breeder Advanced Feeding ------------------------------------------------------------------------------------------------------------------------------- 11.9.1 Selecting the Mode ........................11.9.2 Setup .............................. 11.9.3 Feed Scale Program Help | Set Definitions ..............11.10 Egg Room History ---------------------------------------------------------------------------------------------------------------------------------------------------- WARRANTY ----------------------------------------------------------------------------------------------------------------------------------------------- 151 © Munters AB, 2018...
-
Page 8: Introduction
The information contained herein has been prepared by qualified experts within Munters. While we believe the information is accurate and complete, we make no warranty or representation for any particular purposes. The information is offered in good faith and with the understanding that any use of the units or accessories in breach of the directions and warnings in this document is at the sole discretion and risk of the user. -
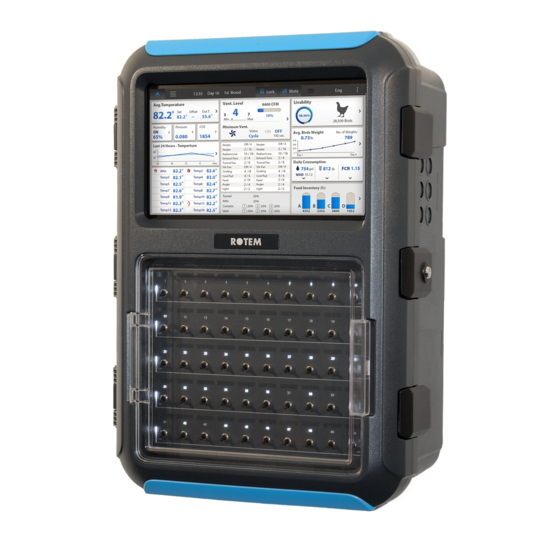
Page 9: Introduction To The Platinum Touch
Selecting the Mode • 2.1 Main Screen Figure 1 shows the Platinum Touch / Rotem One Main Screen. Figure 1: Platinum Touch / Rotem One Main Screen Temperature: Displays the average temperature, the set point the offset differential, and •... -
Page 10: Menu Elements
Displays the growth day Displays the house status (full house or brood mode) Click to turn off alarms. However, Platinum Touch / Rotem One continues to register alarms until alarms are reset. Click to read the latest controller error messages (see Alarms History, page 74). -
Page 11: Selecting The Mode
2.4 Selecting the Mode Platinum Touch / Rotem One runs in two modes: Broiler and Breeder. To select the mode: 1. Open the door. Locate the keyboard. 2. Disconnect the power cable from the power source. 3. On the keyboard, press the Delete button and reapply power. The Cold Start screen appears. -
Page 12: Control Menu
Static Pressure • Cool Pad • Foggers • Water & Feed • Light • Extra Systems • Control Mode • System Parameters • Ammonia Treatment • Feed Scale Program • Light Dimmers • Water Dosing • © Munters AB, 2018... -
Page 13: Temperature Curve
System > Sensors > Analog 1. In , designate the required number of sensors as temperature sensors. When using more than one sensor, Platinum Touch / Rotem One begins treatments based on the average. System > Temperature Definition 2. In , assign specific sensors to devices. -
Page 14: Temperature Curve Help | Set Definitions
Platinum Touch / Rotem One reminds you. When you press Enter to acknowledge the reminder, the Platinum Touch / Rotem One logs it in the Table of Events. NOTE '0' disables this parameter (if value is changed an appropriate message is displayed). - Page 15 When the temperature is above the Temp On temperature, the fans run continuously. • In Figure 2: Fans are off below 75° • Between 75° - 80° fans run: • o At minimum ventilation if the temperature is rising © Munters AB, 2018...
-
Page 16: 9 B S Etting Up Minimum Ventilation
Ramping means a temporary change in the minimum ventilation. Ramping operates in two manners: Ramping Enable: Set to No/Yes. • o Increase: When the temperature rises above [Set Temperature + Difference above Set], the minimum ventilation increases by the amount (percentage) set in Ventilation Change. © Munters AB, 2018... -
Page 17: Additional Details
Unlike the Min. Vent Timer, this cycle timer also operates above the set temperature. 3.4 Introduction to Humidity, Ammonia, and CO2 Treatment Platinum Touch / Rotem One provides various options to controlling the humidity, CO2, and ammonia levels. None: No treatment is provided. -
Page 18: Humidity Treatment
Humidity treatment enables keeping humidity levels within defined levels by controlling the air exchange. Platinum Touch / Rotem One uses a combination of vent openings and ventilation to maintain these levels. When the relative humidity rises above the defined levels, the fans' minimum on time increase by the levels defined in the table below. -
Page 19: Humidity Treatment Help | Set Definitions
Delay Before Treatment (Sec): Once the relative humidity rises about the permitted level, • Platinum Touch / Rotem One waits this amount of time before beginning treatment. Cycle Minimum OFF Time (sec): The minimum amount of time treatment ceases in each cycle. -
Page 20: Co2 Treatment Help | Set Definitions
In System > Setup, enable a static pressure unit. Refer to Static Pressure Calibration and Static Pressure. Static Pressure Method • Disabling the Static Pressure Sensor • Static Pressure Help | Set Definitions • © Munters AB, 2018... -
Page 21: Static Pressure Method
Low Pressure Alarm: Set alarm for low static pressure. If you disable it by setting zero, the Platinum Touch / Rotem One warns you and enters a record in the Table of Events. o High Pressure Alarm: Set alarm for high static pressure. -
Page 22: Disabling The Static Pressure Sensor
Reset the alarms one time to cease the display. 3.7.3 S TATIC RESSURE EFINITIONS Define: • o Wind Gust Delay Time (sec): Set length of time (seconds) before starting Static Pressure control after an unexpected change in air pressure. © Munters AB, 2018... -
Page 23: Cool Pad
Min Tunnel Curtain % to Start Fan: Set a value that serves as a minimum to begin fan operation in tunnel mode. o 2nd S.P. At This Fan Temp ON: When the defined fan turns on, Platinum Touch / Rotem One switches to the second static pressure parameter. - Page 24 On Temperature Difference: Set difference from tunnel temperature to use this setting. You can use negative differential temperatures. Note the settings for Day 14. Platinum Touch / Rotem One uses the maximum temperature differential that applies to choose the correct settings.
-
Page 25: Cool Pad (Ramping), Version 7.22 And Above
1. On the Keyboard, go to Control > Control Mode and enable Cooling Ramping. CONTROL MODE Growing Zone FULL HOUSE House Mode NORMAL Temperature Curve Minimum Vent Curve Tunnel ALLOWED Cooling Ramping 2. Go to System > Temp & Timer Setting. © Munters AB, 2018... - Page 26 6. Define the Set Definitions (options). 3.8.2.2 Cool Pad Help | Set Definitions Define: • o Enable Cooling From/To Time: Define the hours between which cooling pads can operate. Range: 00:00 – 23:59. Default: 00:00 (always enabled) © Munters AB, 2018...
-
Page 27: Foggers
On Temperature Difference: Set difference from tunnel temperature to use this setting. You can use negative differential temperatures. Note the settings for Day 14. Platinum Touch / Rotem One uses the maximum temperature differential that applies to choose the correct settings. -
Page 28: 0 7 B F Oggers Help | Set Definitions
1 0 8 B These parameters define the feed and water delivery schedule through the week. NOTE: The Water and Feed parameters work in conjunction with the Lighting parameters. Daily: Same schedule for every day of the week. • © Munters AB, 2018... - Page 29 Week: Select which days in the week that feed and water are delivered. • NOTE: If you choose Daily, the Scale function is always enabled. If you choose 2- 6 Days or Week, the Scale function is disabled on non-feeding days. © Munters AB, 2018...
-
Page 30: Light
2. In , define Feed by Cycle. Control > Light 3. In , define the parameters as required. 4. Select Light Feed. The Light parameters screen appears. These parameters configure the Light functions on feed days. © Munters AB, 2018... - Page 31 6. If the Feed by Cycle is set to 2- 6 Days, select Light No Feed. The Light parameters screen appears. These parameters configure the Light functions on non-feed days. 7. If required, click and set the parameters. © Munters AB, 2018...
-
Page 32: Light Help | Set Definitions
Light Sensor Active: The light sensor turns off all lights when sufficient outside lights exists. If a light sensor is installed, enable this option to turn off the light during feeding time when there is sufficient outside light. Refer to Light Sensor Calibration for details. © Munters AB, 2018... -
Page 33: Light Measurement Control
On/OFF Light Function does not operate when using Light Dimming by LUX. • Sunrise/Sunset functions does not operate when using Light Dimming by LUX. • To configure light measurement: 1. In System > Sensors > Analog, define a sensor as Light 0 – 40 LUX. © Munters AB, 2018... - Page 34 Default. Range 0 – 120. o Decrease Interval Time (sec): The interval time for the light intensity to decrease (by 1%) from the previous change. Default. Range 0 – 120. 6. Set the Low Light Intensity Alarm, page 56 (optional). © Munters AB, 2018...
-
Page 35: Extra Systems
Extra Systems ignore the humidity parameters. 3.13 Control Mode Select house-operating modes, turn temperature curves on or off and select which type of min/max level method to use. Control Mode Main Screen • Catching Mode • © Munters AB, 2018... -
Page 36: Control Mode Main Screen
Tunnel: Select either to NOT ALLOW or ALLOW tunnel ventilation. 3.13.2 C ATCHING Catching Mode is used when birds are being removed from the chicken house. In this mode: You can limit light intensity and ventilation • The following functions are disabled. • © Munters AB, 2018... -
Page 37: System Parameters
If during treatment, the ammonia level drops below the Stop Value parameter, the ventilation level automatically returns to that level used before ammonia treatment began. © Munters AB, 2018... -
Page 38: Ammonia Treatment Help | Set Definitions
Feed Scale enables mixing different types of feeds from (up to) four different feed bins. The user fills each bin with the required feed type and sets the mixture rations and quantities in Platinum. The augers then distribute the feed as defined. © Munters AB, 2018... -
Page 39: Feed Scale Help | Set Definitions
3. Go to 4. Define: o Day: Define the days at which the feed per bird changes. Platinum Touch / Rotem One calculates a feed curve based on these days. You can define the days as negative days. o Feed per Bird: Define the amount of feed per bird/pigs (kilograms) to be distributed. -
Page 40: Operating Mode
There are three settings; Default, Slower, Faster. NOTE Munters recommends leaving this parameter at the default level. o Valve Close Time [seconds]: Set the delay in time, if any, that the valve emptying the feed scale closes. -
Page 41: Feed Scale Hot Screen
Define this sensor in This screen shows the sensor's current status. o Alarm: This parameter shows if there are active alarms. View the alarms on the Main Screen. © Munters AB, 2018... -
Page 42: Feed Scale Functionality In Two Houses
OUSES Platinum Touch / Rotem One enables sharing feed scale functionality between two houses. Two load cells are connected to a single feed scale. Each Platinum Touch / Rotem One Controller is connected to one load cell. When the system is running, one controller operates each set of augers, feed scale valve, hoppers, and so on. - Page 43 Figure 6: Feed scale block diagram © Munters AB, 2018...
- Page 44 System > Relay Layout 1. Go to 2. Define a relay as Feed S. Active. System > Digital Sensor 3. Go to 4. Define one sensor as Hopper Sensor and one sensor as Feed Scale Interlock. © Munters AB, 2018...
-
Page 45: Light Dimmers
3.17 Light Dimmers Platinum Touch/Rotem One supports configuring up to five RLED 2.0 Light Dimmers from the Platinum Touch/Rotem One screen. RLED 2.0 can be connected via a Platinum Touch/Rotem One communication card or via an analog output card. Each RLED 2.0 has two independent channels; meaning five RLED 2.0 units fulfill the role of ten light channels. - Page 46 You can map the channels to the light lines in any order. Control > Light 4. Go to 5. Define the parameters as described Light, page 30. 6. The main screen now displays the active and inactive light lines. © Munters AB, 2018...
-
Page 47: Water Dosing
3.18 Water Dosing Platinum Touch/Rotem One Version 7.20 support specific dosing pumps used to inject additives into the water supply. From the controllers you can define the type of pump used, the additive, dosage rate, and additive amount. Install and map one pump to a digital input screen. -
Page 48: Water Dosing Help | Set Definitions
Dosing Shortage Alarm Time (sec): Define the amount of time that must pass when additives • cease to be added before an alarm is triggered. Range: 1 – 9999 seconds. 0 disables the alarm. Default: 20. © Munters AB, 2018... -
Page 49: Management Menu
Growth Day and Flock • Alarm Settings • Alarm Reset • Fail Safe Settings • Password • Feeders & Drinkers • Nipple Flushing • Water on Demand • Current Sense • RDT-5 • Switches and Relays • © Munters AB, 2018... -
Page 50: Bird Inventory
1. Enter the quantities under Birds Placed. There are separate rows for male and female. If you do not wish to keep separate data, simply enter the data into one or the other. 2. When required, enter the quantity found dead, culled, or moved. Platinum Touch / Rotem One calculates the totals and subtotals. -
Page 51: Feed Inventory Help | Set Definitions
Feed Alarms. If you have installed load cells and connected silo scales to your Platinum Touch, it automatically maintains feed inventory, including delivery dates and feed consumption data. You can monitor your fill system and maintain approximate feed inventory using the Digital Inputs. -
Page 52: Alarm Settings
Sensor Alarm- Differential from High Alarm: Individual active growth area sensors alarm if they read this much or more above the Control > Temperature Curve >Low Alarm Temperature. Alarms o Alarm Test at Time (hh:mm): Schedule the alarm test time. © Munters AB, 2018... -
Page 53: Alarm Setting Help | Set Definitions
Auger Overtime Delay (minute): Set the maximum auger run time for your cross fill system. If you have a monitor connected to the digital inputs programmed as Feeder-1 Overtime or Feeder-2 Overtime the Platinum Touch / Rotem One sends an alarm after this delay. - Page 54 Fogger Water Overflow (per minute): Define the water overflow for foggers (gallons/liter per minute). Water Shortage Alarms o Allow Water Shortage Alarm From/To: Set the period for which the controller generates water shortage alarms. © Munters AB, 2018...
- Page 55 (for the reminder time). Ammonia Alarm o Ammonia High Level: Set the ammonia level at which an alarm is sent. Secondary Alarms o Enable Secondary Alarms: Refer to Prioritizing Alarms, page 56. © Munters AB, 2018...
-
Page 56: Prioritizing Alarms
4.4.2 P RIORITIZING LARMS Platinum Touch / Rotem One enables prioritizing alarms. When enabled: ventilation-related alarms are defined as critical. The main alarm relay will transmit these • alarms to the device wired to the relay (for example, a dialer). -
Page 57: Fail Safe Settings
When there is a problem such as extremely high air temperature, the Fail-Safe function immediately activates a backup system (for example the RBU-27 ) to ensure that adequate ventilation continues. The Platinum Touch / Rotem One has six options besides controller failure or power off to activate the fail- safe relay. -
Page 58: Feeders & Drinkers
Water-Line Lift (inch): Define the specific drinker line lift, measured in inches. 3. If required, click and set the parameters. 4.8.1 F & D EEDERS RINKERS EFINITIONS Define: • Feeders & Drinkers o Adjust at Time: Set the required time to adjust the feeders' and drinkers' positions. © Munters AB, 2018... -
Page 59: Nipple Flushing
4.9.1 S CHEDULING THE LUSH 1. Configure up to 20 flush times. 2. Set the water flushing start time and duration (water lines as defined by relay layout). © Munters AB, 2018... -
Page 60: Flushing Order
Water Temperature Sensor PTC: • 1V (4 mA) = -40⁰ C 5V (20 mA) = 60⁰ C Munters Water Temperature Sensor • NOTE Refer to the Installation Manual for details on installing these products. To configure nipple flushing by temperature: 1. -
Page 61: Water On Demand
(manual or solenoid according to the mode installed). Platinum Touch/Rotem One enables controlling the water cycle times using relays and controlling the water pressure using analog input and output sensors. The two methods are complimentary. A user can use either one alone or both. -
Page 62: Sensor Control
5. Using the Keyboard: In Service > WOD Calibration: a. Enter the first pressure and voltage data points. b. Repeat for second data point. 6. Set the WOD alarms in Water on Demand Alarms. © Munters AB, 2018... -
Page 63: Water On Demand Help | Set Definitions
Touch/Rotem One Controllers or as a stand-alone unit. When wired to the Platinum Touch/Rotem One, you can use the Platinum Touch/Rotem One to set the RDT-5's stage activation temperatures (which is easier than setting the temperatures on the RDT-5 screen). The stage activation temperature determines when cooling and heating operations take place. - Page 64 Notes: o Platinum Touch/Rotem One does not store these temperatures; RDT-5 does. If you connect the Platinum Touch/Rotem One to a different RDT-5 unit, you must re-enter the temperature curve. o If you previously defined the temperature curve in the RDT-5, Platinum Touch/Rotem One retrieves the data and you can edit the data in this screen.
-
Page 65: Temperature Curve | Set Definitions
3. Connect the second RDT-5 unit to the controller and perform a Cold Start 4. Upload settings from the SD card. Refer to Load Settings, page 121 for details. Verify that you are uploading the correct file! © Munters AB, 2018... -
Page 66: Rdt-5, Version 7.22
RDT-5. Both units operate as if they are operating using legacy software. CAUTION Munters recommends that users who employ RDT-5 units update that product’s software when you update the Platinum Pro software to version 7.22. 4.13 Switches and Relays This screen displays the current relay definitions and the relays’... -
Page 67: History Menu
Feed Consumption History • Mortality History • Heaters History • Radiant Heaters History • Variable Heaters History • Alarms History • Events Log History • Power Consumption • History View • Ammonia History • Dosing History • © Munters AB, 2018... -
Page 68: Temperature History
NOTE If two humidity sensors are installed, this screen displays their average. The History View display shows reading of both sensors only if they have been selected for logging. © Munters AB, 2018... -
Page 69: Co2 History
In Version 7.17 and below, the unit records the data of up to two-bird scales; if you have more • than one scale-1, data is combined. In Version 7.18, the controller records up to four scales. • © Munters AB, 2018... -
Page 70: History, Version 7.19
7.19 ISTORY ERSION The Daily Gain shows difference between the current average weight and the previous day’s • average weight; the data comes from all the scales. No daily gain is shown for individual scales. • © Munters AB, 2018... -
Page 71: Feed Conversion
The water menu records daily water consumption and shows the daily differential change from the previous day in percent. Connect the water monitor digital inputs. You can monitor up to two drinking water meters, total drinking water, total water, cool pad, fogger, and cool pad flush consumption. © Munters AB, 2018... -
Page 72: Feed Consumption History
It also shows the percentage dead and gives an updated count of bird inventory. The history is maintained separately for male, female and total. Use the left and right arrow keys to switch to the next screen. © Munters AB, 2018... -
Page 73: Mortality History
Use the left and right arrow keys to switch to the next screen. 5.9 Heaters History Platinum Touch / Rotem One maintains daily total run times of each heater. The data is in hours:minutes format. -
Page 74: Radiant Heaters History
5.10 Radiant Heaters History Platinum Touch / Rotem One maintains daily total run times of each radiant heater, including separate data for low level and high-level heaters. The table fills several screens; to view the off screen data, use the arrow keys to scroll. The data is in hours:minutes format. -
Page 75: Events Log History
5.13 Events Log History The Platinum Touch / Rotem One records significant events with growth day and time stamp. The Table of Events is 1000 events long and is not reset when using Management, Growth Date & Flock > Start New Flock. -
Page 76: Power Consumption
, set the frequency of your data collection. Factory default collects one-hour data on a selection from the choices below. 2. Under Help | Graph you can select a variety of graphs of the detailed history. 3. If required, click and set the parameters. © Munters AB, 2018... -
Page 77: Ammonia History
• Feed Consumption • Level of Ventilation • NOTE Altering choices erases old data and starts a fresh data set. 5.16 Ammonia History This screen displays the minimum, average, and maximum ammonia levels, by growth day. © Munters AB, 2018... -
Page 78: Dosing History
This screen displays the date, total work time, water volume transmitted, and total volume of dosage material added. Because the type of additive can be change, the controller records each additive’s history separately. Version 7.22: Scroll right and left to view the history of each particular pump. • © Munters AB, 2018... -
Page 79: System Menu
Vent Curtain Setup • House Dimensions • Fan Air Capacity • Setting up a Bird Weight Curve - Summary • Non-Gender Based Weighing • Gender Based Weighing • Silo / Auger Layout • Communication • Scale Layout • © Munters AB, 2018... -
Page 80: Scales Testing
The standard optional communication card provides lightning protection, and does not have local computerized intelligence to identify itself to the system. Note that if a card is missing, turn the power OFF and then ON for a card rescan. © Munters AB, 2018... -
Page 81: Setup
No unit enabled: If you choose None, ventilation is controlled by time or a potentiometer. • 6.4 Time & Date This menu sets the current time and date for the controller. © Munters AB, 2018... -
Page 82: Variable Speed Fan Setting
System > Variable Speed Fans Setting 2. In , set the following parameters (refer to Figure 7): o Min: The minimum fan speed/analog output (in percentage) o Max: The maximum fan speed/analog output (in percentage) © Munters AB, 2018... -
Page 83: 1 1 B V Ariable Speed Fan Help | Set Definitions
In Figure 7, the F. MV Off is 7° F. Default is 0° F Day to Disable Fan Off: The growth day at which the variable speed fan ceases to operate. • © Munters AB, 2018... -
Page 84: Relay Layout
3. If required, click and set the parameters. o If you have installed Current Sense relays, Platinum Touch / Rotem One defines them automatically. Current sense relays transmit to the user’s PC the amount of the current being passed to the relay and send alarms when the current is too low or too high. In addition, you can view the daily electricity consumption in History. - Page 85 Extra System Alarm (N.C.) Fail Safe (N.C.) Feeder Win Open Feeder Win Close Feeder Line Up Feeder Line Down Drink Line Up Drink Line Down Water Main Water Bypass Water Line AS Relay AS Analog Output © Munters AB, 2018...
-
Page 86: Sensors
Install analog input cards. This screen enables the user to define the analog sensors. The Platinum Touch / Rotem One regards temperature, humidity, and CO2 sensors and circuit breaker as analog sensors. These sensors measure a continuous range rather than just on or off. -
Page 87: Analog Output
1. Go to 2. On each input, define the sensor as required using the drop down list. Platinum Touch / Rotem One automatically numbers the sensors according to their function. • You cannot define more than the permitted number of any particular sensor. For example, you •... -
Page 88: Analog Output Settings
The current average substitutes for either failed or missing sensors. NOTE Sensors 10 – 18 require installing a second analog card. © Munters AB, 2018... - Page 89 When an attic sensor is not installed, the attic vent is disabled. NOTE symbol designates an analog output device. This section enables the user to set the temperature and the timer setting for all heating and cooling devices. © Munters AB, 2018...
-
Page 90: Temp & Timer Setting
Temperature and Timer Settings screen, according to the on/off schedule defined Control > Timer Setting . Select which timer defines the schedule. Program: This selection disables the parameters set in this page. The cooling device works according to the device's program screen. Foggers operate © Munters AB, 2018... -
Page 91: 0 5 B T Emp & Timer Settings Help | Set
• Vent/Curtain Help | Set Definitions • If you map a curtain or vent to a potentiometer, the Platinum Touch / Rotem One controller uses that method (and not time). NOTE After defining the method used, define the opening levels in Vent &... -
Page 92: Using Time To Calibrate
Enter the number of seconds to open and close from limit to limit for each of the Vents and Curtains in your installation. Platinum Touch / Rotem One then calculates the percentage of open and closed time and adjusts the static pressure methods accordingly. -
Page 93: Stop Fans
In many installations the backup system, such as Munters' FBU-27, may have opened the air sources. When the Platinum Touch / Rotem One takes over control again, the air inlets are incorrectly positioned. The calibration at power up feature synchronizes the actual position and the controller. -
Page 94: House Dimensions
Define height, width, and length of house (controller calculates total area). • To set the dimensions in metric or non-metric units, go to System > Setup and scroll down to • Length Unit. © Munters AB, 2018... -
Page 95: Fan Air Capacity
Setting: Define the curve type (Auto, Custom, or Factory Curve) • Bird Weight: Define the reference weight or curve data points (day and weight). • 6.15 Non-Gender Based Weighing Scale Layout • Bird Scale Setting • Bird Weight • © Munters AB, 2018... -
Page 96: Scale Layout
A scale card must be installed in the controller or an RSU-2 unit must be connected to the controller for these screens to appear. Use this screen to define the card functions. Platinum Touch/Rotem One supports the RSU-2 and two types of scale cards: Two channel scale cards: Supports bird scales only. - Page 97 This parameter defines range of weights that are recorded. Bird weights that are outside of the band are discarded. o If you select Auto, Platinum Touch automatically calculates the band of acceptable weights. o If you select Manual, define the upper and lower ranges.
-
Page 98: Bird Weight
If you selected Auto in Bird Scale, edit the weight as required. The weight is automatically adjusted. o If you selected Custom in Bird Scale, edit the curve as required. o If you selected an industrial standard, the curve is read only. © Munters AB, 2018... -
Page 99: Gender Based Weighing
3. Go to System > Scale Settings > Bird Scale > Help. Select Auto or Manual. This parameter defines which measured bird weights are used in calculating the actual curve. Bird weights that are outside of the band are discarded. © Munters AB, 2018... -
Page 100: Auto Or Auto Turkey Curve
If you select Auto, Platinum Touch calculates the band of acceptable weights. o If you select Manual, define the female/male upper and lower weight ranges. 4. Go to System > Scale Settings > Bird Scale. o Define the weighing method: Auto, Curve, Auto Turkey. Curve includes a user-defined curve option and industrial standard curve options. -
Page 101: Customized/Industrial Standard Curves
3. For female and male, select the required curve from the drop down list. 4. Go to System > Bird Weight. o If you selected Custom, you can edit the curve. o If you selected an industrial standard curve, the curve is read only. © Munters AB, 2018... -
Page 102: Silo / Auger Layout
CAUTION The baud rate used must be the same in all controllers, computers, and other devices. o House number: Each controller on a network must have a unique number (1 – 64) so Munters' communication software can distinguish individual controllers. © Munters AB, 2018... -
Page 103: Scale Layout
6.19 Scale Layout Use Scale Layout to define the scales or silos connected to the controller. Define the weighing device attached to each channel of the scale option card. © Munters AB, 2018... -
Page 104: Appendix A: Output Data
Ext. Sys Indicates operating external system number Light Note that these mention output percentage Water Indicates operating water number Feed Indicates operating feed number Auger Indicates operating auger number Rad. Lo Indicates operating radiant heat low number © Munters AB, 2018... - Page 105 Relay switch setting changed New flock Appears when new flock is updated Reset alarm Appears when reset alarm is done System message # For Munters’ technicians only Alarm card fail Appears when the alarm card fails © Munters AB, 2018...
- Page 106 Appears when the system tries to recover itself, in cases such as System recover noises Appears when either using the correct password, or when using hot System lock key '9,' or automatically after 5 minutes Empty house mode Appears when setting at a specific time © Munters AB, 2018...
-
Page 107: Appendix B: Natural Ventilation
3. Go to Installation > Relay. 4. Define relays as Curtain Open and Curtain Close (up to four each) (for details refer to Relay Layout, page 84). 5. Go to System > Temperature Device Settings (option). © Munters AB, 2018... - Page 108 7. Go to System > Vent/Curtain Setup. 8. Define the curtains opening and closing times (for details refer to Vent Curtain Setup, page 91). 9. Go to System > Vent/Curtain Setup > Help (option). © Munters AB, 2018...
- Page 109 CAUTION If all MNT functions are disabled on a curtain, the curtain never the less functions in all three modes. At least one mode must be enabled to disable other modes. 13. Go to System > Temperature & Timer > Settings. 14. Set the curtain parameters as required: © Munters AB, 2018...
-
Page 110: Theory Of Operation
However, if the temperature is below the Natural Setting Off temperature, curtains move to their minimum position. o Control mechanisms such as static pressure only begin to function when the transition is completed. © Munters AB, 2018... -
Page 111: Curtain Movement
However, when the toggle switch is reset to Automatic, the curtain returns to its previous position. For example if the curtain had gone down to 45% open when the toggle switch was set to On, it will return to 45% when the switch is reset to Automatic. © Munters AB, 2018... -
Page 112: Appendix C: Device Setup Summary
Attic fans maximize the amount of fresh air in cold weather by utilizing warm air found near the ceiling. Air entering via the attic inlets tends to become warmer and drier than the outside air. NOTE: Munters recommends operating the attic vents at static pressures lower than the vent inlets. System > Relay Layout 1. In , define relays as attic open and attic close. - Page 113 When regular heater is activated, the low pressure alarm is disabled since heaters produce positive static pressure. o Heater Off Temperature must be at least 0.5° F higher than the Heater On Temperature. o Heater On Temperature must be equal or less than the Set Temperature. © Munters AB, 2018...
-
Page 114: Appendix D: Keyboard Functions
11. WIND DIRECTION CALIBRATION 10.1.1 T EMPERATURE ALIBRATION The Platinum Touch / Rotem One temperature sensors are typically accurate to approximately 0.5º F within the range of temperatures for poultry production. Calibrate them in this menu by © Munters AB, 2018... -
Page 115: Humidity Calibration
1. Obtain an accurate reference sensors and a pail of water at the approximate required temperature. 2. Stir the reference sensor together with the Platinum Touch / Rotem One sensor vigorously in the bucket of water. Keep hands off the sensor itself, so that it responds accurately to the water temperature. -
Page 116: Co2 Sensor Calibration
NOTE Run Platinum Touch / Rotem One for a few hours so that the temperature in the box becomes stable and only then calibrate. CAUTION DO NOT blow the air into the hose to see of the pressure changes! The sensor is sensitive and blowing air can cause irreparable damage. -
Page 117: Light Sensor Calibration
8. When the outside light is bright enough, press Enter. 10.1.6 F ALIBRATION Platinum Touch / Rotem One can use silo scales or less expensive digital monitoring devices to • keep track of your feed. This menu calibrates the digital monitoring devices. -
Page 118: Water Calibration
Method Current: Weight per Minute 10.1.7 W ATER ALIBRATION Platinum Touch / Rotem One supports up to four dry contact pulse output water meters. Enter the quantity of water per pulse for your water meters. WATER CALIBRATION Water 1 –... -
Page 119: Nipple Flushing
FLUSH ORDER Line: Order: FLUSHING DAYS Day: Sun Mon TUE WED THU FRI Flush: ▪ √ √ ▪ ▪ ▪ ▪ • Flush Order: Set flushing according to line/order • Flushing Days: Set flushing per day © Munters AB, 2018... -
Page 120: Feeders & Drinkers
This menu enables the user to save the program settings to an SD card and transport them to another controller. NOTE If both a data plug and SD card are inserted, the data plug takes priority and that option appears on the screen. © Munters AB, 2018... -
Page 121: Load Settings
NOTE Version 7.19 and above supports this function. When uploading settings to a controller, Platinum Touch/Rotem One lists which tables (if any) will not be transferred. Compatibility issues might arise in cases when transferring settings between controllers using different software versions or having different configurations. By listing which tables will not transfer, the user knows which tables must be defined manually. -
Page 122: Current Sense Relay Calibration
WAIT till operation completion for 15 sec Verify that the relay switch is AUTO 3. Select a relay and click Enter. NOTE Set the relay to Auto. 4. Repeat for each current sense relay. © Munters AB, 2018... -
Page 123: Wind Direction Calibration
Metric = Bar o Non Metric = PSI Service > WOD Calibration 2. In a. Enter the first voltage and check pressure data points. b. Repeat for second data points. 3. Set the Help Definitions (optional) © Munters AB, 2018... -
Page 124: Ammonia Calibration
• the relay current alarm • voltage type • NOTE Configuring the amperage is not required. The Platinum Touch / Rotem One controller automatically configures default settings. © Munters AB, 2018... - Page 125 4. Configure the voltage: Select 110 or 220 volts. NOTE All relays’ minimum/maximum current settings per equipment type must be within 30% (±) of the nominal value. However, the augers minimum can go down to 0.0 amperes. © Munters AB, 2018...
-
Page 126: Appendix E: Breeder Mode
11 Appendix E: Breeder Mode This section details functions specific to the Platinum Touch / Rotem One Breeders mode. • Egg Room Setup • Egg Counter • Egg Room Water and Feed • Egg Belt Runtime • Nest Function • Work Room Control •... - Page 127 , configure which temperature sensors operate in the egg room. NOTE Refer to Temperature, page 88 for details on this screen. Service > Humidity Calibration 4. Using the Keyboard: In , calibrate the Egg Room humidity sensor. © Munters AB, 2018...
- Page 128 Humidifier relative humidity percentage Control > Egg Room Control > Help > Set 6. In , configure the following alarm parameters: o Low Temperature o High Temperature o Low Humidity o High Humidity o Delay (minutes) © Munters AB, 2018...
-
Page 129: Egg Counter
The Breeder Mode is configured. 11.2 Egg Counter Platinum Touch / Rotem One Breeders Mode supports up to four egg counters per house. Platinum Touch supports Accucount infra-red egg counters (refer to the Egg Counter manual for details). The following sections detail the setup. -
Page 130: Egg Room Water And Feed
(which negatively affects the birds' feed intake). To compensate, increase the ventilation before/during the feeding time by lowering the target Control > Water & Feed 1. Go to © Munters AB, 2018... - Page 131 Under Feed Line Operation, define when the lines descend and rise (Line Down, Line Up times). Service > Feed Line Calibration b. On the keyboard: Go to c. Enter the amount of time required for the curtains to rise and descend. NOTE Measure these times if you don't know them. © Munters AB, 2018...
-
Page 132: Egg Belt Runtime
Feeder Line 1 will be on 4:45 until 5:15, even though the line 3 turns off the feeder. • 11.4 Egg Belt Runtime Platinum Touch / Rotem One Breeder supports measuring the egg belt runtime. Install digital input cards. -
Page 133: Nest Function
Open Time: The time each Nest lines' doors open. o Duration: The amount of time required for the Nests to open. o Close Time: The time each Nest lines' doors close. o Duration: The amount of time required for the Nests to close. © Munters AB, 2018... -
Page 134: Nest Function, Version
Nest: Under each nest, define if it opens or closes. In the example below, Nests 3 and 4 open at 12:00 and close at 15:00. Nests 1 and 2 open at 15:00 and remain open until 12:00 the following day. © Munters AB, 2018... - Page 135 None: No action (relay is closed or released) In the example below, Nests 3 and 4 open at 12:00. Nest 2 opens at 15:00. Nest 3 closes at 16:00, while Nests 2 and 4 remain open. © Munters AB, 2018...
-
Page 136: Work Room Control
During feed distribution, each silo has a mechanical arm that disconnects at the end of a feed cycle, preventing further distribution. When this disconnect happens, a signal is sent from the arm to the silo, informing the latter that it must be refilled. Platinum Touch / Rotem One enables recording these signals in the Events History. -
Page 137: Weighing The Birds In Breeder
The following section details how to set up scales to weigh the birds. Scale Layout: Use the process detailed in the Broiler Section. Refer to Scale Layout, page Bird Scale Setting • Bird Weight History • © Munters AB, 2018... -
Page 138: Bird Scale Setting
Note that the default range of the female and male bird are reversed. 4. Go to System > Bird Weight. 5. The Bird Weight screen displays the target weight for the current growth day for each gender. Edit the weight as required. © Munters AB, 2018... - Page 139 4. Go to System > Bird Weight > Help. 5. Define the parameters: o Curve Offset: Enter the factor used to adjust the weight curve. This amount is added to the curve. Range: -4.40 to +4.41 Kg/Lb. © Munters AB, 2018...
-
Page 140: Bird Weight History
Custom. The curve that you defined will reappear. 11.8.2 B EIGHT ISTORY The scale history shows bird weight statistics for female and male houses. You can review daily data for each gender or for each scale. © Munters AB, 2018... -
Page 141: Breeder Advanced Feeding
The feed is mixed in the feed scale container and then placed into hoppers, from which the feed is transported to the birds. What is unique in this program is the flexibility in designing feeding lines for male, female, and mixed lines. Using the Platinum Touch / Rotem One program, you define the entire feeding program: •... - Page 142 Figure 8: Dual Line Block diagram © Munters AB, 2018...
-
Page 143: Selecting The Mode
1. Disconnect the power cable from the power source. 2. Reapply power while pressing Delete. The Cold Start screen appears. 3. Select Yes. The Choose Controller Type appears. 4. Select the Breeder. 5. Select Precision. 6. Select Advanced Feeding. 7. Press Enter. © Munters AB, 2018... -
Page 144: Setup
• Up to two intermediate hopper augers. • Up to 24 line hopper valves. o Platinum Touch/Rotem One defines line hopper valves 1 – 16 as being female line hopper valves and valves 17 – 24 as being male line hopper valves. - Page 145 Set the water or feeder lines to Continuous, Cycle, or Off. 5. Go to Control > Water & Feed > Help. 6. If a device is set to Cycle, define the Water/Feeder On and Off times. © Munters AB, 2018...
- Page 146 Silo: Read only number. Auger: This defines which auger is mapped to which silo. Define this as None (disabling the auger line) or Auger. Platinum Touch/Rotem One numbers the auger but you can manually edit the number. To edit, press the required number and then Enter.
- Page 147 Both: When defined as Both, any auger that is defined Male, Female, or Both can add feed to the mixture. o None: This option None Active, you cannot edit that line’s parameters. o Erase: This option erases any parameter definitions for that number. © Munters AB, 2018...
-
Page 148: Feed Scale Program Help | Set Definitions
Line Hopper Valves: Define the amount of feed that each feeding station receives. • o Version 7.21: Range 0 – 22025 Lbs/0 -9999 Kg o Version 7.22: Range 0 – 22025.8 Lbs/0 -9999.9 Kg 11.9.3 F CALE ROGRAM EFINITIONS © Munters AB, 2018... - Page 149 There are three settings; Default, Slower, Faster. NOTE Munters recommends leaving this parameter at the default level. o Valve Close Time [seconds]: Set the delay in time, if any, that the valve emptying the feed scale container closes.
-
Page 150: Egg Room History
11.10 Egg Room History History > Egg Room Go to to view a daily history of the egg room temperature and humidity. • Press the right/left arrow keys to switch between views. © Munters AB, 2018... -
Page 151: Warranty
Munters plant was required: if this is not done, the user is fully responsible for the damage which they could suffer. - Page 152 The use of non-original spare parts or incorrect assembly exonerates the manufacturer from all liability. Requests for technical assistance and spare parts can be made directly to the nearest Munters office. A full list of contact details can be found on the back page of this manual.
- Page 153 Munters Brasil Industria e Comercio Ltda, Phone +55 41 3317 5050, Canada Munters Corporation Lansing, Phone +1 517 676 7070, China Munters Air Treatment Equipment (Beijing) Co. Ltd, Phone +86 10 80 481 121, Denmark Munters A/S, Phone +45 9862 3311, India...
Need help?
Do you have a question about the Platinum Touch and is the answer not in the manual?
Questions and answers