Table of Contents
Advertisement
Quick Links
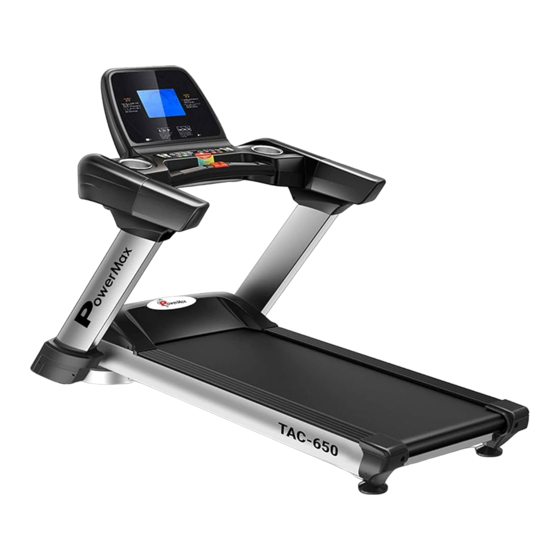
TAC-650
COMMERCIAL MOTORISED TREADMILL
OWNER'S MANUAL
Read all instructions carefully before using this product. Retain this owner's manual
for the future's reference. Product may be slightly different with photos, it is subject
to actual product. Thank you for purchasing this product. It will improve your health.
Advertisement
Table of Contents

Related Manuals for PowerMax TAC-650


Summary of Contents for PowerMax TAC-650
- Page 1 TAC-650 COMMERCIAL MOTORISED TREADMILL OWNER’S MANUAL Read all instructions carefully before using this product. Retain this owner's manual for the future's reference. Product may be slightly different with photos, it is subject to actual product. Thank you for purchasing this product. It will improve your health.
-
Page 2: Table Of Contents
IMPORTANT MATTER 1 YEAR LIMITED WARRANTY PowerMax Fitness warrants to the original purchaser that this product is free from defects in material and workmanship when used for the purpose intended, under the conditions that it has been installed and operated in accordance with PowerMax Fitness's Owner's Manual. PowerMax Fitness's obligation under this warranty is limited to replacing or repairing, free of charge, any parts which may prove to be defective under normal home use. -
Page 3: Safety Instruction
5. Date of Purchase * Terms and Conditions Apply. For T&C visit www.powermaxfitness.net 1. Safety Instruction Many safety problems are considered in design and manufacturing of the product, but please still operate according to the instruction below just in case. We are not responsible for any consequences caused by abnormal operation. -
Page 4: Special Safety Instruction
2. Special Safety Instruction Power source • Place the treadmill where the plug can reach the socket. Directly insert the power line into socket and keep it firm. • Please use qualified socket to avoid consequential danger. If the plug and socket are •... -
Page 5: Configuration List
3. Configuration List Left and right Main frame columns Electronic Panel meter stand Left and Left and right right side side covers covers Outer cover Inner cover on on column column 21# safety switch Bag of 20# MP3 connecting line instruction 90# silicone oil 83# instruction... - Page 6 www.powermaxfitness.net...
-
Page 7: Explosion Diagram
4. Explosion Diagram All accessories are here and displayed in the list below. The above parts list is list of the highest configuration of this series of products. www.powermaxfitness.net... -
Page 8: List Of Explosion Diagram
5. List of Explosion Diagram Serial Serial Name Qty. Name Qty. Pedestal Protecting cover on column Left column Left foamed armrest Right column Right foamed armrest Electronic meter stand Upper cover of motor Ascension frame Lower cover of motor Main frame Left side cover Motor support Right side cover... - Page 9 Cylinder head hexagon socket 150 single ground line head cap screw Countersunk head hexagon Power switch socket head can screw Upside-down T-shaped Cross recessed pan head self- socket tapping screw Cross recessed pan head self- Power line (with tail plug) drilling screw Magnet ring Flat gasket...
-
Page 10: Steps Of Assembly
Trim strip Left and right rear angle beads Grip pulse + ascension/switch Grip pulse + speed shortcut key 6. Steps of Assembly Step 1: installation of complete machine 1. Hold the electronic meter and slowly lift it to fixed screw hole. 2. - Page 11 Step 3: 1. Take out support of massager, pay attention to (R) indication of (L) gasket, and fix support of massager onto left and right stand pipes with 70# screw and 87# flat gasket. 2. Take out supine support, and fix supine support onto support of massager with 72# screw and 87 flat gaskets.
-
Page 12: Structure Of Finished Product
Step 4: 1. Install dumbbell onto groove on supine support in the figure; 2. The body twister can be placed at any stable position by the user; 3. Safety lock is placed at yellow position on electronic meter; 4. Massage belt is hung in grooves on both sides of massager. 5. -
Page 13: Operating Instruction Of Treadmill
8. Operating instruction of treadmill: 1. Power socket with ground line must be used for your safety when you use the treadmill. 2. Insert power plug into socket and turn on power switch a (light turns red). You will hear "beep"... - Page 14 Description of folding: Fold the treadmill: Folding the treadmill can save space. Turn off the power switch and pull out the power plug before folding. Lift the running platform with hands until it is stuck by gas spring casing. Lower the running platform: Gently tread the gas spring casing as shown in the figure, the running platform will slowly fall to the ground.
-
Page 15: Operating Instruction Of Instrument
9. Operating Instruction of Instrument 1. Face map: 2. Instruction of window: 2.1 Left window: "DIS" window: display mileage in exercise, including time count and countdown. "CAL" window: display caloric value in exercise, including time count and countdown. "INCL" window: display ascension value. Display number of built-in programs: Pl—P12;... - Page 16 Display the number of sections of program currently edited when entering self-complied program 3. Functions of keys: Start: press this key, the treadmill will start running at minimum speed or default speed of program after countdown of 3s. Stop: press this key in exercise, the treadmill will slowly decelerate to stop Program selection key: P1---P12---U1---U3---FAT in succession in manual mode Selection key of countdown mode: mode selection key, change and...
- Page 17 Volume + Backward: select the last song Forward: select the next song Note: please remove the safety lock in case of changing unit of speed into mile, and press keys of program and mode for 3s. 4. Main function: Turn on the power, all windows will be on for 2s, and the system starts self-inspection and enters standby state.
-
Page 18: Description Of Program
10. Description of Program Press program key and select any of P01---P12, which is built-in program, when "TIME" window displays default value and flickers, and lattice window displays graph of current program. Adjust the time of exercise needed through speed or ascension +/-. Press Start, the treadmill will be started according to the speed and incline of the first section after countdown of 3s. - Page 19 3. Heartbeat measurement: Hold steel sheet of left and right armrests, the heartbeat window will display your heartbeat after about 5-10s. Heartbeat data is only for rough reference of exercise degree and cannot be used as medical\ data. 4. Functions of media and sound: This machine accepts input of multiple media, such as U-disk and external audio.
- Page 20 Table 1: Built-in program data sheet Note: the value is original kilometres divided by 1.6 after speed display is changed into mile Time period Set time/16 time periods = running of each time period (unit of speed is km) Program INCLINE SPEED INCLINE...
-
Page 21: Fault Analysis And Handling
11. Fault Analysis and Handling Fault code Cause Solution Poor communication 1. Inspect whether connecting line between between electronic meter electronic meter and controller suffers from and controller poor contact. 2. Poor contact of main IC of controller. Reinsert it. 3. - Page 22 it will be stretched after use to deviate from central position to cause damage by wearing trim strip and rear protecting cover. It is normal to stretch the running belt in use. Adjust running belt If the running belt is slip or not smooth when you use the treadmill, you can improve it by adjusting degree of tightness of running belt.
-
Page 23: Important Matter
You need to tighten the running belt again if the above steps fail to reach the effect. Lubricating oil The treadmill is oiled when leaving the factory, but lubricity of treadmill shall be inspected frequently, which helps to keep it in optimum state. The treadmill must be oiled after 1 year or running for 100h. - Page 24 frequent and violent exercise without permission of doctor. Please stop using the product and consult your doctor if you feel unwell in use. The product shall be used correctly. Please read service manual in detail before exercise. Please keep children and pets away if the product is unattended or idle. Please wear suitable clothes including sneakers.
- Page 25 Powermax Fitness (I) Pvt. Ltd. Address: 808, Lotus Trade Centre, New Link Road, Andheri (west) Mumbai – 400053 Email us: customersupport@powermaxfitness.net Telephone No.: +91-8080-206-206 www.powermaxfitness.net...
Need help?
Do you have a question about the TAC-650 and is the answer not in the manual?
Questions and answers