Vankyo Leisure 3 Projector Manual
- User manual (32 pages) ,
- User manual (32 pages)
Advertisement
Notice
- Please read this manual thoroughly before using the projector;
- Please use the correct power cord for the country where you are located;
- Do not look into the lens when the projector is on to prevent the bright light from hurting your eyes;
- Do not place the projector on an unstable stand, or table;
- Do not use the projector where it may be exposed to rain, water, or excessive humidity;
- If you do not use the projector for a long time, make sure its power is turned off and the plug is disconnected from the outlet;
- When shipping the projector, place it in its original packing materials or use equivalent materials with cushioning around the projector;
- If the projector is mounted on a ceiling or wall, it should be installed by the safe mounting hardware;
- If the projector is damaged, do not attempt to service this product yourself and contact Vankyo Support Team;
Introduction to your projector
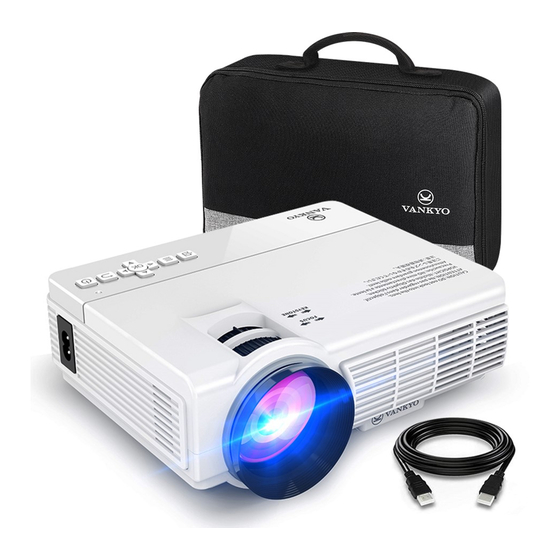
Product Packing List
Please keep all the packaging material in case shipment is needed in the future. Make sure you receive all the parts below.

Leisure 3

Carrying Bag

User Manual

Remote

AV cable

HDMI cable

VGA cable

Power cable
If there is any part missing, please contact Vankyo Support Team.
Projector Overview


When you use the remote, please make sure to point at the IR in the front of the Leisure 3.
Projector Specification
| Display Technology | LCD | Light Source | LED |
| Native Resolution | 800*480 | Resolution Supported | 576i, 576P, 720i, 720P, 1080i, 1080P |
| Projection Distance | 1.16-5M | Projection Screen | 37"-150" |
| Installation Type | Front/Rear/Ceiling | Aspect Ration | 4:3/16:9/Auto |
| Focus | Manual | Keystone | ±15° |
| Speaker | 2W/8ohm*2 | Power Supply | AC 100-240V, 50/60Hz |
| Unit Dimension | 198*148.6*68mm | Unit Net Weight | 0.9KG |
| Photo Format Supported | BMP/JPG/PNG/GIF/JPEG | Audio Format Supported | ACC/MP2/MP3/PCM/FLAC/WMA |
| Video Format Supported | AVI/MP4/MKV/FLV/MOV/ RMVB/3GP/MPEG1/ MPEG2/H.264/XVID | Ports | HD In*1/USB Port*1/VGA Port*1/ AV In*1/Audio Out*1/TF Card Slot*1 |
Setting up Your Projector
Projector Installation Options
Depending on how you positioned the projector, you may need to change the projection direction to project your images correctly. If you project from the ceiling or from the rear, please go to Menu > Picture > Projection Mode to set up the projection modes. There are following modes for different installing options. 0 means Front. In this mode, the projector must be placed in front of the wall/screen, and image will be directly projected to the wall/screen.

1 means Rear. In this mode, the projector can be placed behind the screen and a compatible screen which supports rear projector will be required.

2 means Rear On Ceiling. In this mode, the projector is placed behind the screen with the lens upside down. This mode allows you to flip the image over. A compatible screen which supports rear projector will be required.

3 means Front On Ceiling, which flips the image over top-to-bottom to project upside-down from a ceiling or wall mount.

Note: Wherever you set up the projector, make sure to position it squarely in front of the center of the screen or the wall, not at an angle, if possible.
Projection Distance and Size
The distance at which you place the projector from the screen determines the approximate size of the image. The projection size increases when the projector is father from the screen. Locate the projector at an appropriate position, then adjust the focus ring and Keystone manually to get the best image performance.

Note: Being too far or too close between the projector and the wall/screen, or the incorrect adjustment of the focus ring and Keystone may result in the poor image.
Projector Connections
When you connect any device to the projector, please follow the steps below at your first use of the projector.
Step 1: Connect the power cord into the projector's power inlet, then plug the power cord into an electrical outlet;
Step 2: Take off the lens cover, then press the Power button on the projector or the remote to turn on the projector;
Step 3: Enter the interface of the OSD Language to set your preferred language;
Step 4: Press the Up/Down/Left/Right buttons to select your language, then press the OK button of the projector/remote to confirm;
Step 5: It will show a screen with No Signal. Insert the device/cables into the correspondingly ports on the projector;
Step 6: Press the ![]() button to enter the interface of Input Source;
button to enter the interface of Input Source;
Step 7: Press the Up/Down or theSource button to select, then press the OK button to select the correct input source.
Step 8: Adjust the focus ring and keystone to get the best image performance.
Tips:
- After you plug the power cord into the inlet, turn on the projector until the LED indicator on the projector shows solid Red. If the projector is turned on and working properly, the LED indicator shows solid Yellow;
- Never look into the projector lens when the lamp is on. This can damage your eyes and is especially dangerous for children;
- Install 2 pieces of AAA batteries into the remote before using it.
Connecting to the External Storage Device
You can project movies, music, photos, and texts by connecting USB Drive, microSD (TF) Card, Hard Disk (extra power supply is required) to your projector even without using a computer or a mobile device.
Step 1: After connecting the different external devices, press the ![]() button on the projector or the Source button on the remote to enter the interface of Input Source.
button on the projector or the Source button on the remote to enter the interface of Input Source.
Step 2: Press the Up/Down/Source on the projector or remote to select the correct input source, then press the OK/Enter button of the projector/remote to confirm. For USB/Hard Disk or microSD (TF) card, please select input source USB or TF;

Playing the Video
After selecting USB or TF in the interface of Input Source, you will enter the main interface which shows the options of PHOTO, MUSIC, MOVIE, and TEXT.

Step 1: Select MOVIE in the main interface by pressing the UP/Down/Left/Right buttons and the selected frame will be highlighted to be blue with font in yellow. Then press the OK button to enter the following interface;

Step 2: Select the disk C, then press the OK button to enter the disk;
Step 3: Select the video file or click the folder to enter the next directory till you find the video you would like to play in the directory;

Step 4: Press the ![]() button on the projector or the Play/Pause button on the remote to play the selected video into full-screen mode.
button on the projector or the Play/Pause button on the remote to play the selected video into full-screen mode.
Tips:
- Select the Return icon and press the OK button to return to the root directory shown in Step 1 no matter in which directory, while select the Up Folder icon and press the OK button to return to the parent directory;
- Hover the cursor on the selected video for more than 3 seconds to preview the video;
Press the OK button when playing the video, it will show a bottom bar with different settings. Press the Down button or the Back button to hide it.

Play/Pause: plays or pauses the current video;
FB: Fast Backward, rewinds the video back quickly while playing it. The rewinding speed ranges from 2 X to 32X;
FF: Fast Forward, pushes the video to move forward quickly while playing it. The forward speed ranges from 2 X to 32X;
Prev.: Previous, goes back to the previous video;
Next: goes to the next video;
Stop: exits from the current video;
R_ALL: has the options of Repeat 1, RepeatAll and RepeatNONE. Press the OK button to switch among these options. RepeatAll loops to play all the videos in your playlist; RepeatNONE plays the current video once, then exits from the current video; Repeat 1 loops to play the current video all the time;
R_OFF: has the options of R_OFF and R_ON. Press the OK button to switch among these options. R_OFF means turning off the repeat to play the videos randomly, while R_ON means turning on the repeat;
Set A/Set B/None: selects Set A by pressing the OK button to set a time point and select Set B by pressing OK button to set another time point when playing the video, then it will loop to play the video fragment between these points. Select None to return to normal playing mode;
Playlist: a list of video files that can be played from the current folder. If you did not tick the favorite videos by pressing the OK button in the directory, it will show all the video files in this folder that can be played; otherwise, it will only show your ticked video(s);
Info: shows the information about the current video including resolution, size and so on;
Slow...: Slow Forward, plays the video in slow motion with a speed being range from 2X to 16X;
Step...: Step Forward, steps forward the video frame by frame by pressing the OK button.
Tips:
- Your projector can play videos with formats of AVI/MP4/MKV/FLV/MOV/RMVB/3GP/MPEG1/MPEG2/H.264/XVID.
- All the folders will be shown in the USB disk or microSD card, but you can only play the video files after you select MOVIE in the main interface.
Playing the Music
After selecting USB or TF in the interface of Input Source, you will enter the main interface which shows the options of MOVIE, MUSIC, PHOTO and TEXT.

Step 1: Select MUSIC in the main interface by pressing the UP/Down/Left/Right buttons and the selected frame will be highlighted to be blue with font in yellow. Then press the OK button to enter the following interface;

Step 2: Select the disk C, then press the OK button to enter the disk;
Step 3: Select the music file or click the folder to enter the next directory till you find the music you would like to play in the directory;

Step 4: Press the ![]() button on the projector or the Play/Pause button on the remote to play the selected music into full-screen mode.
button on the projector or the Play/Pause button on the remote to play the selected music into full-screen mode.
Tips:
- Select the Return icon and press the OK button to return to the root directory shown in Step 1 no matter in which directory, while select the Up Folder icon and press the OK button to return to the parent directory;
- Hover the cursor on the selected music for more than 3 seconds to preview the music;
It will show a bottom bar with different settings when playing the music. Press the Down button or the Back button to hide it. Press the OK button to show it again.

Play/Pause: plays or pauses the current music;
FB: Fast Backward, rewinds the music back quickly while playing it. The rewinding speed ranges from 2 X to 16X;
FF: Fast Forward, pushes the music to move forward quickly while playing it. The forward speed ranges from 2 X to 16X;
Prev.: Previous, goes back to the previous music;
Next: goes to the next music;
Stop: exits from the current music;
R_ALL: has the options of Repeat 1, RepeatAll and RepeatNONE. Press the OK button to switch among these options. RepeatAll loops to play all the music in your playlist;RepeatNONE plays the current music once, then exits from the current music; Repeat 1 loops to play the current music all the time;
Set A/Set B/None: selects Set A by pressing the OK button to set a time point and select Set B by pressing the OK button to set another time point, then it will loop to play the music fragment between these points. Select None to get back to the normal playing mode;
R_OFF: has the options of R_OFF and R_ON. Press the OK button to switch among these options. R_OFF means turning off the repeat to play the music randomly, while R_ON means turning on the repeat;
Mute: mutes or unmutes the current music;
Playlist: a list of music files that can be played from the current folder. If you did not tick the favorite music by pressing the OK button in the directory, it will show all the music files in this folder that can be played; otherwise, it will show your ticked music file(s);
Info: shows the information about the current music including Bit Rate, Artist, Size, and so on.
Tips:
- Your projector can play the audio files with formats of ACC/MP2/MP3/PCM/FLAC/WMA.
- All the folders will be shown in the USB disk or microSD card, but you can only play the music files after you select MUSIC in the main interface.
Playing the Photo
After selecting USB or TF in the interface of Input Source, you will enter the main interface which shows the options of MOVIE, MUSIC, PHOTO and TEXT.

Step 1: Select PHOTO in the main interface by pressing the UP/Down/Left/Right buttons and the selected frame will be highlighted to be blue with font in yellow. Then press the OK button to enter the following interface;

Step 2: Select the disk C, then press the OK button to enter the disk;
Step 3: Select the photo or click the folder to enter the next directory till you find the photo you would like to play in the directory;
Step 4: Press the ![]() button on the projector or the Play/Pause button on the remote to play the selected photo into full-screen mode.
button on the projector or the Play/Pause button on the remote to play the selected photo into full-screen mode.
Tips:
- Select the Return icon and press the OK button to return to the root directory shown in Step 1 no matter in which directory, while select the Up Folder icon and press the OK button to return to the parent directory;
- Hover the cursor on the selected photo for more than 3 seconds to preview the photo;
It will show a bottom bar with different settings when playing the photo. Press the Down button or the Back button to hide it. Press the OK button to show it again.

Play/Pause: plays or pauses the current photo;
Prev.: Previous, goes back to the previous photo;
Next: goes to the next photo;
Stop: exits from the current photo;
R_ALL: has the options of Repeat 1, RepeatAll and RepeatNONE. Press the OK button to switch among these options. RepeatAll loops to play all the photos in your playlist;RepeatNONE plays the current photo once, then exits from the current music; Repeat 1 loops to play the current photo all the time;
R_OFF: has the options of R_OFF and R_ON. Press the OK button to switch among these options. R_OFF means turning off the repeat to play the photos randomly, while R_ON means turning on the repeat;
MUSIC: after you tick some music file(s) under the MUSIC category, go to the PHOTO category. Press the OK button when selecting the MUSIC icon in the interface of the photo playing, it will play the music file(s) you ticked for photo background;
Playlist: a list of photo files that can be played from the folder. If you did not tick the favorite photos by pressing the OK button in the Sub-menu, it will show all the photos in this folder that can be played; otherwise, it will show your ticked photo(s).
Info.: shows the information about the current photo including resolution, size, date and time;
![]() : rotates the photo by 90 degrees clockwise;
: rotates the photo by 90 degrees clockwise;
![]() : rotates the photo by 90 degrees counterclockwise;
: rotates the photo by 90 degrees counterclockwise;
![]() :zooms in the photo size up to 8X;
:zooms in the photo size up to 8X;
![]() :zooms out the photo size down to1/4;
:zooms out the photo size down to1/4;
Mov...: after zooming in the photo, press the OK button when selecting the MOVE icon. You can view more details of the current photo by pressing the Up/Down/Left/Right buttons;
Slide...: Slide Show, the animation modes for switching the photos. There are options of Fade, Normal, Random Play, Blocks, Diagonal Blocks, Wipe.
Tips:
- Your projector can play the photo with formats of BMP/JPG/PNG/GIF/JPEG.
- All the folders will be shown in the USB disk or microSD card, but you can only play the photo after you select PHOTO in the main interface.
Playing the Text
After selecting USB or TF in the interface of Input Source, you will enter the main interface which shows the options of MOVIE, MUSIC, PHOTO and TEXT.
Step 1: Select TEXT in the main interface by pressing the UP/Down/Left/Right buttons and the selected frame will be highlighted to be blue with font in yellow. Then press the OK button to enter the following interface;
Step 2: Select the disk C, then press the OK button to enter the disk;
Step 3: Select the text or click the folder to enter the next directory till you find the text you would like to play in thedirectory;
Step 4: Press the ![]() button on the projector or the Play/Pause button on the remote to play the selected text in full-screen mode.
button on the projector or the Play/Pause button on the remote to play the selected text in full-screen mode.
Press the OK button on the projector or the remote when playing the text, it will show a bottom bar with different settings. Press the Down button or the Back button to hide it.

Prev P: Previous Page, goes back to the previous page of the current text;
Next P: Next Page, goes to the next page of the current text;
Prev.: Previous, goes back to the previous text;
Next: goes to the next text;
Stop: exits from the current text;
MUSIC: after you tick some music files under the MUSIC category, go to the TEXT category. Press the OK button when selecting the MUSIC icon in the interface of the text playing, it will play the music files you ticked for text background;
Playlist: a list of text files that can be played from the folder. If you did not tick the texts by pressing the OK button in the Sub Menu, it will show all the texts that can be played; otherwise, it will show your ticked text(s).
Info.: shows the size of the current text;
Tips:
- Select the Return icon and press the OK button to return to the root directory shown in Step 1 no matter in which directory, while select the Up Folder icon and press the OK button to return to the parent directory;
- All the folders will be shown in the USB disk or microSD card, but you can only play the text after you select TEXT in the main interface.
- Your projector can play the text files with a format of TXT.
Connecting to the Computer
When you're in a conference room and need to project slides, videos, music and so on, please connect your computer to the projector.
Option 1: Connect the projector to your computer by using the HDMI cable in the package. An HDMI connection is recommended for projecting movies, videos, and other files which need to be HD.
Step 1: Turn on your computer and the projector;
Step 2: Connect the HDMI cable to your computer's HDMI port;
Step 3: Connect the other end to any available HDMI port on your projector;
Step 4: Press the ![]() button to enter the interface of Input Source;
button to enter the interface of Input Source;
Step 5: Select HDMI to project any files on your computer by pressing the Up/Down or the ![]() button.
button.

Option 2: You can also connect the projector to your computer by using a VGA computer cable in the package.
Step 1: Turn on your computer and the projector;
Step 2: Connect the VGA cable to your computer's VGA port;
Step 3: Connect the other end to the VGA port on your projector;
Step 4: Press the ![]() button to enter the interface of Input Source;
button to enter the interface of Input Source;
Step 5: Select VGA to project any file on your computer by pressing the Up/Down or the ![]() button.
button.

Notes:
- To connect a Mac/Surface that includes only a Mini DisplayPort, Thunderbolt port, or Mini-DVI port, you need to obtain an adapter that allows you to connect to the projector's HDMI or VGA port. Contact Apple/Microsoft for compatible adapter or get from any store by yourself. For example, here is a Mini DP cable which can be used as a reference (insert on end of the HDMI cable in the package to the projector and the other end to the HDMI connector of the Mini DP port when using):

- You need to select the project option when connecting your computer to the projector at the first use.
- For Windows7 and higher system, pressing the Windows logo key + P key at the same time invokes a display-switch toolbar with various display options shown below:

- PC screen only -This option displays the contents of your computer screen on the computer only. This is a great option to choose when your presentation hasn't yet started or if you want to use the computer for another reason and don't want the contents of the screen displayed through the projector for all to see.
Duplicate - This option simultaneously displays the contents of the computer screen on the computer screen and through the projector. This is a great choice when your back will be toward the projector's screen while giving a presentation. This way you can watch the computer screen while the audience watches the projector screen and you won't have to continually turn your back to the audience during the presentation.
Extend - This option splits the image between the computer and projector. This way you can display one thing on your computer screen and something else on the projector screen. This is great when using PowerPoint so the presentation is displayed on the projector while your presentation notes are displayed on your computer screen in front of you.
Projector Only (Second Screen Only) - As its name implies, this option will display the content of your presentation on the projector, but show a blank screen on your computer. Although not a popular choice, this is a good option when you are running your presentation from your laptop on battery power. Turning off the laptop screen can help preserve battery life.
Combination keys to invoke and switch the display mode might vary depending on different computer brands or models. Link with detailed information:
http://kb.mcgill.ca/?portalid=2&articleid=1750#tab: homeTab: crumb: 8:artId: 1751:src: article - For the Windows XP system, please refer to https://www.youtube.com/watch?v=fV6PQu1VzFg
- For the Mac system, Choose Apple menu > System Preferences, click Displays, then select the Arrangement tab to check/uncheck the Mirror Display box to extend or mirror the content to the projection screen. For more information, please refer to https://support.apple.com/en-us/HT202351;
- For Windows7 and higher system, pressing the Windows logo key + P key at the same time invokes a display-switch toolbar with various display options shown below:


Connecting to the Mobile Device
If you would like to project the files on your mobile devices like the smartphone or tablet, you can connect the projector to them.
Step 1: Turn on your mobile device and the projector;
Step 2: According to the connector on your mobile device, prepare an HDMI adapter by yourself;
Step 3: Connect the HDMI port to your projector;
Step 4: Connect the other end with Type-C/ Lightning/ Micro USB port to your mobile device.
For example, you can prepare an HDMI adapter with an HDMI port for connecting to the projector, a USB port for charging and a Type-C/ Lightning/ Micro USB port for connecting to your mobile device as below:

Step 5: Press the ![]() button to enter the interface of Input Source;
button to enter the interface of Input Source;
Step 6: Select HDMI to project any file on your mobile device by pressing the Up/Down or the ![]() button.
button.
Tip:
- Select Trust when there may be a pop-up window on your mobile device, then you can project any files on the mobile device;

- When it shows the screen with some QR codes, butterfly icon and so on after selecting, please do not scan any QR code and just wait for a moment;
- Never directly insert your Lightning cable, Micro USB cable or the Type-c cable to the USB port on the projector. Instead, use an adapter mentioned above to transmit the signal. Here are some pictures of the proper cable below as reference:

For iPhone

For Android device with Micro USB

For Android device with Type-C


Connecting to the DVD Player
If you would like to watch movies by using the projector and a DVD player, you can use the AV cable in the package.
Step 1: Turn on your DVD player and the projector;
Step 2: Connect the colorful Female connectors to your DVD player's RCA cable;
Step 3: Connect the yellow Male connector to the AV In port on the projector;
Step 4: Press the ![]() to enter the interface of Input Source;
to enter the interface of Input Source;
Step 5: Select the correct input source AV to project the DVD in your DVD player by pressing the ![]() button.
button.

Using the Basic Projector Features
You can use the projector's Menu system to adjust the settings to control how your projector works.
Picture Settings
- Press the Menu button, it will display the PICTURE settings shown below.

Picture Mode: switches among the image modes ofStandard, Soft, User and Vivid for different projected contents. You can set up the Contrast, Brightness, Color, Sharpness and Tint for the image after you select the User mode;
Color Temperature: switches among the color temperature modes of Medium, Warm, User and Cool for different color preferences of the image. You can set up color proportions of Red, Green and Blue for the image after you select User mode;
Aspect Ratio: is the ratio of its sizes in different dimensions. It has 4:3, 16:9 and Auto;
Noise Reduction: sets up the intensity of noise reduction when the projected contents have sound. It includes Off,Low, Middle, High and Default;
Reduce Display Size 100%: to proportionally reduce the image size, being range from 75% to 100%. - Press the Up and Down button to select the option you would like to change, then press the OK button to enter the submenu to set up.
- When you finish changing settings on a menu, press the Back button to exit.

Sound Settings
- Press the Left and Right buttons to enter the Sound Settings:

Sound Mode: To set up sound patterns of Standard, MUSIC, MOVIE, Sports and User for different projected contents;
Balance: to balance the sound of the left and right channel of the speaker;
Auto Volume: to intelligently adjust volume. - Press the Up and Down buttons to select the option you would like to change, then press the OK button to enter the submenu to set up.
- When you finish changing settings on a menu, press the Back button to exit.

Option Settings
- Press the Left and Right buttons to enter the Option Settings:

OSD Language: to set up the language displayed in the operation interface;
Restore Factory Default: to reset the projector;
Blending: to adjust the background transparency of the Menu interface. You can choose from Low, Middle, High and Off;
OSD Duration: to adjust the duration of keeping the Menu interface. You can choose from 5 Sec, 10 Sec, 15 Sec and Off;
Software Update (USB): to update the projector's software version. - Press the Up and Down buttons to select the option you would like to change, then press the OK button to enter the submenu to set up.
- When you finish changing settings on a menu, press the Back button to exit.

After Using Your Projector
Please turn off the projector after using it.
- Press the On/Off button once, the projector displays a shutdown confirmation screen below:
Press Power again to power off, or press another button to cancel. - Turn off the projector by another press. (To leave it on, press any other button.)
- Unplug the power cord of the projector;
- Cover the lens and store the projector in a cool and dry place;
Troubleshooting
Problems listed below might occur during the operation of your projector. Please refer to the possible factors which might cause the issue to do troubleshooting.
- Why Is the Display of the Projector Available but Without Audio?
*The Projector or the connected device (PC, TV, etc.) is muted
*Dolby sound is not supported, exit to play again
*The audio format is not supported by the projector
*VGA connection can only transmit analog signal of video not audio. An external speaker is required when the device is connected via VGA cable.
*Encryption applied to the videos or media player which holds the video. Try more videos to define this possibility.
*Exclude the above possibilities, try another HDMI cable /external speaker, and a 2.0USB disk/ Micro SD card within 32G/USB hard disk within 1TB to play directly to check if the video and audio are both available. - Why Is the Audio of the Projector Available but Without Display?
*The video format is not supported by the projector
*Encryption applied to the videos or media player which holds the video
*If the lamp of the projector is off with only audio playing, the lamp is defective. Please contact seller for a replacement
*Try another HDMI cable if you select the HD input source - Why Does the Projection Screen Show No Signal?
*Make sure all cables are plugged correctly and firmly
*Make sure you select the right input source. For example, if you insert a USB drive, please select USB in the interface of Input Source *USB 2.0 disk is supported on this projector. If a USB 3.0 is connected, it will only show No Signal. - How Can I do if the Image is Blurry or Out of Shape?
*Adjust the focus and keystone ring by moving it leftward/rightward till it shows the best images
*Place projector on a flat surface horizontally or vertically. An inclination of any angle may result in blurry displays or uneven colors
*Darker environment suggested achieving the best projecting performance
*The eligible distance of 1.16m-5m/37inch-150inch between the projector and projecting screen/wall
*Projecting wall or screen is clean white if possible. - How Can I Do if the Image is Up Side Down?
*Enter Menu-Picture-Projection Mode to flip the projection image accordingly. - How Can I Do if the Projection Screen is Not Square or Allied Horizontally
*Make sure the projector is placed on a flat surface with projector light in the middle of the screen.
*Make sure the projector screen is placed horizontally. - How Can I Do if There is Color Distortion?
*Make sure the video source has a fine resolution.
*Adjust the colors: enter Menu-Picture-Color Temperature, then select different modes and adjust the value accordingly.
*Reset the projector to manufacturer setting: enter Menu-Option-Restore Factory Default to reset. - How Can I Do if the Remote is Unresponsive?
*Make sure the batteries are installed correctly and the power is enough.
*The remote works with the projector through the IR receiver. The remote works only when the IR receiver is within the direct reaction distance and will be unresponsive if the IR receiver is blocked or covered. - How Should I do if There are Small Dots on Display?
*Tap the projector slightly to shake off the dust which may be caused during installing or shipping
*Clean the lens with clean non-woven fabrics - How Should I Do if There is Expanding Dark Spot or Smoke when Using the Projector?
*Check if the fan noise increases or the fan stops working. Unplug the projector and contact Vankyo Team for assistance.
*Make sure the outlet and projector power adapter are not wet or humid which will cause sparks or smoke on outlet when power on the projector. - Why Does the Projector is Shut Off during Playing?
*Make sure the power plug is working and firmly fitted into the outlet.
*If the LED indicator on the projector is light up, but the fan doesn't work, please contact Vankyo Team for assistance.
*Overheat on the projector will activate built-in power-off protection panel. Restart the projector when it gets cooler.
*Overload of power when USB disk of 1TB or above is connected without external power supply will cause shutting off. Insert the disk when the projector is powered off or provide an external power supply for disk would solve the issue. - Can this Projector Support 3D Effect?
*The projector supports 3D video source, and 3D viewing performance is achievable with Red-Blue 3D Glasses; but please understand the experience will not be better than in the theater and we do not recommend it if you have a higher expectation about 3D effect. - Why doesn't Anything Work in the Main Interface Especially with External Storage Connected?
*Correct input source must be selected when you use the USB disk or SD card; otherwise, No Signal will be shown on the screen. - Why doesn't the Projector's Lamp Light Up or Power On?
*Please contact Vankyo for assistance when this occurs. - How Can I Change the Language?
*Press the Menu button to enter Option -OSD Language interface to select the language - How Can I Connect My Smart Phone to the Projector?
*HDMI adapter is needed to delivery display from smart phones. Adapters vary depending on smart phones. - What kind of Screws do I need for mounting this Projector?
*M4 Screw - What Kind of Cable do I Need when Connecting TV BOX, TV, Firestick and DVD Player to the Projector?
*HDMI cable for all devices mentioned above. For some TV without HDMI port, VGA cable will work. Certain DVD players require the AV cable connection. - How Can I Display PowerPoint on the Projector?
*To project the PowerPoint from a computer or other mobile devices, you can just connect the computer or the mobile device to the projector;
*To project from a USB disk, PowerPoint is not supported. However, we can save PowerPoint profile as PNG, or JPG or other image formats which are supported by the projector, then select the photos that we plan to do loop play. Default interval of each photo is about 5 second and we can pause it by controlling through the button on the remote or the projector.

VideosVankyo Leisure 3 Review Video
Documents / Resources
References
![kb.mcgill.ca]() http://kb.mcgill.ca/?portalid=2&articleid=1750#tab:homeTab:crumb:8:artId:1751:src:article
http://kb.mcgill.ca/?portalid=2&articleid=1750#tab:homeTab:crumb:8:artId:1751:src:articlehttps://www.youtube.com/watch?v=fV6PQu1VzFg
![kb.mcgill.ca]() http://kb.mcgill.ca/?portalid=2&articleid=1750#tab:homeTab:crumb:8:artId:1751:src:article
http://kb.mcgill.ca/?portalid=2&articleid=1750#tab:homeTab:crumb:8:artId:1751:src:articlehttps://support.apple.com/en-us/HT202351
Download manual
Here you can download full pdf version of manual, it may contain additional safety instructions, warranty information, FCC rules, etc.
Advertisement


Need help?
Do you have a question about the Leisure 3 and is the answer not in the manual?
Questions and answers