
Related Manuals for Kontron CP-RIO6-923


Summary of Contents for Kontron CP-RIO6-923
- Page 1 sales@artisantg.com artisantg.com (217) 352-9330 | Visit our website - Click HERE...
- Page 2 » Kontron User's Guide « CP-RIO6-923 Document Revision 1.2 Document ID: CP-RIO6-923 Issue Date: April 2011 If it's embedded, it's Kontron. www.kontron.com...
-
Page 3: Revision History
© 2011 Kontron, an International Corporation. All rights reserved. The information in this user's guide is provided for reference only. Kontron does not assume any liability arising out of the application or use of the information or products described herein. This user's guide may contain or reference information and products protected by copyrights or patents and does not convey any license under the patent rights of Kontron, nor the rights of others. -
Page 4: Table Of Contents
3.1 1000BASE-T Ports ....................9 3.2 Serial RS232 Interface ................... 11 3.3 CompactPCI Bus Connectors ..................12 3.4 Front Panel Elements .................... 15 Getting Help ....................A-2 A.1 Returning Defective Merchandise................A-2 A.2 When Returning a Unit..................A-3 CP-RIO6-923 User Guide www.kontron.com... - Page 5 List of Tables Table 1-1: CP-RIO6-923 Main Specifications ..............3 Table 3-1: Ethernet Port Mapping ................9 Table 3-2: RJ45 Pin Assignment ................. 10 Table 3-3: RS232 Pin Assignment ................11 Table 3-4: Serial console terminal cable interface: RJ45 Female to DB9 Female ..... 11 Table 3-5: Connector J3 Pinout ..................
- Page 6 List of Figures Figure 3-1: Functional Block Diagram ................9 Figure 3-2: CP-RIO6-923 single-slot front panel ..............16 Figure 3-3: CP-RIO6-923 dual-slot front panel ..............16 CP-RIO6-923 User Guide www.kontron.com...
-
Page 7: Proprietary Note
Kontron AG without further notice. Trademarks Kontron AG and the Kontron logo are trade marks owned by Kontron AG, Germany. In addition, this document may include names, company logos and trademarks, which are registered trademarks and, therefore, propri- etary to their respective owners. -
Page 8: Before You Begin
• Use extreme caution when installing or removing components. Refer to the installation instructions in this user's guide for precautions and procedures. If you have any questions, please contact Kontron Technical Support WARNING High voltages are present inside the chassis when the unit’s power... -
Page 9: When Working Inside A Computer
Also, before connecting a cable, make sure both connectors are correctly oriented and aligned. CAUTION Do not attempt to service the system yourself, except as explained in this user’s guide. Follow installation and troubleshooting instruc- tions closely. viii CP-RIO6-923 User Guide www.kontron.com... -
Page 10: Advisory Conventions
CE Conformity This symbol indicates that the product described in this manual is in compliance with all applied CE standards. Please refer also to the section „Regulatory cpmpli- ance Statements“ in this manual. CP-RIO6-923 User Guide www.kontron.com... -
Page 11: Safety Instructions
Therefore, in the interest of your own safety and of the correct operation of your new Kontron product, you are requested to conform with the following guidelines. -
Page 12: Special Handling And Unpacking Instructions
Unpacking Follow these recommendations while unpacking: • Remove all items from the box. If any items listed on the purchase order are missing, notify Kontron customer service immediately. • Inspect the product for damage. If there is damage, notify Kontron customer service immediately. -
Page 13: General Instructions On Usage
General Instructions on Usage In order to maintain Kontron’s product warranty, this product must not be altered or modified in any way. Changes or modifications to the device, which are not explicitly approved by Kontron AG and described in this manual or received from Kontron’s Technical Support as a special handling instruction, will void your... -
Page 14: Regulatory Compliance Statements
CE compliance. Kontron does not offer engineering services for designing cabling systems. In addition, Kontron will not retest or recertify systems or components that have been reconfigured by custom- ers. -
Page 15: Two Year Warranty
Any extensions to the original guarantee are consid- ered gestures of goodwill, and will be defined in the “Repair Report” issued by Kontron with the repaired or replaced item. -
Page 16: Introduction
Chapter 1 Introduction www.kontron.com... -
Page 17: Product Overview
Product Overview The CP-RIO6-923 is a PICMG 2.0 compliant 6U rear panel I/O board that can be used with PICMG 2.16 compli- ant switches like the CP6923 or the CP6930. It provides access to up to 24 of the switch ports that are con- nected to the backplane. -
Page 18: Technical Specification
Introduction 1.2 Technical Specification Table 1-1: CP-RIO6-923 Main Specifications CP-RIO6-923 SPECIFICATIONS • 6U CompactPCI, Rear-panel I/O board • 233 mm x 80 mm Mechanical • Weight Dual Slot Variant: 340g • Weight Single Slot Variant: 260g • Temperature Operating: -40°C to +85°C Designed to meet or exceed the following: •... -
Page 19: Installation
Chapter 2 Installation www.kontron.com... -
Page 20: Safety Requirements
2.1 Safety Requirements The following safety precautions must be observed when installing or operating the CP-RIO6-923. Kontron assumes no responsibility for any damage resulting from failure to comply with these requirements. -
Page 21: Installation Procedure
2.2 Installation Procedure For installing the CP-RIO6-923, it is not required that the system is powered down or the switch board in the corresponding front slot is removed or deactivated. To install the RIO module in a system proceed as follows: 1. -
Page 22: Removal Procedure
Installation 2.3 Removal Procedure For removing the CP-RIO6-923, it is not required that the system is powered down or the switch board in the corresponding front slot is removed or deactivated. To remove the RIO module proceed as follows: 1. Ensure that the safety requirements indicated in section 2.1. are observed. -
Page 23: Hardware Description
Chapter 3 Hardware Description www.kontron.com... -
Page 24: 1000Base-T Ports
The dual-slot version supports PICMG 2.16 backplane ports FL1 to FL23 and FLf (Fabric to Fabric Link Port). The single-slot version supports FC12 to FL23 and FL15 to FL23 on the CP-RIO6-923-9. The switch interfaces which are accessible via the CP-RIO6-923 are listed in the following table. -
Page 25: Table 3-2: Rj45 Pin Assignment
Note that ports marked with a '-' are not available on the RIO module. On the CP-RIO6-923-9, backplane contacts of FL12 to FL14 are removed to increase signal quality in applica- tions were these ports connect to other cPCI slots on the backplane. Covers are plugged into the correspond- ing non-functional RJ45 ports. -
Page 26: Serial Rs232 Interface
3.2 Serial RS232 Interface The CP-RIO6-923 provides a serial RS232 interface via an RJ45 connector. It is labelled "COM" on the front plate. This connector is provided on the dual-slot as well as on the single-slot variant. It has the following... -
Page 27: Compactpci Bus Connectors
Hardware Description 3.3 CompactPCI Bus Connectors Three daughter card connecters (rJ3, rJ4 and rJ5) are used for the connection between the CP-RIO6-923 and the backplane. • rJ3 connects FL Port 1 to FL Port 8 and FL Port f • rJ4 connects FL Port 20 to FL Port 23 and the RS232 Interface (RX/TX) •... -
Page 28: Table 3-6: Connector J4 Pinout
FL_DC22- FL_DB22+ FL_DB22- FL_DD22+ FL_DD22- FL_DA23+ FL_DA23- FL_DC23+ FL_DC23- FL_DB23+ FL_DB23- FL_DD23+ FL_DD23- Key Area RTM_TXD# RTM_RXD# Note... RTM_TXD# (driven by switch board) and RTM_RXD# (driven by RIO module) are the two-pin RS232 rear I/O interface. CP-RIO6-923 User Guide www.kontron.com... -
Page 29: Table 3-7: Connector J5 Pinout
FL_DC11- FL_DB11+ FL_DB11- FL_DD11+ FL_DD11- FL_DA10+ FL_DA10- FL_DC10+ FL_DC10- FL_DB10+ FL_DB10- FL_DD10+ FL_DD10- FL_DA9+ FL_DA9- FL_DC9+ FL_DC9- FL_DB9+ FL_DB9- FL_DD9+ FL_DD9- (*) FL12, FL13 and FL14 are not connected to the backplane on the CP-RIO6-923-9 variant. CP-RIO6-923 User Guide www.kontron.com... -
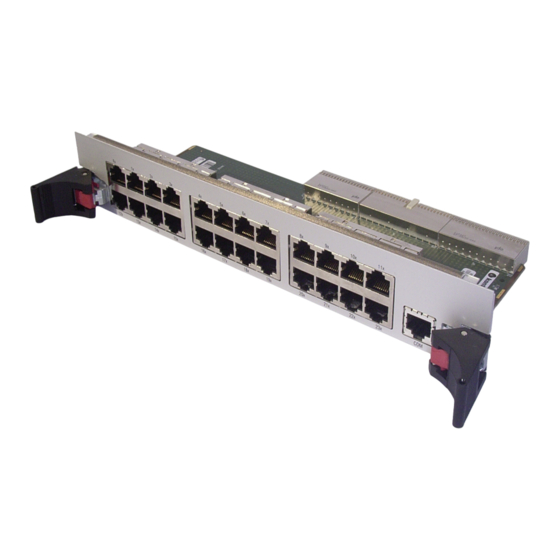
Page 30: Front Panel Elements
Hardware Description 3.4 Front Panel Elements Figure 3-1: CP-RIO6-923 single-slot front panel Figure 3-2: CP-RIO6-923 dual-slot front panel CP-RIO6-923 User Guide www.kontron.com... -
Page 31: Getting Help
Appendix A Getting Help www.kontron.com 1KTC5520/EATX... -
Page 32: Returning Defective Merchandise
Tel.: +49 (0) 8341 803 333 Fax: (450) 437-8053 Fax: +49 (0) 8341 803 339 If you have any questions about Kontron, our products, or services, visit our Web site at: www.kontron.com You also can contact us by E-mail at: North America: support@ca.kontron.com EMEA: support-kom@kontron.com... -
Page 33: When Returning A Unit
• E-mail • Send us an e-mail at: RMA@ca.kontron.com in North America or at: orderprocessing@kontron- modular.com in EMEA. In the e-mail, you must include your name, your company name, your ad- dress, your city, your postal/zip code, your phone number, and your e-mail. You must also include the serial number of the defective product and a description of the problem.
Need help?
Do you have a question about the CP-RIO6-923 and is the answer not in the manual?
Questions and answers