
Related Manuals for OPTO-EDU A12.1010


Summary of Contents for OPTO-EDU A12.1010
- Page 1 A 1 2 . 1 0 1 0 Laboratory Biological Microscope Instruction Manual Please read this manual carefully before use microscope!
-
Page 2: Table Of Contents
Contents BM2000 1. Structure and nomenclature -------------------------------------------------------4 2. Technical parameter and specification ------------------------------------------6 3. Configuration -----------------------------------------------------------------------8 4. Assemblage -------------------------------------------------------------------------9 5. Operation --------------------------------------------------------------------------13 6. Troubleshooting -------------------------------------------------------------------18 7. Maintenance -----------------------------------------------------------------------20 8. Products’ Standards --------------------------------------------------------------20... - Page 3 Safety notice 1. Transportation As microscope is a precision instrument, handle with care, avoiding impact or abrupt movement during transportation. Do not push or pull the microscope during using, otherwise the precision for image will be reduced. 1.1 Hold the curve and keep the microscope in balance 1.2 Do not hold the focusing knob, eyepiece tubes and stage as these parts are movable.
- Page 4 voltage may cause short circuit and fire. The microscope will be damaged. Input voltage in the label: 220~240V 50/60Hz Working voltage could be AC 220V, 230V or 240V 7. The bulb, fuse and electronic cord have been assembled already in the factory and please make sure to use the spare parts of them supplied by the manufacturers.
-
Page 5: Structure And Nomenclature
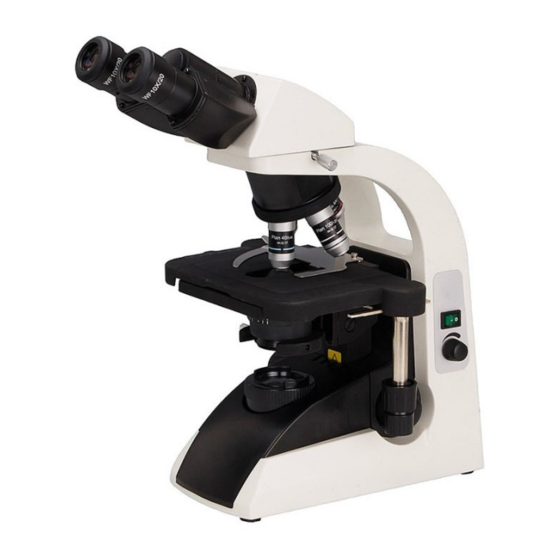
1. Structure and nomenclature Eyepiece 10X, Binocular head diopter adjustable Eyepiece fixture Eye tubes fixture screw Microscope body Nosepiece Objectives Power supply Specimen holder Mechanical stage Lightness adjusting knob switch screw Condenser with Fine focusing knob auxiliary lens Collector Stage movement knob (Y axis) Stage movement knob (X axis) -
Page 6: Technical Parameter And Specification
2. Technical parameter and specification 1. Specification 1.1 Optical system: infinity optical system 1.2 Illumination: inserted transmitted illumination, 12V20W/30W halogen bulb (standard outfit) or LED (available) Input voltage: 220V~240V 50/60Hz Voltage undulation: ±10% Electric current: 0.4A Fuse: 250V 1A delayed model, 5×20 minitype fuse 2pcs 1.3 Focusing adjustment: Division of fine focusing adjustment: 0.002mm Fine focusing knob control range: stage will be up or down 0.2mm per circle Coarse focusing knob control range: stage will be up or down 20mm... -
Page 7: Configuration
Resolution = λ / ( 2 × N.A.) λ stands for wavelength ( λ = 0.55μmm) ﹡Eyepiece view field The max diameter measured when the diaphragm is open. 10X/20 means the magnification is 10X and the max diameter of view field is 20mm ﹡Effective view field Liner view field which is observed on the object surface Effective view field = eyepiece view field / objective’s magnification... - Page 8 objectives) 100X 60X/0.85 achromatic objective LED transmitted illumination Siedentopf trinocular inclined at 30º(360º rotatable) 4. Assemblage Please read the safety notice carefully before assembly and make the assembly according to the following steps. Tools: wrench (2 pcs) 4.1 There is correct input voltage in the label on microscope. Make sure the voltage in your position is right.
- Page 9 4.4 Mount the blue filter Take out the filter from the bottom of condenser and mount it in the bracket then move the bracket into the condenser. 4.5 Adjustment and replacement 4.5.1 Condenser The condenser is mounted in the microscope before shipment.
- Page 10 4.5.5 Other attachments Replace other attachments (eg, camera) according to the instruction 4.6 Replacement 4.6.1 Replacement for bulb 4.6.1.1 Turn off the power supply (turn the switch to “O”) and pull out the connector 4.6.1.2 Wait for 30 minutes till the bulb is cooling 4.6.1.3 Handle the grooves in condenser and pull it out 4.6.1.4 Pull out the original bulb 4.6.1.5 Replace the bulb by gloves or cloth material then...
- Page 11 5.4 Focus by 10X objective Put the 10X objective into the optic path and focus by turning coarse and fine focusing knob ﹡Turn the stage and focusing knob according to the direction shown in the picture ﹡There is no coarse focusing knob in one side of stage’s moving knob and in the other side there are both coarse and fine focusing knob ﹡Never turn the left and right focusing knob in the adverse direction at the same time.
- Page 12 accordingly 5.8 Adjusting aperture diaphragm Adjust the aperture diaphragm adjusting shaft for condenser till the position which stands for the magnification of objective ﹡adjust the aperture diaphragm 5.8.1 Adjust the aperture diaphragm by the adjusting shaft. The brightness and resolution will be decrease while the contrast and depth of view will increase if the diameter of aperture diaphragm reduces 5.8.2.
-
Page 13: Operation
As the air bubble in the oil immersion will make bad affect to the quality of image, please make sure that there is no air bubble in the oil immersion before use. Please check the air bubble as following, remove the eyepieces and open the view field diaphragm and aperture diaphragm entirely then observe the exit pupil which is light and in nummular shape 5.9.2.3 Remove the air bubble as following... -
Page 14: Troubleshooting
5.11.2 Installation for Canon 650 digital camera Connect the photo adaptor with the Canon 650 digital camera. Then insert it into the photo tube. Adjust it till get sharp image then tighten the fixing screw. The operation is same as the above of CMOS/CCD camera. -
Page 15: Maintenance
Revolving nosepiece not in click stop Revolve to click-stop position position Image tinged yellow Blue filter not used Use blue filter Insufficient illumination brightness Condenser aperture too small Readjust aperture Condenser position too low Correct position Dirt or dust on the lens (condenser, Cleaning objective, eyepiece, collector) 2. - Page 16 Do not use petroleum benzine to clean the entrance lens at the bottom of the eyepiece tube or prism surfaces inside the eyepiece tube. Absolute alcohol and petroleum benzine are quite inflammable. Take great care when handling them and when setting the power switch on and off. Be very careful with fire. 2.
Need help?
Do you have a question about the A12.1010 and is the answer not in the manual?
Questions and answers