
Related Manuals for Thermo Scientific Shandon ClearVue A79210100


Summary of Contents for Thermo Scientific Shandon ClearVue A79210100
- Page 1 Shandon ClearVue™ Operator Guide - English A79210100 - Issue 2 Shandon ClearVue™ Operator Guide A79210100 - Iss 2...
- Page 2 © 2007 Thermo Fisher Scientific. All rights reserved. Thermo Shandon Limited is an ISO 9001 and TickIT Accredited Company Thermo Fisher Scientific is the trading name of Thermo Shandon Limited All other trademarks are the property of Thermo Fisher Scientific and its subsidiaries Thermo Fisher Scientific makes every endeavour to ensure that the information contained in its support documentation is correct and clearly stated but does not accept responsibility for any errors or omissions.
- Page 3 Symbols Symbols The following symbols and conventions are used throughout this manual and on the instrument. ThIS SyMbOL IS USED ON ThE EQUIPMENT, OR IN A DOCUMENT, TO WARN ThAT INSTRUCTIONS MUST bE FOLLOWED FOR SAFE AND CORRECT OPERATION. IF ThIS SyMbOL APPEARS ON ThE INSTRUMENT, ALWAyS REFER TO ThIS OPERATOR GUIDE.
-
Page 4: Table Of Contents
Contents How to Use This Guide 1 - Introducing the Shandon ClearVue 1-1 - Introduction 1-2 - Coverslip Compatibility 1-3 - Identification of Parts 1-4 - System Interfacing 1-5 - System Specification 1-6 - Coverslipping Method 2 - Basic Operation 2-1 - Daily Tasks 2-2 - Weekly Tasks 2-3 - Changing the Carbon Filter... - Page 5 3 - Settings 3-1 - Selecting Coverslip Size Options 3-2 - Adjusting Coverslip Position 3-3 - Altering Coverslip Transfer Head Position 3-4 - Screen Options 3-5 - Time and Date Settings 3-6 - Disc Options 3-7 - Altering the Mountant Dispense Volume 3-8 - Changing Languages 4 - Troubleshooting 4-1 - Error Screens...
-
Page 6: How To Use This Guide
How to Use This Guide Introduction Introduction The Shandon ClearVue is a high throughput, automated coverslipper intended for use in laboratories by operators familiar with coverslipping techniques and laboratory equipment. before operating this instrument the user should have read and Safety Safety and Warranty understood the... -
Page 7: Introducing The Shandon Clearvue
1 - Introducing the Shandon ClearVue 1-1 - Introduction 1-1 - Introduction The Shandon ClearVue is a high-throughput, precision engineered, slide coverslipper, capable of coverslipping 400 slides every hour in a precise and efficient manner. The Shandon ClearVue has been designed for general laboratory use, and can handle baskets from the following stainers: ®... -
Page 8: Identification Of Parts
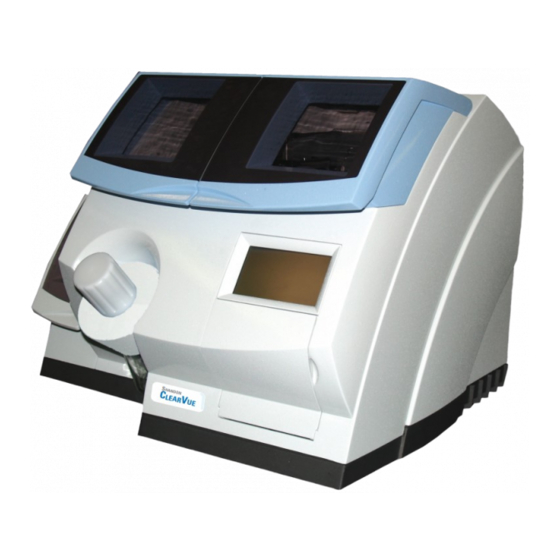
1-3 - Identification 1-3 - Identification of Parts of Parts A79210100 - Iss 2 Shandon ClearVue™ Operator Guide... - Page 9 1 - Load Door 1 - Load Door Load Door 2 - Unload Door 2 - Unload Door Unload Door 3 - Prep Door 3 - Prep Door Access Door 4 - Touch Screen 4 - Touch Screen 5 - Mountant Bottle 5 - Mountant Bottle Touch Screen 6 - Load Rail...
- Page 10 Orientation Orientation Indicator for Indicator for loading onto loading onto ClearVue ClearVue Slide Slide Shelves Shelves Location Location Hook Hook Orientation Orientation Indicator for Indicator for slide loading slide loading Slider Slider A79210100 - Iss 2 Shandon ClearVue™ Operator Guide...
- Page 11 1-4 - System 1-4 - System Touch Screen panel is the primary user interface mode on the Shandon ClearVue. Interfacing Interfacing It is used to input data, operate the manual functions and inform the user of instrument data. In addition, the Shandon ClearVue will issue audible alerts when appropriate.
-
Page 12: System Specification
1-5 - System 1-5 - System Specification Specification Dimensions height 500 mm 19.7” Width 645 mm 25.4” Depth 575 mm 22.6” Weight 48 kg 106 lbs Electrical Specification Voltage 100 - 240 V Frequency 50 / 60 hz Power (max) 300 VA <... -
Page 13: Coverslipping Method
1-6 - Coverslipping 1-6 - Coverslipping The Shandon ClearVue has been specifically designed to ensure consistent, high quality, coverslipping. Method Method The following diagram shows how the coverslip is laid: This method of coverslipping has been proven, through rigorous testing, to minimize bubbles and ensure complete adhesion to the slide. -
Page 14: Basic Operation
2 - Basic Operation The following chapter describes the basic operational tasks required to run the Shandon ClearVue on a daily basis. 2-1 - Daily Tasks 2-2 - Weekly Tasks 2-3 - Changing the Carbon Filter 2-4 - Filling the Xylene Tray 2-5 - Filling the Mountant bottle 2-6 - Changing the Purge Tray and Debris Tray 2-7 - Starting up the Shandon ClearVue... -
Page 15: Daily Tasks
2-1 - Daily Tasks 2-1 - Daily Tasks The following tasks should be carried out at least once a day: Top-up the Dispense Head Cleaning Station - see Section 2-8 Wipe the Dispense Head with a Xylene damp cloth. Wipe the top of the Dispense Head Cleaning Station with a Xylene damp cloth. -
Page 16: Weekly Tasks
2-2 - Weekly Tasks 2-2 - Weekly Tasks The following tasks should be carried out at least once a week: Empty, clean and refill the Dispense Head Cleaning Station - see Section 5-2-3. Remove any discarded coverslips from the Slip Dispense Area. -
Page 17: Changing The Carbon Filter
2-3 - Changing 2-3 - Changing Carbon Filter 3 Months should be changed every to ensure it functions correctly. the Carbon Filter the Carbon Filter Carbon Filter To change the Filter Cover Slide the off to gain access to the Carbon Filter Carbon Filter Lift the... - Page 18 Filter Cover Slide the back into position making sure it is firmly clipped into place. The Carbon Filter should be changed every 3 months - write the installation date on the Carbon Filter using a marker to ensure proper record keeping. A79210100 - Iss 2 Shandon ClearVue™...
-
Page 19: Filling The Xylene Tray
2-4 - Filling the 2-4 - Filling the Xylene Tray is intended to provide a xylene rich atmosphere Load Rail Xylene Tray Xylene Tray to prevent slides on the from drying out. Xylene Tray every week should be checked and topped up as required. - Page 20 The depth of the xylene should be no higher Anti-Surge Baffle than the top of the Anti-Surge Baffle Anti-Surge Baffle Xylene - Harmful Xylene - Harmful Xylene Tray Slowly close the completely to ensure that the seal is properly engaged. Anti-Surge Baffle Anti-Surge Baffle A79210100 - Iss 2...
-
Page 21: Filling The Mountant Bottle
2-5 - Filling the 2-5 - Filling the Mountant Dispense Head The Mountant bottle supplies to the Mountant Bottle Mountant Bottle Mountant Bottle It is strongly advised not to allow the to run dry. Some mountants are harmful! Mountant Bottle To fill the Mountant Bottle Remove the... - Page 22 Mountant Bottle Replace the lid and tighten it fully. Maximum Maximum Fill Level Fill Level Do not overfill the Mountant Bottle. Ensure no mountant reaches the Air Vent on the spout as this will cause the instrument to cease operation. Note: De-Gas the Mountant Bottle (see Section 2-9) after filling.
- Page 23 2-6 - Changing 2-6 - Changing Purge Tray Mountant is used as a recepticle for expelled Xylene the Purge Tray the Purge Tray and Debris Tray and Debris Tray Purge Tray The volume of fluid in the should be checked prior to Flush Purge carrying out either a...
- Page 24 Reach into the instrument as shown and, using Purge Tray the tab, carefully lift the down off its shelf. Harmful Chemicals Harmful Chemicals Purge Tray Dispose of the used according to local regulations. Either: Coverslip Hopper Unpack a new ; the end cap Purge Tray doubles as a new Purge Trays...
- Page 25 Purge Tray Place the new onto its shelf. Debris Tray Replace the Debris Tray Door Close the Shandon ClearVue™ Operator Guide A79210100 - Iss 2...
-
Page 26: Starting Up The Shandon Clearvue
2-7 - Starting Up the 2-7 - Starting Up the To start up the Shandon ClearVue: Shandon ClearVue Shandon ClearVue Mains Power Switch Turn the to the On ‘I’ position Battery Isolation Switch Turn the to the On ‘I’ position Language Select When the screen appears,... -
Page 27: Filling The Dispense Head Cleaning Station
Dispense Head Cleaning Station Dispense ensures the 2-8 - Filling the 2-8 - Filling the Head Mountant does not get blocked with Dispense Head Dispense Head Cleaning Station Cleaning Station Dispense Head Cleaning Station should contain enough Xylene for there to be a visible pool in the central well. Dispense Head Cleaning Station To Fill the Main Menu... - Page 28 Wait for activity within the Shandon ClearVue to Access Ready Touch stop, and to flash on the Screen. Access Door Open the A79210100 - Iss 2 Shandon ClearVue™ Operator Guide...
- Page 29 Dispense Head Cleaning Station should now be accessible from above. Dispense Head Cleaning Drip Xylene into the Station until it is at a level where it can be seen in the central well (approx. 18ml). Xylene Xylene Shandon ClearVue™ Operator Guide A79210100 - Iss 2...
- Page 30 Access Door When finished, close the Complete Touch Screen press the key on the A79210100 - Iss 2 Shandon ClearVue™ Operator Guide...
-
Page 31: Gassing The Mountant Bottle
2-9 - De-Gassing the 2-9 - De-Gassing the Mountant Bottle To De-Gas the Mountant Bottle Mountant Bottle Main Menu Mountant From the , press the Touch Screen on the De-gas Touch Screen Press the key on the Start Touch Screen Press the key on the Shandon ClearVue™... - Page 32 The Shandon ClearVue will now de-gas the Mountant Bottle When the Shandon ClearVue has stopped de- Mountant Bottle Exit gassing the press the Touch Screen key on the A79210100 - Iss 2 Shandon ClearVue™ Operator Guide...
-
Page 33: Flushing The System
2-10 - Flushing 2-10 - Flushing To flush the system: the System the System Access Door Ensure the is closed. Main Menu Mountant From the , press the Touch Screen on the Flush Touch Screen Press the key on the Purge Tray Ensure the is empty and that there... - Page 34 Wait for the activity within the Shandon ClearVue Purge to stop, and then empty or discard the Tray as described in Section 2-6 Exit Touch Screen Press the key on the A79210100 - Iss 2 Shandon ClearVue™ Operator Guide...
-
Page 35: Purging The System
2-11 - Purging 2-11 - Purging To purge the system: the System the System Access Door Ensure the is closed. Main Menu Mountant From the , press the Touch Screen on the Purge Touch Screen Press the key on the Start Touch Screen Press the... - Page 36 Wait for the activity within the Shandon Purge ClearVue to stop, and then empty the Tray as described in Section 2-6 Repeat Touch Screen Press on the to restart Purge Cancel process, or to exit. A79210100 - Iss 2 Shandon ClearVue™ Operator Guide...
- Page 37 2-12 - Changing the 2-12 - Changing the Coverslip Hopper To change the Coverslip Hopper Coverslip Hopper Access Door Open the Coverslip Hopper Remove the empty by lifting it upwards. Shandon ClearVue™ Operator Guide Dispense Dispense A79210100 - Iss 2 Dispense Dispense Directional...
- Page 38 Coverslip Hopper Unpack a new and identify Dispense Directional Arrow on the top. Dispense Dispense Directional Directional Arrow Arrow Purge Tray Remove the from the bottom of the Coverslip Hopper. Coverslip Hopper Load the new ensuring that Dispense Directional Arrow is pointing towards the back of the instrument.
- Page 39 2-13 - Loading 2-13 - Loading Baskets To load of slides: Baskets Baskets Load Door Open the Basket Load Rail Place the onto the shown. Notes: Ensure basket slider is closed before loading basket. Ensure directional arrow on basket is pointing upwards. Shandon ClearVue™...
- Page 40 Load Door Close the The Shandon ClearVue will start automatically. A79210100 - Iss 2 Shandon ClearVue™ Operator Guide...
-
Page 41: Unloading Baskets
2-14 - Unloading Baskets To unload Baskets Basket When a of slides is completed, the Audible Alert Shandon ClearVue emits an It is advisable to wait about 15 minutes before Basket removing a completed , to allow the Mountant Basket to dry enough to allow the be handled safely. - Page 42 Basket Unload Remove the completed from the Rail Unload Door Close the A79210100 - Iss 2 Shandon ClearVue™ Operator Guide...
-
Page 43: Aborting A Basket
2-15 - Aborting Basket If for any reason a being coverslipped needs to be returned Unload Rail a Basket to the without finishing the coverslipping process, Abort command can be used. Abort Basket Main Menu Options From the press the key on Touch Screen Abort... -
Page 44: Shutdown Procedure
2-16 - Shutdown To shutdown the Shandon ClearVue: Procedure Baskets • Ensure there are no still in the instrument. Dispense Head • Ensure the is located in the Dispense Head Cleaning Station Mains Power Switch ‘O’ • Switch the to the off position. - Page 45 3 - Settings The following chapter explains the optional settings available with the Shandon ClearVue. 3-1 - Coverslip Size Options 3-2 - Adjusting Coverslip Position 3-3 - Altering Coverslip Transfer head Position 3-4 - Screen Options 3-5 - Time and Date Settings 3-6 - Disc Options 3-7 - Altering the Mountant Dispense Volume 3-8 - Changing Languages...
- Page 46 3-1 - Coverslip The Shandon ClearVue is capable of using 3 different lengths of Coverslip Size Options These are: • 40 mm • 50 mm • 55 mm Coverslip Position The default setting for is with a Slide Coverslip between the end of the and the end of the 40 mm Coverslips can also be positioned centrally.
- Page 47 40 mm Coverslip The method for selecting the position of the as follows: Main Menu Options From the press the key on Touch Screen 40 Slips Touch Screen Press the key on the Centre Select either (default setting) or then press Shandon ClearVue™...
- Page 48 Using the procedure given in , move Section 3-3 Coverslip Transfer Head into the position Touch Screen specified on the and then press A79210100 - Iss 2 Shandon ClearVue™ Operator Guide...
- Page 49 3-2 - Adjusting The Coverslip position on the Slide can be adjusted in the following manner: Coverslip Position Main Menu Options From the press the key on Touch Screen Slip Position Press the key. Arrow Keys Use the to move the Coverslip to the required position.
- Page 50 Note: The Coverslip position can be adjusted by up to 1mm in any one direction in 0.25mm increments. The default position has a setting of 0. Positive numbers indicate that the Coverslip has moved in the direction of the corresponding arrow. Negative numbers indicate that the Coverslip has moved in the opposite direction to the arrow.
- Page 51 The negative number values indicate a movement in the opposite direction to the labelled arrows; Coverslip hence the is positioned below and to the left hand side of centre. Shandon ClearVue™ Operator Guide A79210100 - Iss 2...
- Page 52 3-3 - Altering Coverslip Transfer Head has 2 possible positions to allow Centrally Coverslip Transfer the 40 mm coverslips to be positioned either or in the End (Default) position ( See Section 3-1 Head Position The method for changing the Coverslip Transfer head position is: •...
- Page 53 Coverslip Transfer Head • Identify the Default Transfer Head Position Transfer Head Position for 40 mm Central Setup Thumbscrew • Loosen the by turning it anti- clockwise. Shandon ClearVue™ Operator Guide A79210100 - Iss 2...
- Page 54 Thumbscrew • Pull the out as shown to release Coverslip Transfer Head Location Pins Coverslip Transfer Head • Remove the from the Location Pins as shown. Location Pins A79210100 - Iss 2 Shandon ClearVue™ Operator Guide...
- Page 55 Coverslip Transfer Head • Reposition the required. Note: Ensure the Coverslip Transfer Head sits correctly on the Location Pins before tightening the Thumbscrew. Default Transfer Head Position Transfer Head Position for 40 mm Central Setup Shandon ClearVue™ Operator Guide A79210100 - Iss 2...
- Page 56 3-4 - Screen Options Touch Screen settings can be altered to adjust both the View Angle Brightness and the screen View Angle is the angle from which the screen is best View Angle viewed - so a tall person would want a higher than a shorter person.
- Page 57 Screen Adjust This will open the display. View Angle From this it is possible to adjust the Brightness Arrow using the relevant Keys Touch Screen When the is configured as Options required, press to return to the Menu Shandon ClearVue™ Operator Guide A79210100 - Iss 2...
- Page 58 3-5 - Time and The Time and Date can be altered in the following way: Date Settings Main Menu Options From the press the key on Touch Screen Set Time Press the key. Set Time This will open the display. A79210100 - Iss 2 Shandon ClearVue™...
- Page 59 Time From this it is possible to adjust the Date Arrow Keys using the relevant Time Format Date Format can also be 24 Hour / 12 Hour altered by pressing the mm/dd / dd/mm keys as appropriate. When the settings are configured as required, press to apply the settings.
- Page 60 3-6 - Disc Options Disc Options Engineers’ Log screen allows an to be taken and the Shandon ClearVue software to be updated. Engineers’ Log may be requested by a Service Engineer to aid troubleshooting. Engineers’ Log To create an Note: An Engineers’...
- Page 61 Disc Options This will open the display. Insert a blank, formatted, floppy disc into the Disc Drive Write Engineers’ Log Press the key. The Shandon ClearVue will then write to the floppy disc. When the above screen has gone and the light Disc Drive on the has gone out, it is safe to...
- Page 62 Software Update would normally be performed by a Service Engineer; however, it is possible for the user to perform an update if supplied with a new version on a floppy disc. Software Update To perform a Insert the floppy disc, containing the updated Disc Drive version of the software, into the Disc Options...
- Page 63 3-7 - Altering To allow for variations in the thickness of cut samples, the Shandon Basket Recognition ClearVue has a feature. the Mountant Dispense Volume This allows the Shandon ClearVue to determine the colour of the Slider Baskets on the Baskets supplied with the Shandon ClearVue have either a Black Slider...
- Page 64 Mountant Volume To adjust the Main Menu Mountant From the , press the Touch Screen on the Volume Touch Screen Press the key on the Arrow Keys Use the to adjust the dispensed Basket volume for each type. A79210100 - Iss 2 Shandon ClearVue™...
- Page 65 Notes: The recommended volume of mountant for general use is 15ml. During processing, pressin the Mountant key from the Main menu will automatically open the Mountant Volume screen. Adjusting the Volume during processing will have an IMMEDIATE effect on the amount of mountant dispensed. Shandon ClearVue™...
- Page 66 3-8 - Changing After the initial start-up procedure it is possible to change the Language Touch Screen used on the display. Languages Language can be changed as follows: Main Menu Mountant From the , press the Touch Screen on the Language Touch Screen Press the...
- Page 67 Arrow Keys Use the to highlight the required language from the list available and press Select Shandon ClearVue™ Operator Guide A79210100 - Iss 2...
- Page 68 4 - Troubleshooting This chapter describes some possible problems and their solutions. 4-1 - Error Screens Error 1 Error 2 Error 4 Error 3 Error 6 Error 5 Error 8 Error 7 A79210100 - Iss 2 Shandon ClearVue™ Operator Guide...
- Page 69 Error 9 Error 10 Error 12 Error 11 Error 14 Error 13 Error 16 Error 15 Shandon ClearVue™ Operator Guide A79210100 - Iss 2...
- Page 70 Error 17 Error 18 Error 20 Error 19 Error 22 Error 21 Error 24 Error 23 Error 25 A79210100 - Iss 2 Shandon ClearVue™ Operator Guide...
- Page 71 Error Screen When an appears there will be a one or more of the following options given to rectify the error. Error Screens The specific explain the options available. Shandon ClearVue™ Operator Guide A79210100 - Iss 2...
- Page 72 4-2 - Identifying The quality of prepared slide can be used to help troubleshooting on the Shandon ClearVue, which can then be solved either by the Problems operator or by a Service Engineer. The two states which can be observed are: •...
- Page 73 Correct appearance of coverslipped slide: • Minimal overspill of mountant at the frosted end of slide. • Coverslipped area free from bubbles. • Coverslipped area totally covered in mountant. • Minimum mountant overspill over the rest of the coverslip perimeter. •...
- Page 74 Description Possible Cause Solution Broken Laydown: Too much ‘suckback’. Contact Thermo Fisher Scientific Service Department. Mountant Pump Contact Thermo Fisher Scientific Backlash in Service Department. • Small breaks at beginning Non-approved mounting reagent Use approved mounting reagent of laydown used. (see Appendix B).
- Page 75 Description Possible Cause Solution Dispense Head Dispense Head ‘Stutter’ Laydown: too high. • Check fully screwed down. • Contact Thermo Fisher Scientific Service Department. Pipes Syringe Flush Air in system until all bubbles have been expelled. • Laydown made up of several larger drops.
- Page 76 Description Possible Cause Solution Suction Cup Multiple Bubbles at End: broken. Suction Cup Replace (see Section 5-2-4) • Multiple bubbles visible towards the non-frosted end of the slide. Suction Cup Straight Line of Bubbles contaminated Suction Cup Remove (see with mountant. Section 5-2-4) and clean using a xylene-damp cloth.
- Page 77 Description Possible Cause Solution Dispense Head Dispense Head Single Bubble at Non- too high. • Check Frosted End of Slide fully screwed down. • Contact Thermo Fisher Scientific Service Department. • Often located underneath Suction Cup Dispense Head Dispense Head Single Bubble at Frosted too high.
- Page 78 Description Possible Cause Solution Poor quality (bowed) coverslips. Replace with better quality (non- Strip of No Mountant bowed) coverslips. • A distinct line of coverslip is not stuck to slide. A79210100 - Iss 2 Shandon ClearVue™ Operator Guide...
- Page 79 4-3 - Troubleshooting Tables Problem Cause Solution The Shandon The Shandon Wait approximately ClearVue does ClearVue is still 30 seconds for not respond when starting-up. the start-up the mains power sequence to finish. is switched on. No power supply. Connect the power lead and switch on the mains power at the socket and...
- Page 80 Problem Cause Solution Mountant Low xylene level Refill the Dispense Dispense Needle in Dispense head head Cleaning dirty / blocked. Cleaning Station. Station fully ( Section 2-8 Quick drying Contact your Mountant has Thermo Fisher formed a skin Product Specialist on the Needle.
- Page 81 Problem Cause Solution Slide jams. Incorrect size Refer to Section of slide. for maximum permissible slide sizes. Chipped or broken Ensure only slide loaded undamaged slides into basket. are loaded into the instrument. basket slider is Ensure the slider is not fully closed.
- Page 82 Problem Cause Solution Coverslip Incorrect size Refer to Section misdispense. of coverslip. for permissible coverslip options. broken slip Clear broken slips jamming hopper. from hopper. Debris on Slip Clean Slip Dispense Dispense Carriage. Carriage (see Section 5-2-7 Mountant dried Clean Slip Dispense on Slip Dispense Carriage (see Carriage.
- Page 83 Problem Cause Remedy Coverslip Loss of vacuum on Clean suction cup misdispense Coverslip Transfer (see Section 5-2-4 (Cont.). head Suction Cup. If this is ineffective call Thermo Fisher Service Team for support. hopper empty. Load new hopper (see Section 2-12 hopper not loaded Load hopper correctly.
- Page 84 Problem Cause Remedy breaking Incorrect size Refer to Section coverslips. of coverslip. for permissible coverslip options. broken slip Clear broken slips in hopper. from hopper. Debris on Slip Clean carriage Dispense Carriage. (see Section 5-2-7 Mountant dried Clean carriage on Slip Dispense (see Section 5-2-7 Carriage.
- Page 85 Problem Cause Remedy basket Jams. Incorrect size Refer to Section of slide. for maximum permissible slide sizes. basket slider not Ensure slider is fully closed. fully closed prior to loading basket. Damaged or Replace basket. broken basket. build-up of Clean or replace dried mountant basket.
- Page 86 Problem Cause Remedy breaking Slides. Incorrect size Refer to Section of slide. for maximum permissible slide sizes. Chipped or broken Ensure only slide loaded undamaged slides into basket. are loaded into instrument. Slide loaded into Ensure slides are basket incorrectly. correctly loading into baskets.
- Page 87 Problem Cause Remedy breaking Slides Transfer head Replace Transfer (cont.). damaged. head. Dispense head Set Dispense head height set height correctly incorrectly. see Section 5-2-8 Other error. Call Thermo Fisher Service Team for support. Shandon ClearVue™ Operator Guide A79210100 - Iss 2...
- Page 88 5 - Cleaning and Maintenance 5-1 - Cleaning Daily Tasks Section 2-1. Schedules Weekly Tasks Section 2-2. If the Shandon ClearVue has been used with, or has come into contact with, hazardous material, ensure that the appropriate decontamination procedures have been followed (See World Health Organization ‘Laboratory Biosafety Manual’).
- Page 89 Disconnect the Shandon ClearVue from the Mains before cleaning. Inspect the instrument for obvious damage or wear whenever it is being cleaned. Shandon ClearVue™ Operator Guide A79210100 - Iss 2...
- Page 90 5-2 - User Cleaning The following sections give details on how to carry out basic and Maintenance cleaning and maintenance procedures. If a problem occurs which is not covered in these sections contact Thermo Fisher Scientific Service Department. 5-2-1 - Changing O-Rings Rubber are used to ensure air-tight or water-tight seals...
- Page 91 O-Ring Seal Identify the black at the base of Mountant Bottle spout. O-Ring Seal Use a pair of scissors or wire-cutters to carefully O-Ring O-Ring Seal cut the , ensuring none of the Seal Mountant Bottle surfaces of the are damaged in the process.
- Page 92 O-Ring Seal Xylene Tray To remove the on the for replacement: Xylene is Harmful. Baskets Ensure that there are no currently being processed within the Shandon ClearVue. Taking care not to spill any remaining xylene, Xylene Tray pull the out and remove it from the instrument.
- Page 93 Use a pair of scissors or wire-cutters to O-Ring Seal carefully cut the , ensuring none of Xylene Tray the surfaces of the are damaged in the process. O-Ring Seal Xylene Tray To remove the on the for cleaning: Follow above.
- Page 94 O-Ring Seals To clean the O-Ring Seal Remove the using the appropriate method described above. Use a xylene-damp cloth to remove any O-Ring Seal encrusted mountant from the Check the seal for signs of tearing or splitting, and replace if necessary. O-Ring Seals To replace the Note:...
- Page 95 Retaining Surface Once it is over the , roll it Recess towards the Retaining Surface O-Ring Seal Allow the to snap into place, then Recess ensure it is properly seated in the Shandon ClearVue™ Operator Guide A79210100 - Iss 2...
- Page 96 5-2-2 - Mountant Jar A79210100 - Iss 2 Shandon ClearVue™ Operator Guide...
- Page 97 5-2-3 - Dispense Dispense Head Cleaning Station To clean the Head Cleaning Main Menu Mountant From the , press the Station Touch Screen on the Xylene Touch Screen Press the key on the Start Touch Screen Press the key on the Shandon ClearVue™...
- Page 98 Wait for activity within the Shandon ClearVue to Access Ready Touch stop, and to flash on the Screen. Access Door Open the A79210100 - Iss 2 Shandon ClearVue™ Operator Guide...
- Page 99 Dispense Head Cleaning Station should now be accessible from above. Dispense Head Cleaning Station Pull the upwards to remove it from it’s fixing. Shandon ClearVue™ Operator Guide A79210100 - Iss 2...
- Page 100 Dispense Head Cleaning Station Remove the as shown and dispose of the contents according to local regulations. Use a xylene damp cloth to clean all the surfaces Dispense Head Cleaning Station of the including the internal parts. A79210100 - Iss 2 Shandon ClearVue™...
- Page 101 Dispense Head Cleaning Reassemble the Station Dispense Head Cleaning Station Refill the described in Section 2-8 Shandon ClearVue™ Operator Guide A79210100 - Iss 2...
- Page 102 5-2-4 - Changing Suction Cup To change the the Suction Cup Access Door • Open the Coverslip Transfer Head • Identify the Default Transfer Head Position Transfer Head Position for 40 mm Central Setup A79210100 - Iss 2 Shandon ClearVue™ Operator Guide Dispense...
- Page 103 Thumbscrew • Loosen the by turning it anti- clockwise. Thumbscrew • Pull the out as shown to release Coverslip Transfer Head Location Pins Shandon ClearVue™ Operator Guide A79210100 - Iss 2...
- Page 104 Coverslip Transfer Head • Remove the from the Location Pins as shown. Location Pins Suction Cup • Remove the by pushing down from the top of the rubber as shown. Push down Suction Cup from top of Fitting Suction Cup A79210100 - Iss 2 Shandon ClearVue™...
- Page 105 Suction Cup • Fit the new by pushing it onto the Suction Cup Fitting Suction Cup Ensure top of Fitting Suction Cup is up against metal collar Coverslip Transfer Head • Replace the onto the Location Pins Thumbscrew and tighten the Shandon ClearVue™...
- Page 106 5-2-5 - Cleaning Slip Wiper To clean the the Slip Wiper A79210100 - Iss 2 Shandon ClearVue™ Operator Guide...
- Page 107 5-2-6 - Cleaning Camera To clean the the Camera Unload Door • Open the Camera Lens Lint- • Carefully wipe the using a Free Cloth Never use solvents or water to clean the camera. Shandon ClearVue™ Operator Guide A79210100 - Iss 2...
- Page 108 5-2-7 - Cleaning the Slip Dispense Carriage To clean the Slip Dispense Coverslip Hopper • Remove the as described in Carriage Section 2-12 Coverslip Hopper • Without turning the upside Hopper down, check the bottom of the for any Coverslips broken Broken glass may be present! Coverslips...
- Page 109 Slip Dispense Carriage • Move the forwards if Access necessary by pressing the button in the Mountant Screen and then following the steps Support given in for moving the Section 2-8 Shandon ClearVue™ Operator Guide A79210100 - Iss 2...
- Page 110 5-2-8 - Removal and Mountant Dispense Needle Assembly To remove the Cleaning the Mountant Access Door • Open the Dispense Needle Mountant Dispense Needle • Unscrew the Assembly Support Arm and lift out of the shown. Dispense Directional Arrow A79210100 - Iss 2 Shandon ClearVue™...
- Page 111 Do not disconnect the tubing! Mountant Dispense Needle • Place the Assembly in a container of xylene and allow to soak overnight. Needle • When the is clean, replace the Mountant Dispense Needle Assembly to the Support Arm. Mountant Dispense Needle •...
- Page 112 5-2-9 - Cleaning the Touch Screen To clean the display: Touch Screen Main Menu Options From the press the key on Touch Screen Clean Press the key. Cleaning screen will appear, in which it is Touch Screen possible to touch the display without any effect, enabling the cleaning of the screen.
- Page 113 Cleaning screen shows a countdown timer which shows how long the cleaning screen will continue to be dispayed for. Touch Screen When cleaning the • Use a soft, damp cloth to wipe the screen. • Thoroughly dry the screen using a lint-free cloth.
- Page 114 5-3 - Taking Out of If the Shandon ClearVue is to be taken out of operation for a long period of time, or put into storage, ensure the following procedure Operation and Storage has been followed: Mountant Bottle • Empty the and clean with xylene.
- Page 115 Appendix A - Spares and Accessories Accessories Item Part No. Coverslip hopper with Coverslips A792????? Gemini basket - Thick Prep A79220001 Gemini basket - Thin Prep A79220002 Sakura basket - Thick Prep A79220003 Sakura basket - Thin Prep A79220004 Extraction Adaptor Kit A792????? V24 Kit A792?????
- Page 116 Appendix B - Reagent List B1 - Reagents Xylene Toluene Shandon Xylene Substitute Ethanol Industrial Methylated Spirit (IMS) - up to 5% methanol in ethanol Isopropanol (IPA) Water Sodium hypochlorite (10% in water) B2 - Mountants Shandon ClearVue Mount Shandon Consul-Mount (Cytology Formulation) Shandon Consul-Mount (histology Formulation) Shandon Xylene Substitute Mountant Note:...
- Page 117 Appendix C - Transportation Instructions C1 - Things to Do Before Packing • Ensure the instructions for cleaning (see Section ) have been followed. Discard chemicals according to local environmental procedures. • Remove the following: • Debris Tray • Remove any discarded glass •...
- Page 118 Flush • When the cycle is complete, check that Mountant Bottle Cap is clear of mountant. Dispense Head Cap • Place the over the Dispense Head Needle to prevent the xylene which remains in the system from leaking out during transit. Approximately 5ml of xylene will remain in the system - follow good laboratory practice when packing and unpacking.
- Page 119 C2 - Packing Instructions Shandon ClearVue™ Operator Guide A79210100 - Iss 2...
- Page 120 Appendix D - Screen Maps A79210100 - Iss 2 Shandon ClearVue™ Operator Guide...
- Page 121 Shandon ClearVue™ Operator Guide A79210100 - Iss 2...
- Page 122 A79210100 - Iss 2 Shandon ClearVue™ Operator Guide...
- Page 123 Appendix E - Declaration of Conformity Shandon ClearVue™ Operator Guide A79210100 - Iss 2...
- Page 124 Index A79210100 - Iss 2 Shandon ClearVue™ Operator Guide...
- Page 125 Shandon ClearVue™ Operator Guide A79210100 - Iss 2...
Need help?
Do you have a question about the Shandon ClearVue A79210100 and is the answer not in the manual?
Questions and answers