
Related Manuals for Thermo Scientific Ion Torrent Genexus Integrated Sequencer


Summary of Contents for Thermo Scientific Ion Torrent Genexus Integrated Sequencer
- Page 1 ™ Genexus Integrated Sequencer USER GUIDE Catalog Number A45727 Publication Number MAN0017910 Revision A.0 For Research Use Only. Not for use in diagnostic procedures.
- Page 2 Manufacturer: Products: Life Technologies Holdings Pte Ltd | Genexus ™ Integrated Sequencer Block 33 | Genexus ™ Software Marsiling Industrial Estate Road 3 | #07-06, Singapore 739256 Manufacturer: Products: Life Technologies Corporation | ™ Chip and Genexus ™ Coupler 7335 Executive Way | Genexus ™...
-
Page 3: Table Of Contents
Contents ■ CHAPTER 1 Product information ........8 Product description . - Page 4 Contents ■ CHAPTER 2 Before you begin ......... . 23 Precautions .
- Page 5 Contents ■ CHAPTER 5 Create and manage run plans ......55 Create a run plan for a sample run ..........56 Create a run plan for a library run .
- Page 6 Contents ™ Upload sample results files to Ion Reporter Software ......111 Verification runs .
- Page 7 Contents Control and connection symbols ..........153 Conformity symbols .
-
Page 8: Chapter 1 Product Information
Product information ■ Product description ........... . 8 ■... -
Page 9: Genexus ™ Integrated Sequencer
Chapter 1 Product information Genexus Integrated Sequencer ™ ™ Genexus Integrated Sequencer ™ The Genexus Integrated Sequencer includes the following components. Components Cat. No. Genexus ™ Integrated Sequencer A45727 Genexus ™ Installation and Training Kit A40278 Not available for separate purchase. ™... -
Page 10: Library Chemistry
Chapter 1 Product information Reagents and supplies—Ion AmpliSeq library chemistry ™ ™ Reagents and supplies—Ion AmpliSeq library chemistry Genexus ™ Integrated Sequencer reagents and supplies can be ordered in convenient combo kits and starter packs, but most consumables can also be ordered individually as your needs require. -
Page 11: Genexus Gx5 Starter Pack-As
Chapter 1 Product information Reagents and supplies—Ion AmpliSeq library chemistry ™ ™ ™ ™ Genexus ™ ™ Ion Torrent Genexus Starter Pack-AS (Cat. No. A40279) supplies the ™ following components for Ion AmpliSeq library preparation and sequencing using a Starter Pack‑AS ™... -
Page 12: Hd Library Chemistry
Chapter 1 Product information Reagents and supplies—Ion AmpliSeq HD library chemistry ™ ™ Reagents and supplies—Ion AmpliSeq HD library chemistry Genexus ™ Integrated Sequencer reagents and supplies can be ordered in convenient combo kits and starter packs, but most consumables can also be ordered individually as your needs require. -
Page 13: Genexus Gx5 Starter Pack-Hd
Chapter 1 Product information Reagents and supplies—Ion AmpliSeq HD library chemistry ™ ™ ™ ™ Genexus ™ ™ Ion Torrent Genexus Starter Pack-HD (Cat. No. A40280) supplies the ™ following components for Ion AmpliSeq HD library preparation and sequencing Starter Pack‑HD ™... -
Page 14: Shared Reagents And Supplies
Chapter 1 Product information Shared reagents and supplies Shared reagents and supplies The following reagents and supplies are used in both Ion AmpliSeq ™ library chemistry and Ion AmpliSeq ™ HD library chemistry runs. Note: Consumables that have catalog numbers are orderable. Components that have part numbers cannot be ordered individually. -
Page 15: Gx5 Chip And Genexus Coupler
Chapter 1 Product information Shared reagents and supplies ™ ™ ™ Chip and The GX5 Chip and Genexus Coupler (Cat. No. A40269) are ordered as a set that contains two chips and two couplers, sufficient for up to eight sequencing runs. Genexus ™... -
Page 16: Genexus ™ Controls
Chapter 1 Product information Oncomine GX assays ™ ™ ™ Genexus ™ The Genexus Controls kit (Cat. No. A40267) provides sufficient Genexus Control ™ Library-AS to perform four library runs. The kit also provides sufficient Genexus Controls ™ Control Panel-AS and Genexus DNA Control to perform eight sample runs. -
Page 17: Required Materials Not Supplied
Chapter 1 Product information Required materials not supplied Carrier Contents Pool Carriers/kit Part No. Storage color Oncomine ™ TCR Beta‑LR Assay GX (Cat. No. A46297) Oncomine ™ TCR Beta‑LR Assay GX (panel Purple RNA Pool 1 A40282 −30°C to only) −10°C Genexus ™... -
Page 18: Recommended Materials For Nucleic Acid Isolation And Quantification
Chapter 1 Product information Recommended materials for nucleic acid isolation and quantification Recommended materials for nucleic acid isolation and quantification Unless otherwise indicated, all materials are available through thermofisher.com. MLS: Fisher Scientific (fisherscientific.com) or other major laboratory supplier. Item Source Nucleic acid isolation Ion AmpliSeq ™... -
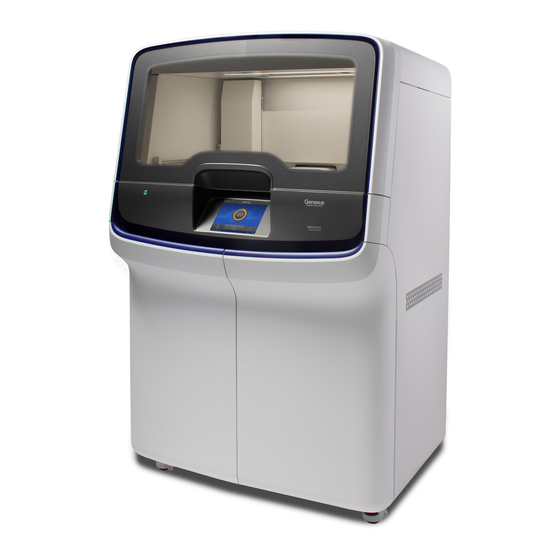
Page 19: Genexus ™ Integrated Sequencer Components
Chapter 1 Product information Genexus Integrated Sequencer components ™ ™ Genexus Integrated Sequencer components ™ Major features and components of the exterior and sequencing reagents bay of the Genexus Integrated Sequencer ™ Door to deck chamber. The door is locked in the closed Genexus Bottle 3 (Cleaning Solution) position during an instrument run. -
Page 20: Genexus ™ Integrated Sequencer Deck Stations
Chapter 1 Product information Genexus Integrated Sequencer deck stations ™ ™ Genexus Integrated Sequencer deck stations ™ Interior Genexus Integrated Sequencer deck components and stations ™ ™ PCR amplification station Zone 3 station (Genexus Strip 3‑GX5 ™ Microcentrifuge Zone 4 station (Genexus Strip 4) ™... -
Page 21: Genexus Integrated Sequencer Input And Output Connections
Chapter 1 Product information Genexus Integrated Sequencer input and output connections ™ ™ Genexus Integrated Sequencer input and output connections The connection panel, power port, and an on/off switch are located on the right side of the rear panel of the instrument. Power port—100–240VAC port that provides power to the instrument. -
Page 22: Workflow
Chapter 1 Product information Workflow Workflow ™ Workflow for a sample-to-results sequencing run using the Genexus Integrated Sequencer Create an assay (page 29) System installed assays that are specifically configured for each sample type are available in Genexus ™ Software. You can use the system-installed assays in your run plan without change. If you want to modify any assay settings, copy the system-installed assay that best represents your experiment, then edit the assay settings as needed. -
Page 23: Chapter 2 Before You Begin
Before you begin ■ Precautions ............23 ■... -
Page 24: Guidelines For Genexus
Chapter 2 Before you begin Guidelines for Genexus Integrated Sequencer operation ™ ™ Guidelines for Genexus Integrated Sequencer operation • Follow guidance that is provided by Genexus ™ Software when you create a run plan to determine which consumables must be loaded and which consumables can be reused from a previous run. -
Page 25: Power The Genexus ™ Integrated Sequencer On Or Off
Chapter 2 Before you begin Power the Genexus Integrated Sequencer on or off ™ • If a chip installed in a sequencer has unused lanes, do not remove it unless you are sure that you want to replace it with a new chip. After a partially used chip has been removed from the sequencer, it cannot be reinserted and reused. -
Page 26: Power Off
Chapter 2 Before you begin Get started with Genexus Software ™ Power off It is not necessary to power off the instrument overnight or over the weekend. If the instrument will not be used for more than 3 days, power off the instrument as follows: 1. -
Page 27: User-Access Levels
Chapter 2 Before you begin Get started with Genexus Software ™ User-access Users at this level... Can... levels • Add and import samples Operator • Prepare library batches • Create and save run plans • Monitor runs • View results and reports Manager Operator functions plus: •... -
Page 28: Sign In
Chapter 2 Before you begin Get started with Genexus Software ™ d. In the Change Password screen, enter your temporary password in the Current Password field. Type a new password in the New Password field, then confirm the password. – Passwords must be between 6 and 10 alphanumeric characters (0–9, Aa– Zz) with no spaces or special characters. -
Page 29: Chapter 3 Create And Manage
Create and manage assays (manager/administrator) ■ ™ About assays in Genexus Software ........29 ■... -
Page 30: System-Installed Assays
Chapter 3 Create and manage assays (manager/administrator) System-installed assays The software provides to tools to: • Create, import, and manage assays. • Create and manage annotation sets, filter chains, copy number baselines. • Edit and manage report templates and classification sets (Presets). System-installed assays ™... - Page 31 Chapter 3 Create and manage assays (manager/administrator) Manage assays (manager/administrator) To... Do the following... View assay details 1. In the Assay column, click an assay name of interest. 2. Scroll down in the View Assay dialog box to view all of the settings. Manager- and administrator-level users Review and export the assay audit 1.
-
Page 32: Create A New Assay (Manager/Administrator)
Chapter 3 Create and manage assays (manager/administrator) Create a new assay (manager/administrator) To... Do the following... Export an assay An assay can be exported, for example if you want to use that assay in another Genexus ™ Integrated Sequencer in your lab. Only locked assays can be exported. - Page 33 Chapter 3 Create and manage assays (manager/administrator) Create a new assay (manager/administrator) 2. Select the assay template that you want to use, then click Launch. Note: · Although each assay template has a specific set of steps in the setup wizard, the setup procedures for all are similar.
- Page 34 Chapter 3 Create and manage assays (manager/administrator) Create a new assay (manager/administrator) 3. In the Panel step, make the following selections or entries, then click Next. a. The panel for the assay from the Panel list. Note: To add a new panel, click (Assay)4Manage Panels, then click Add New.
- Page 35 Chapter 3 Create and manage assays (manager/administrator) Create a new assay (manager/administrator) g. The annotation set to use in variant reporting. To add an annotation set, click (Assay)4Manage Presets4Annotation Sets, then click Add New. Click Summary in the upper right corner to review settings at each step. Click Summary again to hide the menu of steps.
- Page 36 Chapter 3 Create and manage assays (manager/administrator) Create a new assay (manager/administrator) 5. In the QC step, enter Templating Control QC - CF1, Run QC, and Sample QC - Library DNA/RNA parameters, then click Next. Leave parameters that are not applicable to your assay as Not Set.
- Page 37 Chapter 3 Create and manage assays (manager/administrator) Create a new assay (manager/administrator) Parameter Description Sample QC - Library DNA MAPD The Median of the Absolute values of all Pairwise Differences; a quality metric that estimates coverage variability between adjacent amplicons in copy number variant (CNV) analyses. A MAPD value ≤0.5 generally indicates an acceptable level of coverage variability in the DNA Library or DNA Control.
- Page 38 Chapter 3 Create and manage assays (manager/administrator) Create a new assay (manager/administrator) 6. In the Parameters step, review the prepopulated analysis settings, then modify if needed. Click Next when finished. Scrolling from the top, the settings are grouped in the following categories: •...
- Page 39 Chapter 3 Create and manage assays (manager/administrator) Create a new assay (manager/administrator) Parameters can also be set by uploading an Advanced Parameter Configuration file, which overrides default settings. Click Upload Parameters, then click Select file to navigate to this file on your drive and upload. Click Download Parameters to download parameters settings as a JSON file to your hard drive.
-
Page 40: Copy An Assay (Manager/Administrator)
Chapter 3 Create and manage assays (manager/administrator) Copy an assay (manager/administrator) 8. In the Save step, enter a name and a short name for the assay, an optional description, then click Save. The assay appears in the Manage Assays screen with the name you entered. 9. -
Page 41: Import An Assay (Manager/Administrator)
Chapter 3 Create and manage assays (manager/administrator) Import an assay (manager/administrator) 4. When finished, enter a new name and short name for the copied assay in the Assay Name field, then click Save. The newly created assay is added to the list of assays in the Assay > Manage Assays screen. -
Page 42: Chapter 4 Enter Samples And Libraries
Enter samples and libraries ■ Add a new sample ........... 42 ■... -
Page 43: System-Installed Sample Attributes
Chapter 4 Enter samples and libraries Add a new sample 3. In the Add New Sample dialog box, complete the required fields. For a description of the fields, see “System-installed sample attributes“ on page 43. 4. Click Save. The new sample is listed in the Manage Samples screen, and will be available to use in your run plan. -
Page 44: Create A Custom Sample Attribute (Manager/ Administrator)
Chapter 4 Enter samples and libraries Add a new sample Sample attribute Description Cancer Stage The stage of the cancer from which the sample was collected. Select Stage 0–IV, or Primary, Unknown, or Other. Cancer Type The type of cancer that is represented by the sample. Select the type of solid or hematologic cancer. -
Page 45: Import Samples
Chapter 4 Enter samples and libraries Import samples Remove a sample attribute (administrator) An administrator-level user can remove user-created sample attributes from use in the software by designating it as obsolete. Sample attributes can be reactivated, and a record of their use is maintained in the audit trail of samples that are created using that attribute. -
Page 46: Manage Samples
Chapter 4 Enter samples and libraries Manage samples 3. In the template file, fill in the information for each sample, one sample per row. The template file contains default sample attributes as columns. If additional custom sample attributes have been configured in the software, add these attributes as columns to the template file. -
Page 47: Export And Print Samples
Chapter 4 Enter samples and libraries Manage samples • Use the Filter Samples by list and the Sample Name search box to search, sort, and filter the list of samples. Do this List only the samples that In Filter Samples by, select To Be Extracted. have not been extracted. -
Page 48: View Notes Or Add A Note To A Sample
Chapter 4 Enter samples and libraries Manage samples View notes or add You can add notes to a specific sample or view existing notes. a note to a sample 1. In the menu bar, click Samples4Manage Samples. 2. In the Samples > Manage Samples screen, in the Actions column, in the row of the sample of interest, click Notes, then review existing notes or add a new note. -
Page 49: Edit A Sample And Amend A Report After A Run (Manager/ Administrator)
Chapter 4 Enter samples and libraries Manage samples Edit a sample and After a sequencing run and its analysis have completed, a manager- or administrator- level user can edit a sample and amend the Lab Report for up to 30 days. Editing a amend a report sample after a run triggers an automatic update of the report and other files after a run... -
Page 50: Delete Samples
Chapter 4 Enter samples and libraries Prepare or import a library batch Delete samples You can delete samples that have not been assigned to a run. Samples that are assigned to a run are locked and cannot be edited or deleted. Locked samples display Audit in the Actions column. - Page 51 Chapter 4 Enter samples and libraries Prepare or import a library batch 3. Select samples in the list, then click Prepare Library Batch. 4. In the Prepare Library Batch dialog box, in Select Assay, select the appropriate assay. The assay determines specific parameters of the run, including any required controls and post-run data analysis settings.
- Page 52 Chapter 4 Enter samples and libraries Prepare or import a library batch Library Batch IDs can contain only alphanumeric characters (0–9, Aa–Zz), full stop/period (.), underscore (_), and hyphen (-). Required fields are indicated with a red asterisk (*). 6. Enter the barcodes from the respective kit boxes into the appropriate fields. 7.
-
Page 53: Import A Library Batch
Chapter 4 Enter samples and libraries Prepare or import a library batch Import a library You can also import library batch information in the form of an .XLS or .XLSX file. The import file must include all of the library and kit information that you enter in the batch Prepare Library Batch dialog box. - Page 54 Chapter 4 Enter samples and libraries Prepare or import a library batch 8. Click Import. A progress bar followed by an import report displays. If the import process fails, an error message indicates the reason for failure (for example, an invalid character was used).
-
Page 55: Chapter 5 Create And Manage Run Plans
Create and manage run plans ■ Create a run plan for a sample run ........56 ■... -
Page 56: Create A Run Plan For A Sample Run
Chapter 5 Create and manage run plans Create a run plan for a sample run Create a run plan for a sample run You can plan a run starting from isolated nucleic acid samples. Sample run planning is organized into steps: Setup, Assays, Samples, Sample Plate, and Review. - Page 57 Chapter 5 Create and manage run plans Create a run plan for a sample run 2. In the Setup step, enter or make the following selections. a. In Run Plan Name, enter a unique name. b. (Optional) In the Reporting (Optional) section, select one or more options if needed.
- Page 58 Chapter 5 Create and manage run plans Create a run plan for a sample run 3. In the Assays step, select the assay or assays that you want to use in the run, and then click Next. Note: · After selecting an assay, the list is filtered to show compatible assays that can be selected and run at the same time.
- Page 59 Chapter 5 Create and manage run plans Create a run plan for a sample run If you selected the Upload BAM files to Ion Reporter ™ Software reporting option in substep 2b, make the following selections from the dropdown list in the ™...
- Page 60 Chapter 5 Create and manage run plans Create a run plan for a sample run Chip View updates to show the lanes to be used in the run as green (left). Lane usage is calculated based on the number of samples, assay type, primer pools used, and minimum reads per sample entered at assay setup.
- Page 61 Chapter 5 Create and manage run plans Create a run plan for a sample run 7. In the Sample Plate step, review sample positions in the sample plate, modify the concentration of samples, if needed, then click Next. Click Bulk Edit Concentration to modify sample concentration of all samples at one time, then click Update to return to the Sample Plate screen.
- Page 62 Chapter 5 Create and manage run plans Create a run plan for a sample run 8. In the Review step, review the run plan summary, then click Save and Print to print the run setup guide, if desired. Click Save to save the run plan without printing.
-
Page 63: Create A Run Plan For A Library Run
Chapter 5 Create and manage run plans Create a run plan for a library run After saving, the run plan appears on the Manage Runs screen in the run plan list with the name you specified. After selecting the run plan and loading the sequencer, the run is started on the sequencer screen. - Page 64 Chapter 5 Create and manage run plans Create a run plan for a library run 2. In the Setup step, name the run plan and configure reporting options. a. In Run Plan Name, enter a unique name. b. (Optional) In the Reporting (Optional) section, select one or more options if needed.
- Page 65 Chapter 5 Create and manage run plans Create a run plan for a library run 3. In the Assays step, select the assay or assays that you want to use in the run. Note: To create a new assay, see Chapter 3, “Create and manage assays (manager/administrator)“.
- Page 66 Chapter 5 Create and manage run plans Create a run plan for a library run 4. Click Next. 5. In the Library Batches step, select the library batch or batches that you want to use in the run, then click Next. Chip View updates to show the lanes to be used in the run as green.
- Page 67 Chapter 5 Create and manage run plans Create a run plan for a library run 6. In the Review step, review the run plan summary, then click Save and Print to print the run setup guide, if desired. Click Save to save the run plan without printing.
-
Page 68: Chapter 6 Dilute The Samples And Load The Sample Plate
Dilute the samples and load the sample plate ■ Guidelines for nucleic acid isolation and quantification—sample runs ..68 ■ Dilute the samples (if needed) and load the sample plate—sample run ..69 ■... -
Page 69: Dilute The Samples (If Needed) And Load The Sample Plate-Sample Run
Chapter 6 Dilute the samples and load the sample plate Dilute the samples (if needed) and load the sample plate—sample run Dilute the samples (if needed) and load the sample plate—sample Isolate DNA and RNA samples using one of the procedures and kits that are recommended in “Recommended materials for nucleic acid isolation and quantification“... - Page 70 Chapter 6 Dilute the samples and load the sample plate Dilute the samples (if needed) and load the sample plate—sample run 2. Add samples to the sample plate at the volume and positions that are specified in the run setup guide. The sample volume is not adjustable and depends on sample type, the number of primer pools in the assay, and library chemistry.
-
Page 71: Guidelines For Library Quantification-Library Runs
Chapter 6 Dilute the samples and load the sample plate Guidelines for library quantification—library runs Guidelines for library quantification—library runs • We recommend that you use libraries that are freshly quantified and diluted before pooling in a library batch. • Pre-prepared libraries can be quantified by one of the following three methods: –... -
Page 72: Chapter 7 Load The Sequencer And Start A Run
Load the sequencer and start a run ■ Before you begin ........... . . 72 ■... - Page 73 Chapter 7 Load the sequencer and start a run Before you begin b. To remove any remaining beads and liquid from the keyholes, grasp the strip at one end with the strip seal facing up, then swing the strip with a rapid, downward centrifugal arm motion, ending with a sharp wrist-flick.
-
Page 74: Fill Genexus ™ Primer Pool Tubes (Custom Assays Only)
Chapter 7 Load the sequencer and start a run Fill Genexus Primer Pool Tubes (custom assays only) ™ Note: · It is not necessary to resuspend the magnetic beads completely—it is only necessary to dislodge most of the beads that may be trapped in the keyhole. The instrument resuspends the beads during the run when needed. -
Page 75: Load The Sequencer And Start A Run
Chapter 7 Load the sequencer and start a run Load the sequencer and start a run IMPORTANT! · If you are using Ion AmpliSeq ™ library chemistry, leave the tube in position 2 empty and uncapped, but do not remove the tube from the carrier before loading in the sequencer. - Page 76 Chapter 7 Load the sequencer and start a run Load the sequencer and start a run 2. In the Run Selection screen, select from the list the run plan that you want to run. Note: If you select a run plan that requires more lanes than are available on a currently installed chip, a dialog appears giving you the option to install a new chip, or cancel.
- Page 77 Chapter 7 Load the sequencer and start a run Load the sequencer and start a run 4. In the Load Deck screen, the sequencer instructs you step by step to load each required consumable in a highlighted position on the deck. The sequencer detects the loading of each consumable in real-time and advances to the next component automatically.
- Page 78 Chapter 7 Load the sequencer and start a run Load the sequencer and start a run 5. If prompted, insert a new GX5 ™ Chip and Genexus ™ Coupler. Insert the chip into the chip install slot with the chip notch oriented down and toward the front of the instrument.
- Page 79 Chapter 7 Load the sequencer and start a run Load the sequencer and start a run 7. Close the deck door, then tap Next. • If you installed a new chip in the sequencer, the sequencer prompts you to open the sequencing reagents bay doors to empty the waste and remove used sequencing reagents bay consumables.
- Page 80 Chapter 7 Load the sequencer and start a run Load the sequencer and start a run 9. Install a new Genexus ™ Bottle 1, Genexus ™ Bottle 2 (two required), Genexus ™ ™ Bottle 3, and Genexus Cartridge, then tap Next. 10.
-
Page 81: Clear The Instrument Deck And Perform A Uv Clean
Chapter 7 Load the sequencer and start a run Clear the instrument deck and perform a UV Clean Clear the instrument deck and perform a UV Clean After a run completes, remove used consumables from the deck and perform a UV Clean to ready the instrument for the next run. - Page 82 Chapter 7 Load the sequencer and start a run Clear the instrument deck and perform a UV Clean 3. Inspect the Genexus ™ Filter in the liquid waste disposal port and verify that no standing liquid is present. If standing liquid is present, manually remove the liquid with a pipette, then pull out the filter.
- Page 83 Chapter 7 Load the sequencer and start a run Clear the instrument deck and perform a UV Clean 5. After UV cleaning, if all of the chip lanes were used, the sequencing reagents bay doors unlock. Open the doors, remove used components from the bay and empty the Waste Carboy, then tap Next.
-
Page 84: Chapter 8 Monitor The Run
Monitor the run In the Monitor menu, you can view the status of the sequencer in an idle condition, or the status of a run in progress. View run progress on the instrument 1. On the menu bar, click Monitor4Instrument View. 2. -
Page 85: Chapter 9 Review Data And Results
Review data and results ■ Run Results screen ........... 86 ■... -
Page 86: Run Results Screen
Chapter 9 Review data and results Run Results screen Run Results screen In the Results > Run Results screen, samples that have been sequenced are listed by run plan name and sample name. You can search the list of results by run plan name or sample name. Enter a search term, then click (Search). - Page 87 Chapter 9 Review data and results Run Results screen Column Description Run Plan The unique name of the run plan given when it was created in the software. Click the link to open the Run Metrics screen for the run. Run-level plugin results can also be viewed here. Sample Name The unique identifier created when the sample was entered into the software.
-
Page 88: Lab Report
Chapter 9 Review data and results Lab Report Lab Report The Lab Report is a PDF report of the results for each sample in a sequencing run. The assay used in the run determines the data that is included in the report. To automatically generate a Lab Report for each sample during data analysis of a run, select the Generate Report checkbox in the Setup step when you plan the run (for more information, see Chapter 5, “Create and manage run plans“). -
Page 89: Download The Lab Report
Chapter 9 Review data and results View sequencing results and run metrics Download the Lab You can download the Lab Report for a sample of interest. Report 1. In the menu bar, click Results4Run Results. 2. In the Results > Run Results screen, in the Actions column, click Lab Report in the row of the sample of interest. - Page 90 Chapter 9 Review data and results View sequencing results and run metrics 4. Use the buttons and dropdown list at the top of the View Results screen to view information for different samples and assays in the run. • Use the single arrows to navigate between the sample results. Use the double arrows to navigate between assay results, if more than one assay was used in the run.
-
Page 91: Summary Of The Sample Results
Chapter 9 Review data and results View sequencing results and run metrics Summary of the The Summary screen displays a summary of the variant and fusion calls for each sample in a run, as well as details about the sample and a summary of the metrics for sample results the run. -
Page 92: Run Metrics
Chapter 9 Review data and results View sequencing results and run metrics Section Description Fusions Lists and describes the fusions that are detected in the sample. CNVs Lists and describes the copy number variants (CNVs) that are detected in the sample. Column appears in analyses of Ion AmpliSeq ™... - Page 93 Chapter 9 Review data and results View sequencing results and run metrics Metric Description Polyclonal Wells with a live ISP that carries clones from two or more templates. Low Quality Loaded wells with a low or unrecognizable signal. Adapter Dimer Loaded wells with a library template of an insert size less than 8 bases.
-
Page 94: Qc Results
Chapter 9 Review data and results View sequencing results and run metrics QC results The QC screen displays quality metrics for the run and each sample sequenced in the run. This information is also accessible through the Monitor menu within 72 hours of starting the run on the sequencer. -
Page 95: Snv/Indel Results
Chapter 9 Review data and results View sequencing results and run metrics Metric Description Uniformity of Base Coverage The percentage of reads with a depth of coverage ≥20% of the mean read coverage at each position. This metric is applicable to Ion AmpliSeq ™... - Page 96 Chapter 9 Review data and results View sequencing results and run metrics Column Description Oncomine Gene Class The change in molecular function of the altered gene product due to the mutation, based on Oncomine ™ annotations: • Gain-of-function — the altered gene product has a new molecular function or pattern of gene expression compared to the wild-type gene •...
-
Page 97: Fusion Results
Chapter 9 Review data and results View sequencing results and run metrics Column Description Mol Counts The total read coverage across an amplicon containing SNV / INDEL hotspot locations. Count of chip-level reads aligned at this locus that participate in variant calling. Mol Freq % Molecular frequency percentage. - Page 98 Chapter 9 Review data and results View sequencing results and run metrics Column Description Oncomine Driver The gene believed to be associated with increased oncogenic properties. The gene is Gene inappropriately activated by the fusion. Mol Cov. Mutant The median molecular coverage across a fusion amplicon. Imbalance Score Each fusion gene exhibits a characteristic Imbalance Score threshold.
-
Page 99: Cnv Results
Chapter 9 Review data and results View sequencing results and run metrics Representative RNA Exon Variant plots The X‑axis represents specific exon variants, where each variant is labeled with a gene ID followed by a sequence of adjacent exons. The Y‑axis measures the read counts for each variant, normalized to the wild type. Example analysis where only the wild type EFGR (EFGR.E6E7) was detected. - Page 100 Chapter 9 Review data and results View sequencing results and run metrics Column Description ™ Oncomine Variant The type of CNV at the locus based on Oncomine annotations: Class • Amplification — indicates a duplication event at the locus • Deletion — indicates a deletion event at the locus This information is available if the Apply Oncomine Variant Annotations checkbox is selected in the assay used in the run.
-
Page 101: View Annotation Sources
Chapter 9 Review data and results View sequencing results and run metrics View annotation You can view additional information for each hotspot ID listed in the View Results screen in the SNVs/Indels, Fusions, and CNVs tables. sources 1. In the SNVs/Indels screen, in the Gene column, click the gene symbol. The link opens the View Annotation Sources window, which provides information for the particular variant. -
Page 102: Create And Assign Variant Classifications
Chapter 9 Review data and results View sequencing results and run metrics Create and assign You can create and assign user-defined variant classifications in the View Results screen. variant classifications 1. In the menu bar, click Results4Run Results 2. In the Results > Run Results screen, in the Sample Name column, click the sample name. - Page 103 Chapter 9 Review data and results View sequencing results and run metrics Filter the view of results in the View Results screen You can filter results to immediately narrow the list of results that is shown in columns on View Results screens. Filters are available for each column in the list of results.
- Page 104 Chapter 9 Review data and results View sequencing results and run metrics 5. Use the Filter Options dialog box to limit the displayed variants. You can click links to view variants that are Filtered In or Filtered Out. You can also select a chromosome from the drop-down list to limit the displayed variants to one chromosome.
-
Page 105: View Oncomine ™ Tcr Beta-Lr Assay Gx Run Results
Chapter 9 Review data and results View sequencing results and run metrics e. Click Set to add the filter to the Selected Filters list. f. Select and add additional filters to the Selected Filters list as needed, then click Apply. The list of variants changes to reflect the filter chain that is applied. - Page 106 Chapter 9 Review data and results View sequencing results and run metrics • In the Sample QC tab, select from the following options in the Views dropdown menu. – Read classification – Proportion of full length, quality-trimmed, and reads lacking P1key, by read classification –...
-
Page 107: Sign Off On The Run Results (Manager/ Administrator)
Chapter 9 Review data and results Sign off on the run results (manager/ administrator) Sign off on the run results (manager/ administrator) Manager- and administrator-level users can provide their electronic signature on run results for completed runs that have a QC Status of Passed. The signature information appears in the QC Report in the View Result screen, and the Lab Report PDF file. -
Page 108: Generate Customized Reports
Chapter 9 Review data and results Generate customized reports Generate customized reports The Lab Report is generated in the language that is selected in the report template. You can customize this report by generating it in another language. When generating a customized report, you can also update any report template selections. -
Page 109: Results Files
Chapter 9 Review data and results Results files If you generated a report in multiple languages, you can select one or more reports to be included in your download. A ZIP file that contains all the selected reports and other files is downloaded. Results files The following files can be downloaded from the View Results screen. - Page 110 Chapter 9 Review data and results Results files Selection File name Description DNA Read length histogram An image of a histogram that presents all filtered <DnaBarcode> (.png) and trimmed DNA library reads that are reported _rawlib.read_len_histogr in the output BAM file (Y‑axis) and the mean read am.png length in base pairs (X‑axis).
-
Page 111: Review Coverageanalysis Plugin Results
Chapter 9 Review data and results Review coverageAnalysis plugin results Selection File name Description Reports Lab Report(s) A PDF report that contains sample‑specific <language>_<sample name> results. For more information, see “Lab _AD_Lab_Report_<assay Report“ on page 88. name>_<date>.pdf Review coverageAnalysis plugin results The coverageAnalysis plugin generates a Coverage Analysis Report. - Page 112 Chapter 9 Review data and results Upload sample results files to Ion Reporter Software ™ ™ Before you can upload sample results files to Ion Reporter Software, you must ™ configure your Ion Reporter Software account. ™ • To configure an Ion Reporter Server account, see “Configure an Ion Reporter ™...
-
Page 113: Verification Runs
Chapter 9 Review data and results Verification runs Verification runs Use the Results > Verifications Results screen to search, filter, sort, and view completed verification runs and reports. Verification runs are sequencing runs performed during Genexus ™ Integrated Sequencer installation by Thermo Fisher Scientific support specialists to validate the performance of the sequencer. -
Page 114: View And Sign Off On The Verification Run Results (Field Service Engineer)
Chapter 9 Review data and results Verification runs View and sign off Field Service Engineers view and sign off on verification run results. on the verification 1. In the menu bar, click Results4Verification Results run results (Field Service Engineer) 2. In the Results > Verifications Results screen, click View Results in the Actions column for a verification run to view verification results. - Page 115 Chapter 9 Review data and results Verification runs QC Metric Description Sample Balance Factor For a given sample in a system install qualification run, Sample Balance Factor = Number of mapped reads / Mean number of mapped reads for four tested samples A–D. Uniformity Of Base Coverage The percentage of bases having a depth of coverage ≥20% of the mean coverage at each position.
- Page 116 Chapter 9 Review data and results Verification runs QC metric Description Pass threshold Library QC – DNA Amplicons With No Strand Bias The percentage of amplicons with a strand bias between 30% and ≥85.5 70%. MAPD MAPD (Median of the Absolute values of all Pairwise Differences) ≤0.5 is a quality metric that estimates coverage variability between adjacent amplicons in copy number variant (CNV) analyses.
-
Page 117: Appendix A Troubleshooting
Troubleshooting ™ Genexus Software Observation Possible cause Recommended action Cannot sign in to Genexus You either entered an incorrect Contact the Genexus Software system ™ ™ Software password or you are signed out administrator. due to several failed login attempts. Batch sample import fails One or more entries in the Check each entry for correct formatting,... - Page 118 Appendix A Troubleshooting Genexus Software ™ Observation Possible cause Recommended action Library batch import fails The library batch import Every Library Batch ID in the software must be (continued) spreadsheet contains a unique. Ensure that the spreadsheet does not nonunique Library Batch ID. contain any duplicate IDs, and repeat the import.
-
Page 119: Genexus ™ Integrated Sequencer
Appendix A Troubleshooting Genexus Integrated Sequencer ™ Observation Possible cause Recommended action Cannot download run result The run failed. Links to run files Repeat the run. files are not available for runs that fail QC. Genexus ™ Integrated Sequencer Observation Possible cause Recommended action The number of sample reads is... -
Page 120: Appendix B Touchscreen Reference
Touchscreen reference Touchscreen icons Number Icon Description Network connectivity – connected Network connectivity – not connected Instrument idle Sequencing in progress Instrument ready Error Chip status – Absent Chip status – Standby Genexus Integrated Sequencer User Guide ™... -
Page 121: Settings
Appendix B Touchscreen reference Settings Number Icon Description Chip status – Connecting Chip status – Ready Chip status – Imaging Chip status – Error Chip lane status – 4 lanes available Chip lane status – 1 lane in use, 3 lanes available Chip lane status –... -
Page 122: Network Settings
Appendix B Touchscreen reference Settings Note: The System tools option is for use by trained service personnel only. ™ Network Settings The Network Settings menu allows you to configure IP address, Ion Torrent Server, and FTP settings. Item Description When/How to use IP Address Allows users to set or change the IP configuration (DHCP 1. - Page 123 Appendix B Touchscreen reference Settings Item Description When/How to use ™ ™ ™ Ion Torrent Allows users to change the Ion Torrent Server IP When a change to the Ion Torrent Server address and user information. Server IP address or user information Configuration is required.
-
Page 124: Perform A Clean Instrument Operation
Appendix B Touchscreen reference Settings Perform a Clean Cleaning is normally performed automatically at the completion of the previous sequencing run. Perform a Clean instrument procedure if the sequencing run: instrument operation • was aborted or had a power failure during a run, or •... - Page 125 Appendix B Touchscreen reference Settings Item Description When/How to use RFID Lists the product, product expiration date, and remaining To determine if reagents that were left uses of the product. on an instrument during a period of instrument shutdown have expired. 1.
- Page 126 Appendix B Touchscreen reference Settings Item Description When/How to use Chip Calibration Checks the status of a chip. 1. Insert a chip into the chip clamp. 2. Tap Chip Calibration to start the chip calibration. 3. In the dropdown lists, select the Image to display and the type of Calibration to perform.
- Page 127 Appendix B Touchscreen reference Settings Item Description When/How to use Filesystems Provides real-time drive activity status and disk space Use if directed to do so as part of a and disks used. troubleshooting procedure: 1. In the System Tools menu, press Filesystems and disks.
- Page 128 Appendix B Touchscreen reference Settings Item Description When/How to use Upload Allows upload of instrument diagnostics files for review by Upload an instrument diagnostics file Diagnostics support personnel. after an aborted run, or if otherwise directed to do so by Technical Support. Note: The file is pushed to Genexus ™...
-
Page 129: Data Management
Appendix B Touchscreen reference Settings Data Management The Data Management function allows users to delete run data manually, or transfer data in the event of failure of automatic transfer. Under normal conditions, run data are automatically transferred to the analysis server, then deleted from the instrument hard drive. - Page 130 Appendix B Touchscreen reference Settings Manually delete run data To troubleshoot data management problems the Data Management function allows users to delete run data manually or transfer the data to an external server. 1. In the Settings menu, tap Data Management to access the Data Management screen, then tap Manage.
-
Page 131: Instrument Settings
Appendix B Touchscreen reference Settings Instrument The Instrument Settings menu provides information about the instrument and allows settings you to set the instrument name and calibrate the touchscreen. Item Description When/How to use About Provides instrument details. To view instrument reference information or access regulatory information. - Page 132 Appendix B Touchscreen reference Settings Item Description When/How to use Regulatory Info Lists instrument-specific regulatory information. To view instrument RFID regulatory information. See “Radio compliance standards“ on page 158 for compliance information. Instrument To change the instrument name. Name Genexus Integrated Sequencer User Guide ™...
- Page 133 Appendix B Touchscreen reference Settings Item Description When/How to use Screen For troubleshooting if directed to do so Calibration by Technical Support. Touch the red cross with your finger or a stylus each time it appears. In total, you touch the screen 4 times, one time in each corner.
-
Page 134: Appendix C Supplemental Information
Supplemental information ■ Maintain the sequencer ..........134 ■... -
Page 135: Replace The Genexus
Appendix C Supplemental information Quantify FFPE DNA with the Qubit Fluorometer ™ ™ Replace the The Genexus Filter captures particulate matter in the liquid waste to prevent blockage of the waste line over time. The filter needs to be replaced with a new filter Genexus ™... -
Page 136: Guidelines For Using Custom Assays With The Genexus
Appendix C Supplemental information Guidelines for using custom assays with the Genexus Integrated Sequencer ™ Proceed to “Dilute the samples (if needed) and load the sample plate—sample run“ on page 69. ™ Guidelines for using custom assays with the Genexus Integrated Sequencer ™... - Page 137 Appendix C Supplemental information Guidelines for using custom assays with the Genexus Integrated Sequencer ™ ™ Ion AmpliSeq HD library chemistry: • To calculate the Minimum Read Minimum amplicon Count Per Sample parameter that coverage you enter during assay setup, 1,400 estimate the coverage depth that you require to achieve the limit of...
-
Page 138: Planning Sequencing Runs For Efficient Use Of Consumables
Appendix C Supplemental information Planning sequencing runs for efficient use of consumables Planning sequencing runs for efficient use of consumables Genexus ™ Integrated Sequencer consumables are designed to be used most efficiently when samples are grouped in multiples of four. For example, running one sample uses the same number of primer pool tubes, library and template strips, and chip lanes as four samples. -
Page 139: Configure An Ion Reporter
Appendix C Supplemental information Configure an Ion Reporter Server account (administrator) ™ Four-pool assay, requiring 8M reads per sample Note: Eight samples at 8M reads per sample exceed the capacity of the GX5 ™ Chip. You can proceed with the run using eight pairs of library strips and four pairs of template strips, but you may not achieve the minimum reads per sample set for the assay. -
Page 140: Tag An Ion Reporter
Appendix C Supplemental information Configure an Ion Reporter Server account (administrator) ™ ™ The configured Ion Reporter Server account is now available to be selected for automatic upload of sample results files in the Setup step of the run plan creation and manual upload of sample results files in the Results >... -
Page 141: Configure Thermo Fisher (Connect) Accounts (Manager/Administrator)
Appendix C Supplemental information Configure Thermo Fisher (Connect) accounts (manager/administrator) Configure Thermo Fisher (Connect) accounts (manager/administrator) ™ Manager- and administrator-level users configure Genexus Software to link to one or more Connect user accounts. When the Connect account is configured and active, administrators can perform the ™... - Page 142 Appendix C Supplemental information Configure Thermo Fisher (Connect) accounts (manager/administrator) The configured account is listed in the Thermo Fisher Account Settings screen. A successfully authenticated account has Active listed in the Status column. If you ™ selected the option to use this account for Ion Reporter Software, the software version is listed in the Version column and you can now use this account for ™...
-
Page 143: Reads Statistics
coverageAnalysis plugin in Genexus Software ™ ■ Reads statistics ........... . . 143 ■... - Page 144 Appendix D coverageAnalysis plugin in Genexus Software ™ Reads statistics Statistic Description Number of amplicons The number of amplicons that is specified in the target regions file. Percent assigned amplicon The percentage of reads that were assigned to individual amplicons relative to all reads reads mapped to the reference.
-
Page 145: Example Coverage Analysis Report
Appendix D coverageAnalysis plugin in Genexus Software ™ Example Coverage Analysis Report Statistic Description Uniformity of base coverage The percentage of bases in all targeted regions (or whole genome) that is covered by at least 20% of the average base coverage depth reads. Cumulative coverage is linearly interpolated between nearest integer base read depths. - Page 146 Appendix D coverageAnalysis plugin in Genexus Software ™ Example Coverage Analysis Report Genexus Integrated Sequencer User Guide ™...
-
Page 147: Example Charts Generated By The Coverageanalysis Plugin
Appendix D coverageAnalysis plugin in Genexus Software ™ Example charts generated by the coverageAnalysis plugin Example charts generated by the coverageAnalysis plugin The charts that are generated by the coverageAnalysis plugin include Plot, Overlay, or Display menus that allow you to customize the data that is displayed in each chart. Click (Search) (in the top right corner of a chart) to open the chart Viewing Options panel, where you can further customize a chart. -
Page 148: Output Files Generated By The Coverageanalysis Plugin
Appendix D coverageAnalysis plugin in Genexus Software ™ Output files generated by the coverageAnalysis plugin Output files generated by the coverageAnalysis plugin You can download coverageAnalysis plugin results files from links that are contained in the File Links section. ™ Sometimes the file name can be too long to open in applications such as Microsoft ™... - Page 149 Appendix D coverageAnalysis plugin in Genexus Software ™ Output files generated by the coverageAnalysis plugin File Description Amplicon Coverage summary data used to create the Amplicon Coverage Chart. This file contains these coverage fields: summary • contig_id : the name of the chromosome or contig of the reference for this amplicon. •...
-
Page 150: Appendix E Safety
Safety WARNING! GENERAL SAFETY. Using this product in a manner not specified in the user documentation may result in personal injury or damage to the instrument or device. Ensure that anyone using this product has received instructions in general safety practices for laboratories and the safety information provided in this document. - Page 151 Appendix E Safety Symbols on this instrument Symbol and description CAUTION! Potential biohazard. CAUTION! Ultraviolet light. Symbole et description MISE EN GARDE ! Risque de danger. Consulter le manuel pour d’autres renseignements de sécurité. MISE EN GARDE ! Risque de choc électrique. MISE EN GARDE ! Surface chaude.
-
Page 152: Additional Safety Symbols
Appendix E Safety Symbols on this instrument Additional safety Symbol and description symbols CAUTION! Moving parts. CAUTION! Piercing hazard. Symbole et description MISE EN GARDE ! Parties mobiles. MISE EN GARDE ! Danger de perforation. Location of safety Label and location labels A44096 6191... -
Page 153: Control And Connection Symbols
Appendix E Safety Symbols on this instrument Control and Symbols Descriptions connection On (Power) symbols Off (Power) Protective conductor terminal (main ground) Alternating current Conformity Conformity mark Description symbols Indicates conformity with safety requirements for Canada and U.S.A. Indicates conformity with China RoHS requirements. Indicates conformity with European Union requirements. -
Page 154: Instrument Safety
Appendix E Safety Instrument safety Instrument safety General CAUTION! Do not remove instrument protective covers. If you remove the protective instrument panels or disable interlock devices, you may be exposed to serious hazards including, but not limited to, severe electrical shock, laser exposure, crushing, or chemical exposure. -
Page 155: Electrical Safety
Appendix E Safety Instrument safety Electrical safety WARNING! Ensure appropriate electrical supply. For safe operation of the instrument: · Plug the system into a properly grounded receptacle with adequate current capacity. · Ensure the electrical supply is of suitable voltage. ·... -
Page 156: Cleaning And Decontamination
Appendix E Safety Safety and electromagnetic compatibility (EMC) standards Cleaning and CAUTION! Cleaning and Decontamination. Use only the cleaning and decontamination decontamination methods that are specified in the manufacturer user documentation. It is the responsibility of the operator (or other responsible person) to ensure that the following requirements are met: ·... -
Page 157: Safety Standards
Appendix E Safety Safety and electromagnetic compatibility (EMC) standards Safety standards Reference Description EU Directive 2014/35/EU European Union “Low Voltage Directive” Safety requirements for electrical equipment for measurement, control, and laboratory IEC 61010-1 use – Part 1: General requirements EN 61010-1 UL 61010-1 CAN/CSA C22.2 No. -
Page 158: Environmental Design Standards
Appendix E Safety Safety and electromagnetic compatibility (EMC) standards Environmental design standards Reference Description Directive 2012/19/EU European Union “WEEE Directive”—Waste electrical and electronic equipment Directive 2011/65/EU European Union “RoHS Directive”—Restriction of hazardous substances in electrical and electronic equipment SJ/T 11364-2014 “China RoHS”... -
Page 159: Chemical Safety
Appendix E Safety Chemical safety Chemical safety WARNING! GENERAL CHEMICAL HANDLING. To minimize hazards, ensure laboratory personnel read and practice the general safety guidelines for chemical usage, storage, and waste provided below. Consult the relevant SDS for specific precautions and instructions: ·... - Page 160 Appendix E Safety Chemical safety · Vérifier régulièrement l’absence de fuite ou d’écoulement des produits chimiques. En cas de fuite ou d’écoulement d’un produit, respecter les directives de nettoyage du fabricant recommandées dans la FDS. · Manipuler les déchets chimiques dans une sorbonne. ·...
-
Page 161: Biological Hazard Safety
Appendix E Safety Biological hazard safety Biological hazard safety WARNING! Potential Biohazard. Depending on the samples used on this instrument, the surface may be considered a biohazard. Use appropriate decontamination methods when working with biohazards. WARNING! BIOHAZARD. Biological samples such as tissues, body fluids, infectious agents, and blood of humans and other animals have the potential to transmit infectious diseases. -
Page 162: Appendix F Documentation And Support
Documentation and support Related documentation Document Publication number Genexus Software 6.0 User Guide ™ MAN0017911 Genexus Integrated Sequencer Quick Reference ™ MAN0017912 Ion Torrent ™ Oncomine ™ Precision Assay GX User Guide MAN0018508 Oncomine Comprehensive Assay v3 GX User Guide ™... - Page 163 thermofisher.com/support | thermofisher.com/askaquestion thermofisher.com 13 November 2019...
Need help?
Do you have a question about the Ion Torrent Genexus Integrated Sequencer and is the answer not in the manual?
Questions and answers