Otto Bock Avantgarde XXL 2 Instructions For Use Manual
Hide thumbs
Also See for Avantgarde XXL 2:
- Instructions for use manual (84 pages) ,
- Instructions for use manual (32 pages) ,
- Instructions for use manual (108 pages)

Related Manuals for Otto Bock Avantgarde XXL 2


Summary of Contents for Otto Bock Avantgarde XXL 2
- Page 1 Avantgarde XXL 2 Instructions for use (user) ..................
- Page 2 Avantgarde XXL 2...
-
Page 3: Table Of Contents
Approach in case of stiffness ........................ 7.11 Wheel locks ............................7.11.1 Using the wheel locks .......................... 7.11.2 Drum brake ............................7.11.3 Knee lever wheel lock for user and attendant ..................7.11.4 Knee lever wheel lock for one-handed operation (double handrims) ............Avantgarde XXL 2... - Page 4 Inner tube, rim tape and tyre replacement ....................Disposal ................................Disposal information ..........................Legal information .............................. 10.1 Liability .............................. 10.2 Warranty ............................10.3 Service life ............................Technical data ..............................Appendices ................................ 12.1 Threshold values for wheelchairs transportable by train ................Avantgarde XXL 2...
-
Page 5: Foreword
Your product may differ from the models shown. In particular, not all the options described in these instruc tions for use will be installed on your product. • The manufacturer reserves the right to make technical changes to the model described in these instructions for use. Avantgarde XXL 2... -
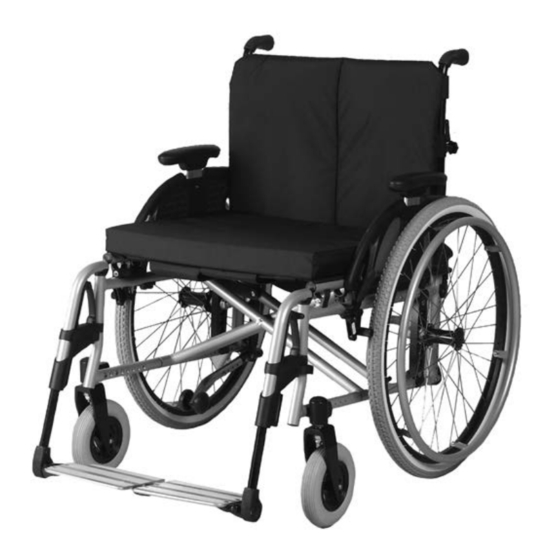
Page 6: Product Description
2 Back support, back support upholstery 8 Leg support 3 Side panel 9 Caster wheel 4 Seat with seat cushion 10 Caster fork 5 Seat pad 11 Drive wheel with handrim 6 Wheel lock 12 Release button for quick-release axle Avantgarde XXL 2... -
Page 7: Intended Use
► Users with the necessary physical and psychological preconditions can be supplied with such versions/set tings. If the physical/psychological preconditions change, the product may no longer be used with these set tings. Inform the responsible qualified personnel immediately in this case. Avantgarde XXL 2... - Page 8 ► Never cross obstacles at an angle. Always approach obstacles head on (at an angle of 90°). ► Raise the front wheels before crossing obstacles. ► Avoid collisions with obstacles and dropping off curbs/ledges. ► Avoid riding cross-country. Avantgarde XXL 2...
- Page 9 Hypothermia or burns due to contact with components, failure of components ► Do not expose the product to any extreme temperatures (e.g. direct sunlight, sauna, extreme cold). ► Do not leave the product in the immediate vicinity of heaters. Avantgarde XXL 2...
-
Page 10: Side Effects
Even in the event of compliance with all applicable guidelines and standards, alarm systems (e.g. in department stores) may respond to your product. Should this happen, remove your product from the area where the alarm was triggered. Avantgarde XXL 2... -
Page 11: Nameplate
(e.g. in the vicinity of radiators or in case of exposure to strong sunlight behind glass), the tyres may become permanently deformed. During extended storage, the knee lever wheel lock on wheelchairs with PU tyres (= tubeless tyres) must be released since tyre deformation may otherwise result. Avantgarde XXL 2... -
Page 12: Preparing The Product For Use
3) If necessary: Attach the leg supports (see Page 15). Fold down the foot plates. With a single-panel foot plate, make sure the support of the foot plate is locked into the receiver (see fig. 5; see Page 14). 4) If necessary: Fit the seat cushion (see Page 16). Avantgarde XXL 2... -
Page 13: Use
The angle of the foot support has been set by the qualified personnel so that it allows the ankles to rest in a com fortable position. Different leg support types and other accessories may be installed depending on the order: Single-panel, angle-adjustable leg support (see fig. 6) The depth of the foot supports is either 125 mm or 160 mm. Avantgarde XXL 2... -
Page 14: Folding The Leg Supports Up And Down
→ Only for leg supports with single-panel foot plate: Make sure the support of the foot plate is locked into the receiver. (not illustrated) → Only for leg supports with segmented foot plates: Make sure the fastening mechanism of the foot plate engages (see fig. 11, item 1). Avantgarde XXL 2... -
Page 15: Removing And Attaching The Leg Supports
2) Pass the calf strap through the eyelets on the swivel segments (see fig. 14, item 1). 3) Adjust the length and fasten the hook-and-loop closure (not pictured). Removing the calf strap 1) Open all hook-and-loop closures. 2) Remove the calf strap from the frame tube. Avantgarde XXL 2... -
Page 16: Adjusting The Leg Support
7.4.1 Removing and fastening the seat cushion The seat cushion can be removed for cleaning. After cleaning, the seat cushion is placed on the seat upholstery and secured against sliding by pressing it onto the hook-and-loop fastener on the seat upholstery. Avantgarde XXL 2... -
Page 17: Backrest
The side panels can be swung away to the rear and removed for transfer. The height of the forearm support can be adjusted without the use of tools. The forearm support is offered in the short, long and asymmetrical versions. Avantgarde XXL 2... -
Page 18: Adjusting The Height Of The Forearm Support
The swivel unit allows the support angle and the rotation setting of an arm support to be adjusted individually. Adjusting the support angle 1) Pull the release button outwards (see fig. 20, item 1). 2) Lift up the arm support at the front end and adjust it to the desired angle (see fig. 20, item 2). Avantgarde XXL 2... -
Page 19: Push Handles
To enable ergonomic pushing by the attendant, the wheelchair can be equipped with height-adjustable push handles. 1) Release the clamping lever. 2) Adjust the height of the push handle. INFORMATION: Adjust both push handles to the same height. 3) Engage the clamping lever. Avantgarde XXL 2... -
Page 20: Removing The Push Handles
1) Open the star handle on the right side (see fig. 26, item 1). 2) Fold the stabiliser bar down (see fig. 26, item 2). Closing the stabiliser bar 1) Fold the stabiliser bar up until the opening is against the screw of the star handle. 2) Hand-tighten the star handle. Avantgarde XXL 2... -
Page 21: Drive Wheels
2) Use your thumb to press in the push-button on the quick-release axle (see fig. 27, item 1). 3) Remove or mount the drive wheel. After mounting: The drive wheels must not be removable after releasing the push-button on the quick-release axle. Avantgarde XXL 2... -
Page 22: Spoke Protector
Caster wheel adapter for low front seat heights (see fig. 29) Reduces the front seat height by 35 mm. Also offers more freedom of movement for the feet due to caster wheels being positioned further to the outside. Avantgarde XXL 2... -
Page 23: Approach In Case Of Stiffness
► Please contact the qualified personnel who adjusted your product for readjustment of the wheel lock. The wheel locks secure the parked wheelchair against rolling away. Different wheel lock types may be installed depending on the order. Avantgarde XXL 2... -
Page 24: Using The Wheel Locks
► Operation of the wheel lock by the user is the same as for the knee lever wheel lock described above. ► Operation of the wheel lock levers by the attendant is the same as for the drum brake described above. Avantgarde XXL 2... -
Page 25: Knee Lever Wheel Lock For One-Handed Operation (Double Handrims)
► If only one attendant helps in overcoming steps, the attendant must first deactivate the anti-tipper so that it cannot collide with the steps during transport. ► The attendant must activate the anti-tipper again after overcoming the steps. Avantgarde XXL 2... -
Page 26: Activating And Deactivating The Anti-Tipper
1) From above, press on the anti-tipper with the hand or foot until it disengages (see fig. 38, item 1; see fig. 39, item 1). 2) Rotate the anti-tipper forward by 180° and release it (see fig. 38, Pos. 1; see fig. 39, Pos. 1). Avantgarde XXL 2... -
Page 27: Tip-Assist
(see fig. 41). Possible errors • The lap belt is positioned above the user’s pelvis in the area of the soft part of the stomach. • The user does not sit upright in the seat. Avantgarde XXL 2... -
Page 28: Transport Wheels
2) The first attendant holds the wheelchair in a stable position so that the drive wheels are relieved in turn. 3) The second attendant carefully removes the first and second drive wheel one after the other. → The wheelchair can now be pushed on the transport wheels. Avantgarde XXL 2... -
Page 29: Crutch Holder With Hook-And-Loop Fastening Strap
► The product must not be lifted by the tray. NOTICE Overloading Damage to the product due to user error ► Do not load the tray with heavy objects. ► No persons may sit or lean on the tray. Avantgarde XXL 2... -
Page 30: Additional Options
2) If necessary: Detach the seat cushion from the hook-and-loop fastener. 3) Pull up the seat upholstery until the wheelchair folds together (see fig. 45). 4) Fasten the safety strap (see fig. 46). 5) Remove the drive wheels (see Page 21). 6) Place the wheelchair in the vehicle. Avantgarde XXL 2... -
Page 31: Use In Vehicles For Transporting Persons With Reduced Mobility
► Information on the current status of our measures is available from the qualified personnel. The Avantgarde XXL 2 wheelchair has not been approved by the manufacturer for use as a seat in vehicles for transporting persons with reduced mobility. -
Page 32: Cleaning Belts/Straps
2) Wipe all parts of the wheelchair with a disinfectant. Important information about disinfecting • If the product is used by more than one person, using a conventional disinfectant is required. • Only use colourless water-based disinfectants. Observe the instructions for use provided by the manufacturer. Avantgarde XXL 2... -
Page 33: Maintenance And Repair
Periodically lubricate the quick-release axle lightly with thin, resin-free oil (sewing machine oil). • If the wheelchair becomes wet, it should be rubbed dry again. Avantgarde XXL 2... -
Page 34: Repair
1) Behind the valve, push one side of the tyre over the edge of the rim. 2) Slightly inflate the tube until it starts to assume its round shape. 3) Unscrew the valve nut from the tube and push the valve through the valve opening in the rim. Avantgarde XXL 2... -
Page 35: Disposal
Expected lifetime: 4 years The design, manufacturing and requirements for the intended use of the product are based on the expected life time. These also include the requirements for maintenance, ensuring effectiveness and the safety of the product. Avantgarde XXL 2... -
Page 36: Technical Data
► Note that not all adjustment possibilities can be used with all product versions. Furthermore, the adjustment combinations are limited by the compact frame geometry. ► Technical changes and tolerances are reserved by the manufacturer. Avantgarde XXL 2 Max. load [kg] Transport weights [kg] Frame: from 11.3... -
Page 37: Appendices
60 mm under the footrest for going forward at the end of the slope) Maximum inclination angle on which the wheelchair will 6 (dynamic stability in all directions) remain stable [°] 9 (static stability in all directions, also when wheel lock engaged) Avantgarde XXL 2... - Page 38 Avantgarde XXL 2...
- Page 39 · www.ottobock.de 143441 Moscow Region/Krasnogorskiy Rayon info@ottobock.com.co · www.ottobock.com.co Russian Federation Otto Bock Healthcare Products GmbH Otto Bock de Mexico S.A. de C.V. T +7 495 564 8360 · F +7 495 564 8363 Brehmstraße 16 · 1110 Wien · Austria Prolongación Calle 18 No. 178-A info@ottobock.ru · www.ottobock.ru F +43 1 5267985...
- Page 40 Ihr Fachhändler | Your specialist dealer Otto Bock Mobility Solutions GmbH Lindenstraße 13 · 07426 Königsee/Germany www.ottobock.com...
Need help?
Do you have a question about the Avantgarde XXL 2 and is the answer not in the manual?
Questions and answers