Advertisement
Quick Links
Advertisement

Related Manuals for OPTO-EDU A18.1831


Summary of Contents for OPTO-EDU A18.1831
- Page 1 A18.1831 Comparison Microscope, Step Zoom, 3.2~288x Instruction Manual...
- Page 2 一、Product introduction A comparison microscope is a new type of microscope that uses a set of eyepieces to simultaneously observe the left and right object fields of view, and uses the methods of field cutting, docking, and overlapping to compare two (or more than two) objects. The instrument has clear imaging and high resolution, and can accurately identify the subtle differences between the objects being compared.
- Page 3 6.There are two synchronous output mechanisms for visual and video, that is, the image observed by the eyepiece can be displayed on the computer monitor synchronously, which is more convenient for observation; 7. Embedded digital camera: 1/2 inch color APTINA CMOSMT9T001 chip, the highest resolution is 3.1 million pixels (2048x1536), exposure time: 0.244ms~2000ms, G light sensitivity: 1.0 V/lux-sec, USB2.0 high-speed interface .
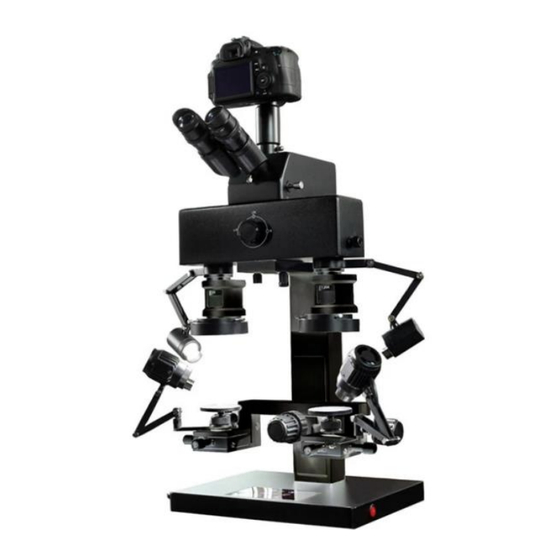
- Page 4 三、Appearance of the instrument Fig.1 1、power supply 2、light control panel 3、Linkage lift knob 4、Horizontal linkage knob 5、Table lift knob 6、LED lights 7、objective lens 8、 magnification adjustment knob 9、Field of view adjustment handwheel 10、...
-
Page 5: Camera Socket
binocular head 11、adjusting screw 12、camera socket 13、Camera interface 14、9.7 inch touch display 15、eyepiece 16、tie rod 17、 magnification correction wheel 18、reflector 19、Stage 20、workbench 21、 Worktable X-axis movement knob 22、 Worktable Y-axis movement knob 四、Instrument installation and focusing 1. installation, focus 1)Fit the binocular head (10) and insert the same required eyepieces (15) into the two tubes of the binocular head. - Page 6 into the color filter. Note: If you find that the bulb does not light up, unscrew the socket, take out the bulb to check or replace it with a new bulb. 3. The light control panel (2) has left and right LED ring lights, left and right strong light reflector lights, left and right LED reflector lights switching and dimming buttons.
- Page 7 the two ridgelines are parallel and overlapping) and the two ridgelines are crossed or scissors-shaped (as shown in the figure), the ridgeline needs to be adjusted precisely. Turning the left screw can change the direction of the ridgeline to eliminate cross or scissors;...
- Page 8 observation of visual and videography. If you need to take pictures, put the camera into the camera (photography) adapter (external), install the camera's driver CD, and then insert the USB port into the computer, adjust the camera properly, and then take pictures. If you want to take pictures, first pull the switch lever (16) out, and then put the camera with bayonet into the camera adapter, and make slight adjustments to the shooting scene through the camera viewfinder, then you can take pictures.
- Page 9 六、Completeness of the instrument There are many instrument accessories and accessories, please confirm the purchase when ordering. For a detailed list, please refer to the packing list. 七、Maintenance and care of the instrument 1、 The instrument should be placed in a dry, ventilated, dust-free, acid-alkali, and vapor-free room, and a dust cover should be covered after each use.
- Page 10 八、Packing List serial name specification quantity configuration number ● host ● binocular head ● eyepiece WF10X ● eyepiece WF20X ● LEDCold light ● Multifunctional Shearing Jig ● photography socket ● blue filter ● green filter ● red filter ● UV sheet ●...
- Page 11 注:●Required accessories ○for option...
Need help?
Do you have a question about the A18.1831 and is the answer not in the manual?
Questions and answers