
Related Manuals for OPTO-EDU A15.2601-T


Summary of Contents for OPTO-EDU A15.2601-T
- Page 1 A15.2601-T Polarizing Microscope, Transmit Instruction Manual To ensure the safety and obtain satisfactory performance, please study this instruction manual thoroughly be fore start to use the instrument.
-
Page 2: Table Of Contents
Contents 1.Purpose …………………… 2.Specification …………………… 3.Parts Name …………………… 4.Installation …………………… 5.Operation …………………… 6.Maintenance …………………… 11 7.Troubleshooting …………………… 13 Outfits …………………… 14... -
Page 3: Purpose
1.Purpose BK-POL Series polarizing microscope is for the field of metallurgy, geology and minerals. BK-POL Series polarizing microscope is with gypsum(λ), mica (λ/4) sample, quartz wedge and attachable mechanical stage. It is an ideal instrument that has perfect function and quality. BK-POL/BK-POLR transmitting/reflecting polarizing microscope is perfect in optical and mechanical quality, and it can be used in observing even, non-even, transparent, non-transparent mineral sample. - Page 4 2.3 Eyepiece Magnification Type View Field Diameter (mm) High eye point 20/22 Reticule (0.1mm) 20/22 2.4 Mechanical Tube Length: ∞ 2.5 Head: Seidentopf binocular (trinocular) head 30°, Interpupillary adjustable distance is 48-76mm. Diopter adjustable range ±5, Anti-fungal systems. 2.6 Intermediate: 360°part division for analyzer, 2°30’per scale, lock system Bertrand Lens (center adjusting) Gypsum(λ), mica (λ/4)sample, quartz wedge...
-
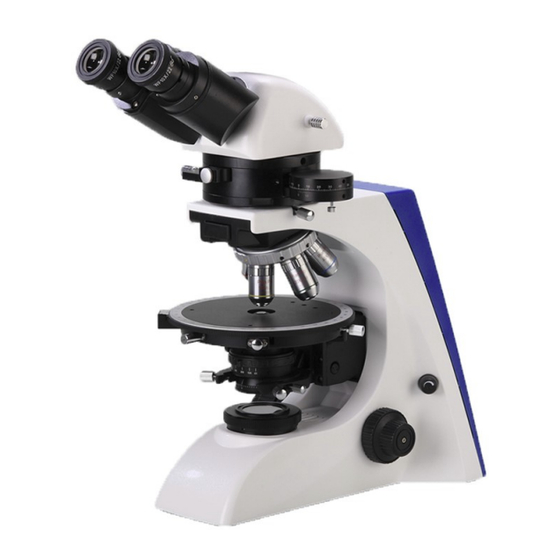
Page 5: Parts Name
3. Parts Name Eyepiece Trinocular Head C-mount Fixing Screw Diopter Adjusting Head Thumb Screw Tube Fixing Hole Bertrand Lens Focuing knob Analyze Bertrand Lens Slip Main Body Fixing Screw Bertrand Lens Centering Screw Main Bod Complementary Inlet Clamp Centering Nosepiece Stage Centering Stage Center... - Page 6 C-mount E-intermediate Analyzer Screw Bertrand Lens Objectiv Locking Screw cursores Handle Adjustable level for swing-out Condenser Condenser Focusing Knob Left Fine Focusing Knob Power Switch Left Coarse Focusing Knob Coarse Focusing Tension Power Adjusting Ring Socket BK-POL Transmitting Polarizer Microscope (2) λ...
- Page 7 Lamp house Aperture diaphragm lever Ground fix screw glass slider Field diaphragm lever Halogen lamp house Halogen Lamp Centering Knob Power line (with plug) Reflection illumination Slider handle Filter slider Polarizing slider Power house Output socket Input socket Potentiometer Power switch Face of Back of Fuse...
-
Page 8: Installation
Locking Nut (Reflecting) Rotatable Stage Support of Quick Down Stage Support BK-POLF Reflecting Polarizing Microscope 4. Installation 4.1 Installation Condition 4.1.1 The required input voltage: 100V-240V, 50/60HZ 4.1.2 Alcohol, gasoline and paper all are burnt early, please take them away from the lamp. 4.1.3 The halogen lamp: 12V/20W, G4 4.1.4 The microscope should be used in environment of indoor... -
Page 9: Operation
4.2 Installation 4.2.1 Please confirm the installation condition meets 4.1; 4.2.2 Put out the main body and place it in table, and loose the main body fixing screw, then put the cost cover out; 4.2.3 Put out the intermediate, fix it into the main body, then tighten the main body fixing screw;... - Page 10 polarizer and the analyzer if not so. 5.6 Choose the complementary slip as per the sample, then insert into the slip. 5.7 Put into the Bertrand Lens Slip in the condition of polarizing; 5.8 Adjust the center of the stage. 5.9 Adjustment for round stage rotating center The rotating axis of the round stage should be in the same line with the axis of optical system.
-
Page 11: Maintenance
stage rotation center adjustment sketch map △ To confirm polarized light’s vibration direction, choose a cleavage black mica, putting it in field center, then rotating the stage until the black mica color getting the darkest, the black mica cleavage direction is the polarized light’s vibration direction. - Page 12 6.2.2 Microscope should be used in environment of indoor temperature 0~40℃ and maximum relative humidity 85%. 6.2.3 Removing equipment is suggested to be installed when microscope used in heavy humidity area to avoid fungus and mist damage instrument. 6.2.4 Please pay attention to prevent microscope from violent shake and vibration in application and in carrying.
-
Page 13: Troubleshooting
7. Troubleshooting In the period of using BK series microscope, if there is any trouble occurs, please referring to the following sheet listed some common troubleshooting resolve them. Trouble Causation Remedy Plug is unreliable Plug in again Switch on but bulb dark Bulb is broken Change bulb Fuse is broken...
Need help?
Do you have a question about the A15.2601-T and is the answer not in the manual?
Questions and answers