
Related Manuals for OPTO-EDU A15.2603


Summary of Contents for OPTO-EDU A15.2603
- Page 1 A15.2603 Polarizing Microscope Instruction Manual To ensure the safety and obtain satisfactory performance, please study this instruction manual thoroughly be fore start to use the instrument.
-
Page 2: Table Of Contents
CONTENT Attentions ………………………………………………………………………… 1.Parts Name ……………………………………………………………… 2.Performance Parameter ……………………………………………………………… 3.Installation And Carry ……………………………………………………………… 4.Operation And Use ……………………………………………………………… 5.Maintenance ………………………………………………………………………… 6.Troubleshooting ………………………………………………………………………… Appendix: outfits …………………………………………………………………………... -
Page 3: Attentions
ATTENTIONS 1. Purpose This microscope is used only for microscopic observation, can not be used for other purposes. Otherwise may cause the damage of the instrument. 2. Disassembly only by the professionals. The microscope has been adjusted before shipping, Unprofessional-person should not disassemble and remove any other parts. -
Page 4: 1.Parts Name
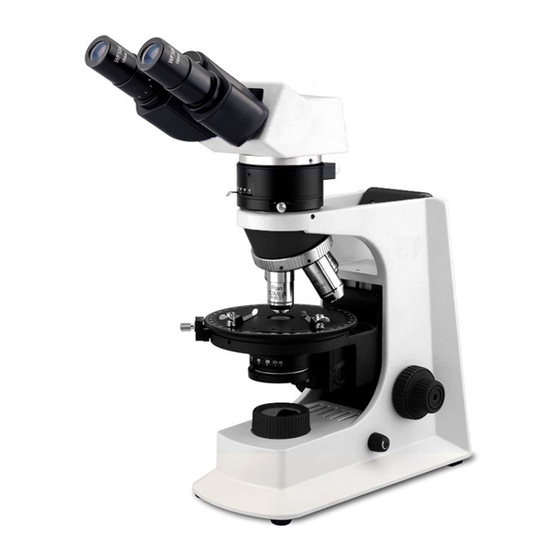
1. Parts Name Eyepiece Eyepiece Tube Bertrand Lens Diopter Adjusting Nosepiece Ring Body Handle Analyzer driving lever Stand λ,λ/4 Centering Nosepiece Compensator Non-stress Objective Clamps Center Adjustable Locking Screw rotating Stage Right Coarse & Fine Condenser Focusing Knobs Built-in Polarizer Brightness control knob Collector... -
Page 5: 2.Performance Parameter
2. Performance Parameter 2.1 Magnification (〝O〞is optional) Objective × × × × × × Eyepiece 10× 1000 × × × × × × 2.2 Objective( 〝O〞 is optional) Objective Field Working Numerical Infinity Plan Resolution (mm) Distance Aperture Achromatic Objective (μm) N.A. -
Page 6: 3.Installation And Carry
3.Installation And Carry Installation Process 1. Confirm the service environment is good for use. 2. Clean working desk,put microscope parts in the left side. 3. Dispose the packing waste properly,don’t left plastic bag or foam on the working desk. 4. take out socket head wrench for use whenever appropriate. -
Page 7: 4.Operation And Use
Operation And Use Bright field operation process instruction 1. Switch on the power, adjust brightness. Turn power switch,rotating screw to adjust brightness of Field. Place specimen on stage, moving to the light path 2. Place Mineral Specimen. until to observe position,gently press clamps, moving to slice’s both end then fixed. -
Page 8: 5.Maintenance
Maintenance Clean: (1) Don’t touch the lens with hand, Dust on lens should be cleaned by soft brush or absorbent cotton or cleaned by absorbent cotton, lens paper with the mixture of alcohol and ether (proportion 1:4). (2) Alcohol and ether all are burnt easily, please take them away from fire. Be careful for turn on and off power. - Page 9 5.4 Replacement of fuse (1) First shut off power,pull out the plug. (2) Unscrew fuse tube socket in back of base, take out old fuse. (3) Replace with same specification fuse,then plug in fuse tube socket again. 5.5 Not in use: (1) Please shut off the power , covered by dust cover, keep in dry and cool place.
-
Page 10: 6.Troubleshooting
6. Troubleshooting n the period of using Smart series microscope, if there is any trouble occurs, please referring to the following sheet listed some common troubleshooting resolve them or keep in touch with us or local agency. Trouble Causation Remedy No bulb Install bulb Plug is unreliable...
Need help?
Do you have a question about the A15.2603 and is the answer not in the manual?
Questions and answers