Racelogic Performance Box Touch V1 Quick Start Manual
Hide thumbs
Also See for Performance Box Touch V1:
- Quick start manual (14 pages) ,
- User manual (8 pages) ,
- Installing (6 pages)
Advertisement
Table of Contents
Quick Start Guide: Decel Mode - Performance Box Touch V1
https://en.racelogic.support//Product_Info/Performance_Meters/Performance_Box_Touch/
Performance_Box_Touch_V1/Quick_Start_Guide_%E2%80%93_Performance_Box_Touch_V1/
Quick_Start_Guide%3A_Decel_Mode_-_Performance_Box_Touch_V1
Performance Box Touch features a 10 Hz GPS receiver and a responsive 4.3" colour touch screen. The
Decel Mode allows you to perform acceleration tests using pre-defined configurations, or using your own specified
values.
Registration
Please register your Performance Box Touch so that Racelogic can continue to inform you about the latest software
releases and firmware upgrades and offer technical support.
Register your unit here.
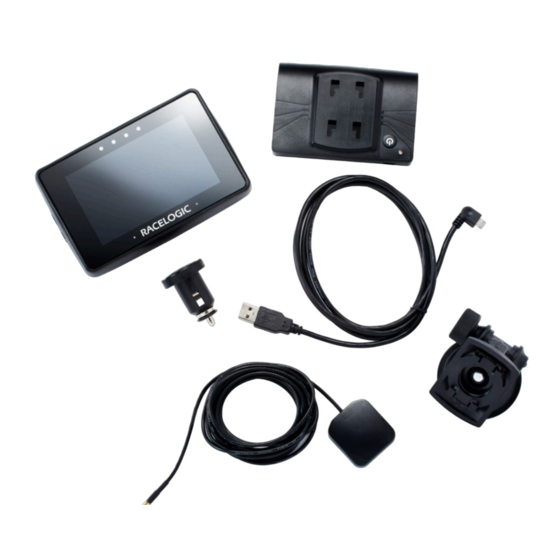
What's Included
Performance Box Touch V1 (RLPBT-V1)
Product Code
PBT-V1
RLACS184
Quantity
1
1
Description
Performance Box Touch Unit
Cigar Plug USB Adapter
1
Advertisement
Table of Contents

Related Manuals for Racelogic Performance Box Touch V1


Summary of Contents for Racelogic Performance Box Touch V1
- Page 1 Decel Mode allows you to perform acceleration tests using pre-defined configurations, or using your own specified values. Registration Please register your Performance Box Touch so that Racelogic can continue to inform you about the latest software releases and firmware upgrades and offer technical support. Register your unit here.
- Page 2 USB2-007241 data and Charging Cable, 1.5 m 8 GB SD Ultima Pro UHS-1 Memory RLACS313 Card RLACS277 Swivel Neck Richter Suction Mount Performance Box Touch V1 Bundle (RLPBT/B) Product Code Quantity Description PBT-V1 Performance Box Touch Unit RLACS184 Cigar Plug USB Adapter USB 2.0 A to Right Angle Micro B...
-
Page 3: Hardware Overview
Product Code Quantity Description GPS/GLONASS Low Profile RLACS284 Antenna, 2 m RLACS281 Plastic Carry Case Hardware Overview You can find more detailed connector information on the PIN OUTS page. Left Side Right Side 06 Logging - Performance Box Touch V1... -
Page 4: Sd Card Format
Logging Performance Box Touch V1 logs data via an SD card inserted into the SD cad Slot on the left-hand side of the unit. Depending on the Logging Strategy you have selected in the General Settings area, the unit will either log continuously or when it detects movement. - Page 5 If you have an SD card that is formatted in the exFAT or NTFS file formats, you will have to reformat it to a FAT32 file system before it will work with a Performance Box Touch unit. SDHC cards (2 GB to 32 GB) Supplied or purchased SDHC cards are formatted in the FAT32 file format.
- Page 6 • Vertical velocity: Vertical velocity in km/h. +ve velocity uphill, -ve velocity downhill. • Long accel: Longitudinal acceleration in g, +ve for forward acceleration. • Lat accel: Lateral acceleration in g, +ve for acceleration to the left. • Solution type: Indicator for what the unit is currently using to derive position: 0 = No sats; 1 = Standalone using GNSS only;...
- Page 7 2. If applicable, connect the external GPS antenna to the Performance Box Touch. 3. Connect the Battery (RLACS290) if required. For more information on the battery click here. 4. Connect the Swivel Neck Richter Suction Mount (RLACS277) to the rear of the unit or battery and attach to the vehicle windscreen.
- Page 8 7. When the unit has booted, select the Mode Button and press DECEL if it is not already selected. 8. Select the Settings Button , then the Decel option and choose from either a Preset Test, or use Custom Start and End Parameters.
- Page 9 11. Take the vehicle outside and wait for the Performance Box Touch to gain satellite lock. The Satellite Icon should display as solid green Note: The first time that the unit is used, it may take up to 10 – 15 minutes to fully acquire satellites. After this, it will usually take 1 –...
- Page 10 16. A screenshot of what is displayed on the screen can be taken at any time by pressing the Screenshot Button 17. To reset all test results shown on the current screen, press the Reset Button 18. When you have finished your testing, completed test results can be viewed by pressing the Results Button More information on Decel Mode testing can be found here.
Need help?
Do you have a question about the Performance Box Touch V1 and is the answer not in the manual?
Questions and answers