
Subscribe to Our Youtube Channel
Related Manuals for Bodyworx ABX800


Summary of Contents for Bodyworx ABX800
- Page 1 DUAL ACTION AIR BIKE Model No: ABX800 Retain this owner’s manual for future reference. Read and follow all instructions in this owner’s manual.
-
Page 2: Table Of Contents
CONTENT PAGE WARRANTY REGISTRATION FORM IMPORTANT SAFETY INSTRUCTIONS SAFETY GUIDELINES PRODUCT DESCRIPTION PART LIST ASSEMBLY INSTRUCTIONS 9-13 SET UP 14-16 CONSOLE INSTRUCTIONS 17-23 BATTERY REPLACEMENT EXPLODED DIAGRAM EXERCISE INSTRUCTIONS 27-28... -
Page 3: Warranty Registration Form
GPI Sport & Fitness Warranty Registration Form Congratulations on purchasing your product, we at GPI believe that our product range is of the highest quality and represents great value for money. We back our product range up with our industry leading warranty. Please see below for the step by step instructions on how to register your product warranty on- line. -
Page 4: Important Safety Instructions
IMPORTANT SAFETY INSTRUCTIONS Before beginning any fitness program, you should obtain a complete physical examination from your physician. This exercise equipment is designed and built for optimum safety for home use. However, certain precautions always apply whenever you operate any exercise equipment. Be sure to read the entire manual before assembly and operation of this machine. -
Page 5: Safety Guidelines
SAFETY GUIDELINES Successful fitness training programs have one prominent feature in common...safety. Fitness training has some inherent dangers, as do all physical activities. The chance of injury can be greatly reduced or completely removed by using correct techniques, proper breathing, maintaining equipment in good working condition, and by wearing the appropriate clothing. -
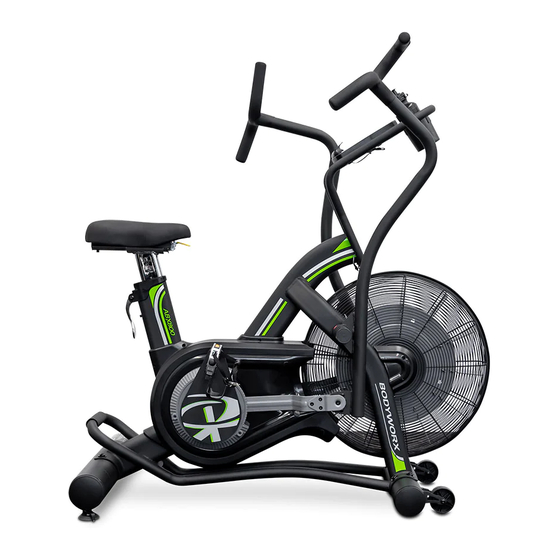
Page 6: Product Description
PRODUCT DESCRIPTION PRODUCT DESCRIPTION 1. Left handlebar 2. Footrest 3. Left pedal 4. Seat 5. Seat post 6. Adjustment lever 7. Left cover 8. Lever 9. Serial number 10. Leveling foot 11. Rear stabilizer 12. Warning label 13. Right pedal 14. -
Page 7: Part List
PART LIST PARTS LIST Name Qty. Name Qty. Main Frame Seat Post Hollow Cap Fan Hub V-Ribbed Belt (690-J6) Left Pedal Fan Hub Spacer Right Pedal Fan Hub Sleeve Front Stabilizer Fan Shaft Endcap (Ø90 mm) Bearing (6301Z) Square Foot Pad Bearing (6901Z) Moving Wheel Left Fan Cage... - Page 8 Square Plug Nut M6 x 1 Seat Holder Bolt M6 x 1 x 35 mm Seat Bolt ST4 x 15 mm Fixing Plate 100A Bolt ST4 x 45 mm Disc Spacer Bolt M4 x 0.7 x 10 mm Cam Handle Bolt M8 x 1.25 x 40 mm Handle Spacer Nut M8 x 1.25...
-
Page 9: Assembly Instructions
ASSEMBLY INSTRUCTIONS ASSEMBLY The packed includes: Custom wrench Allen key 4 mm Wrench 14/17 mm Allen key 5 mm Screwdriver Allen key 6 mm Assembly material: Picture Name Qty. Nylon nut M8 x 1,25 Bolt M8 x 1,25 x 30 mm Bolt M5 x 0,8 x 12 mm Bolt M6 x 1 x 15 mm Bolt M10 x 1,5 x 20 mm... - Page 10 STEP 1 Remove the screws from the cardboard rollers from the front of the main frame (1). Make sure that the transport wheels (43) on the front stabilizer (40) face forward. Attach the front stabilizer (40) to the main frame (1) with screws (108) and washer (112). STEP 2 Remove the screws from the cardboard rollers from the back of the main frame (1).
- Page 11 STEP 3 Attach the right handlebar (58) to the main frame holder (1) and attach the footrest (83) to the main frame holder. Refer to the picture below. Attach the footrest using the modified spanner (83). Attach the cap (84) to the footrest (83). STEP 4 Attach the right connection rod (29) to the bottom of the right handle (58) using the mounting plate (74), spacer (75), bolt (105) and nut (93).
- Page 12 STEP 6 NOTE: The right pedal is marked R. The left pedal is marked L. The right pedal is screwed clockwise. The left pedal is screwed counterclockwise. Loosen the screw (109) on the right crank (28). Screw the right pedal (39) onto the right crank (28) as shown.
- Page 13 STEP 8 Insert two AA batteries into the console (85). Batteries are not included. Connect the connecting cable (63) to the console (85). Secure the console (85) in the console bracket (48) with the screw (106). Do not damage the cables while attaching the bracket (85). STEP 9 Attach the bottle holder (113) to the console bracket (48).
-
Page 14: Set Up
SET UP SET UP Place the exercise bike in place of use. We recommend placing the exercise bike on a protection mat. We recommend a free space of at least 122 cm wide and 183 cm long. Leveling: Align the exercise bike with the leveling feet (46) located on the rear stabilizer (44). Transportation: There are transport wheels (43) on the front stabilizer (40). - Page 15 health problems. Make sure that all screws are properly tightened before use. Maximum load capacity: 160 kg SEAT HEIGHT ADJUSTMENT For effective exercise it is important to set the correct saddle height. Your foot should be slightly bent and relaxed when you step down. If the foot is too stretched or user can’t reach the pedal, the seat must be lowered.
- Page 16 HEART RATE The exercise bike does not include a chest belt or other forms of heart rate transmission. However, it is compatible with chest belts operating at 5 kHz. The chest belt sends information to the console (85). In this way, you practice most effectively because you have the required heart rate information for maximum training efficiency.
-
Page 17: Console Instructions
CONSOLE INSTRUCTIONS CONSOLE The exercise bike uses a fan system to create resistance. The console helps you create goals and track progress. TURN ON: Press the pedal or press any button. TURN OFF: In standby mode, the console will turn off after 60 seconds of inactivity. During training, except for Interval Program, the console will turn off automatically after 90 seconds of inactivity. - Page 18 BUTTONS ENTER Confirm the entered value or program selection START Starting the program or turning on the STOP program STOP Press to stop / pause the program Press and hold for 2 seconds to restart console and setting up age Increase value Decrease of value DOWN...
- Page 19 DISPLAY TIME Shows training time from 1 sec to 1:59:59. 0:00 flashes to set the target time from 1 sec to 1:59:00 and counts down from that value. DISTANCE Displays a distance of 0.1 miles to 999.9 miles. 0: 0 flashes to set the target distance from 0.5 to 999.5 miles and starts counting down from that value.
- Page 20 PROGRAMS The console includes programs: Normal Program, Time, Distance, Calories, Heart-Rate, 10/20 Interval, 20/10 Interval, Custom Setting program. NORMAL PROGRAM Step on to turn on the console. The display will show a flashing 30 for age settings from 1 to 99. With adjust the value and confirm with ENTER.
- Page 21 DISTANCE PROGRAM Press Target Distance display shows flashing 0:0 for adjusting the distance value from 0,5 mile to 999,5 miles. With adjust the value and confirm with ENTER. Program will start. During exercise, the set value will count down, the other values will be counted up.
- Page 22 INTERVAL 10/20 A program where the user exercises for 10 seconds and then rest for 20 seconds. Press the 10/20 Interval button to start the program. Time starts to count down from 3:40 minutes (10 sec x 8 reps, 20 sec x 7 reps).
- Page 23 CUSTOM INTERVAL PROGRAM The user can set their own training interval from 1 second to 9:59 minutes and the number of cycles from 1 to 99. Press Custom interval, 00/01 starts flashing, for setting up the number of repetitions 1 - 99. Use the arrows to set the value and confirm with ENTER.
-
Page 24: Battery Replacement
BATTERY REPLACEMENT BATTERY REPLACEMENT Open the rear cover on the console (85) The console is powered by 2 AA batteries (1.5V). Batteries are not included. Note: Do not mix old and new batteries. • Use the same type of battery. •... -
Page 25: Use
Exercise on the exercise bike is based on very simple movements, but you will surely fall in love with them. Thanks to simplicity of the exercise on the exercise bike in can be done by elderly people. Prior to exercise, it is necessary to adjust the height of the saddle. It is important that you sit comfortably. The bicycle saddle must be set so that you can hold the ergonomically shaped handles when sitting. -
Page 26: Exploded Diagram
EXPLODED DIAGRAM DIAGRAM... -
Page 27: Exercise Instructions
EXERCISE INSTRUCTIONS Using your exerciser will provide you with several benefits, it will improve your physical fitness, tone muscle and in conjunction with a calorie controlled diet help you lose weight. 1. THE WARM UP PHASE This stage helps get the blood flowing around the body and the muscles working properly. It will also reduce the risk of cramp and muscle injury. - Page 28 EXERCISE INSTRUCTIONS 3. THE COOL DOWN PHASE This stage is to let your Cardio Vascular System and muscles wind down. This is a repeat of the warm up exercise e.g. reduce your tempo, continue for approximately 5 minutes. The stretching exercises should now be repeated, again remembering not to force or jerk your muscles into the stretch.
- Page 29 DUAL ACTION AIR BIKE Model No: ABX800 To register your warranty, please go to www.gpisports.com.au DISTRIBUTED EXCLUSIVELY BY 275 Wellington Road Mulgrave, VIC, 3170 Australia...
Need help?
Do you have a question about the ABX800 and is the answer not in the manual?
Questions and answers
How do I pair my HRM
To see the heart rate on the Bodyworx ABX800, you must wear a chest strap. The heart rate monitoring system only works when the chest strap is attached.
This answer is automatically generated