
Subscribe to Our Youtube Channel
Related Manuals for JLL RE200


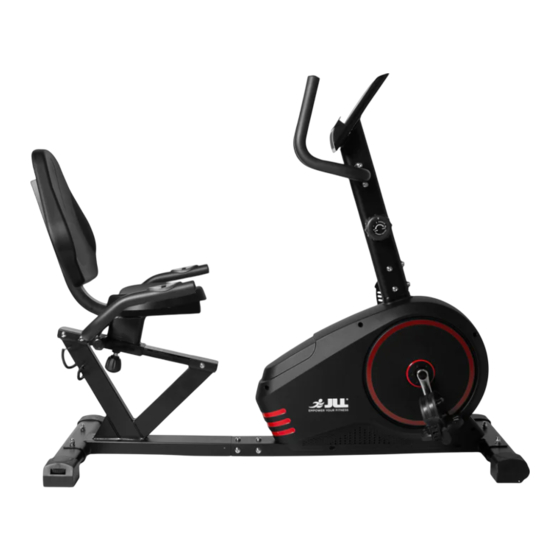
Summary of Contents for JLL RE200
- Page 1 INSTRUCTION MANUAL Please read this book thoroughly before operating the bike. Search “JLL RE200 Recumbent Bike” on YouTube for a step-by-step video guide on how to assemble your bike.
-
Page 2: Table Of Contents
Preparing the site p. 9 Diagram p. 10 Content listing Box contents p. 10 Tools pack p. 10 p. 11 RE200 assembly p. 13 Adjusting the handlebars Monitor configuration p. 13 p. 14 Testing the bike operation Specifications p. 14 3. OPERATION p. - Page 3 4. MAINTENANCE p. 17 Preventive maintenance activities p. 18 Bike cleaning p. 18 Bike balance 5. ADDITIONAL INFORMATION p. 19 Contact information p. 19 Disclaimer...
-
Page 4: Exploded Diagram
EXPLODED DIAGRAM... -
Page 5: Parts List
PARTS LIST... -
Page 6: Safety Instructions
Please contact JLL Fitness on 0800 6123 988 for advice on how to resolve the issue. -
Page 7: User Safety Precautions
9. To avoid bodily injury and/or damage to the product or property, ensure to follow safe procedures for lifting and moving the item. 10. Your product is intended for use in cool, dry conditions. You should avoid storage in extreme cold, hot or damp areas as this may lead to corrosion and other related problems. -
Page 8: Warning Stickers
• Read the instruction manual completely before using the bike. • Ensure all users wear appropriate footwear on JLL ® equipment. • As far as possible provide the following clearances: 0.5 m at each side and 2 m at the back. Be sure your bike is clear of walls, equipment and other hard surfaces. -
Page 9: Assembly
Assembly PREPARING SITE To find the ideal location to set up this bike, ensure that: • Area is well illuminated and well ventilated. • Surface is level. • There is enough space to access the unit and emergency dismount. If it is possible, keep the following clearances: 0.5 m at each side and 2 m at the back. -
Page 10: Content Listing
CONTENT LISTING See diagram (left) and content listing (below) for recumbent bike box contents. See Customer Service chapter for contact information if any parts are missing. BOX CONTENTS Manual Main Base Adjustable Tube Handlebar Post Tools Pack Pulse Plate Handles Stabilisers x2 R/L Handles Pedals R/L... -
Page 11: Re200 Assembly
Inside the box you will find a Tools Pack (Hex Allen Key, Multi-Tool, Washers and Bolts). See previous page. To assemble your JLL RE200 please follow these easy steps: STEP 1... - Page 12 STEP 5 Next, attach the handlebar post to the base by first connecting the sensor wires (40+34+39) to the corresponding wires from the base. Then connect the tension cable as shown in the diagram on the right. Please Note: this will take some force and make sure the resistance dial is already turned down to number Lock in place using six inner hex screws (21), arc STEP 6...
-
Page 13: Adjusting The Handlebars
MONITOR CONFIGURATION LCD display Function Buttons Function Symbols Tablet Holder... -
Page 14: Testing The Bike Operation
TESTING THE BIKE OPERATION Use the following instructions to test the full resistance of the bike and to check the machine for proper operation. 1. Sit on the bike and start pedalling, change the levels of resistance and check to make sure you feel a difference in difficulty. -
Page 15: Operation
Operation Read all instructions, warnings and safety procedures located in the Safety chapter before using the bike. HEART-RATE SENSORS Hold the sensor plates on the handlebars ensuring that your hands are clean. A heart- rate reading will show on the display. Factors that interfere with pulse signal are: •... -
Page 16: Target Programs
TARGET PROGRAMS With the RE200 monitor you are able to set a target time, distance, calories and pulse. Press the mode button until the function you want to set is showing, then press the set button continually to increase the digits. Once you’ve set your target, you can either set another by pressing the mode button to move onto the next setting or start pedalling to begin your workout. - Page 17 Maintenance Maintenance must be performed on a regular basis. Performing maintenance actions can aid in providing safe and trouble-free operation of all JLL ® equipment. ® are not responsible for performing regular inspection and maintenance actions for your machine. JLL ®...
- Page 18 Depending on where the bike is placed, you may experience dry air, causing a common experience of static electricity. You can notice that by walking across a carpet and then touching a metal object. On your bike you may experience a shock due to the build-up of static electricity on your body and the discharge path of the bike.
- Page 19 • Always seek professional advice before changing your diet or starting any exercise program. • JLL Fitness Ltd is not liable for any injuries or damages that may occur when assembling or using this exercise bike. • By reading this you assume full responsibility for any injuries or changes to your physical well-being.
- Page 20 WWW.JLLFITNESS.COM Follow us on Facebook and Twitter @JLLFitness © JLL Fitness Ltd . All Rights Reserved.
Need help?
Do you have a question about the RE200 and is the answer not in the manual?
Questions and answers