
Related Manuals for JLL MAGNETIC VX-BIKE


Summary of Contents for JLL MAGNETIC VX-BIKE
- Page 1 OWNER’S MANUAL IMPORTANT! Please read all instructions carefully before using this product. Retain this manual for future reference.
-
Page 2: Important Safety Notice
The specifications of this product may vary slightly from the illustrations and are subject to change without notice IMPORTANT SAFETY NOTICE: Note the following precaution before assembling or operating the machine 1、 Assemble the machine exactly as the descriptions in the instruction manual. 2、... -
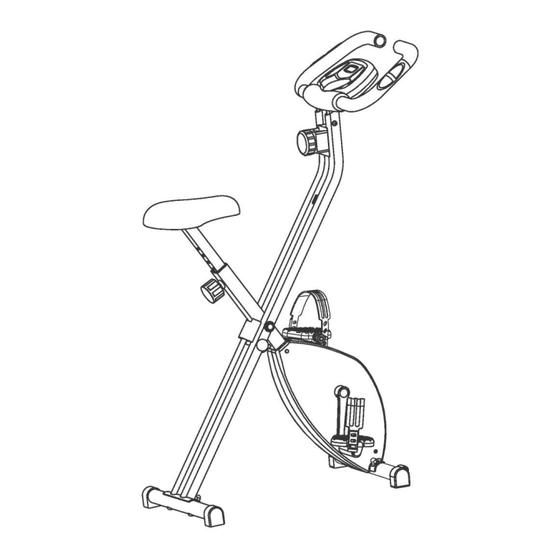
Page 3: Exploded Diagram
EXPLODED DIAGRAM... -
Page 4: Parts List
PARTS LIST Item name Item name Main frame Tension control Front bottom tube Sensor cable Rear bottom tube Flat washer Saddle Cross head screw Handlebar Flat washer D6×1.5×φ16 6L/R Crank 1pr. Socket head cap screw M6×15 7L/R Pedal 1pr. Arc washer D6×1.5 8a/b Console cover 1pr. -
Page 5: Assembly Instructions
Assembly instructions Step1 1. First pull out the Pop-pin knob (30) and unfold Main frame (1), then insert the Pop-pin knob (30) back to the hole of Main frame(1). 2. Lock the Front bottom tube(2) and Rear bottom tube(3) separately to the Main frame(1) with Carriage bolt(12), Arc washer(13) and Acorn nut(14). - Page 6 Step 3 Attach the L/R pedal (7 L/R) to the crank (6 L/R)) respectively as shown. Note: Both Pedals are labeled L FOR LEFT and R FOR RIGHT. To tighten turn the Left pedal COUNTERCLOCKWISE and the Right pedal CLOCKWISE. Step 4 Lock the Saddle(4) to the Saddle post (16) with Nylon nut(10) and Flat washer (9);...
-
Page 7: Warm-Up And Cool-Down
This VX-bike is foldable, please be careful when folding or unfolding the bike ! WARM-UP and COOL-DOWN A successful exercise program consists of a warm-up, aerobic exercise, and a cool-down. Do the entire program at least two and preferably three times a week, resting for a day between workouts. After several months, you can increase your workouts to four or five times per week. - Page 8 to 30 seconds. DO NOT BOUNCE. Toe Touch Inner Thigh Stretch Calf-Achilles Stretch Side Stretch Hamstring Stretch Remember always to check with your physician before starting any exercise program. COOL-DOWN The purpose of cooling down is to return the body to its normal or near normal, resting state at the end of each exercise session.
Need help?
Do you have a question about the MAGNETIC VX-BIKE and is the answer not in the manual?
Questions and answers