Advertisement
Advertisement
Table of Contents

Related Manuals for D-CUT MH-510


Summary of Contents for D-CUT MH-510
- Page 1 OPERATION MANUAL D-Cut Multi-Flooring Cutter MH-510 www.dcutproducts.com...
- Page 2 7. Make sure tool is secure. Operate only on a firm substrate or solid stand. 8. Use the right tool. Do not force the D-Cut Multi-flooring Cutter or use it for a job for which it was not designed; use only on approved materials.
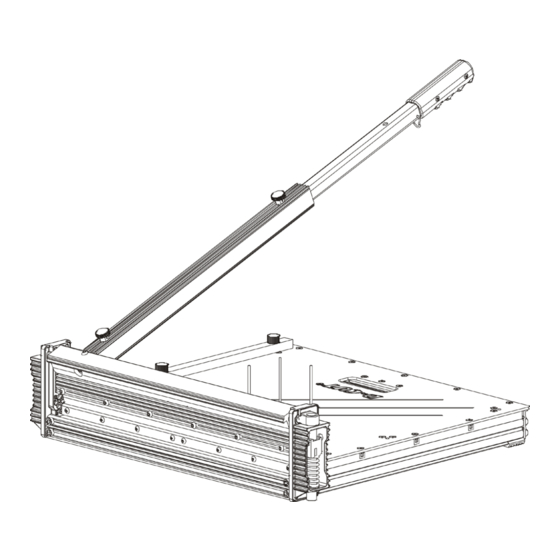
- Page 3 SET UP CUTTING AND C Installation of the Cutter (1) Install the table to the cutter base with provided screws and bolts as shown. Warning: Do not put your fingers against the sharp edge of the blade at any time. Installation of the Cutter (2) Pull up the lock pin on the aluminum handle as shown and...
- Page 4 CUTTING Straight Cutting Insert material between the cutting blade and the base, flush with the angle attachment as shown and hold the material with foot then push handle down to complete a cut. Warning: Maintain control of the handle. Do not allow handle to slam back after making a cut.
- Page 5 MAINTENANCE Changing the Blade Use the provided Allan wrench to remove the six screws, then hold the blade by each end and carefully remove the blade out of the blade holder. Note: The flat side of the blade faces the table. Warning: Do not put your fingers against the sharp edge of the blade at any time.
- Page 6 PART LIST...
- Page 7 PART LIST Parts Q’ty Parts Q’ty Cross Head Screw M5 × 10 Hex Nut M5 Hex Head Screw M5 × 16 Nut Straight Locating Slot Hex Head Screw M6 × 14 Nut Curve Locating Slot Nylon Bar Holder Chain Blade Cutting Base Hex Head Screw M5 ×...
Need help?
Do you have a question about the MH-510 and is the answer not in the manual?
Questions and answers