Neopost IJ45 Manual
Hide thumbs
Also See for IJ45:
- Installation manual (2 pages) ,
- Getting started (2 pages) ,
- User manual (102 pages)
Table of Contents
Advertisement
Quick Links
WARNING!
Do not under any circumstances attempt to remove the machine
covers or attempt to repair the IJ35/45. There are no operator
serviceable parts thereunder.
The IJ35/45 product is licensed for use under the conditions of P.O.
Authority. This license is issued subject to the product being secure
at all times. Any removal of covers or dis-assembly of the product
will result in the license being revoked and may result in P.O.
Authority requesting Neopost to remove the product from use.
The ink cartridge system used within the IJ35/45 contains P.O.
Authority approved ink. This cartridge should not be tampered with
in any way or the use of non approved inks be undertaken. This will
breach any P.O. Authority licence agreement on the product and
may result in P.O. Authority requesting Neopost to remove the
product from use.
EC DIRECTIVE 1999/5/EC
Neopost declares that this Franking Machine is in compliance with
the Essential Requirements and other provisions of Directive
1999/5/EC. A full copy of this Declaration may be found at
www.neopost.co.uk/docs/IJ35Compliance.htm
MODEM APPROVAL REQUIREMENTS
This equipment contains a modem which has been approved in
accordance with Council Decision 98/482/WC-CTR21 for pan-
European single terminal connection to the Public Switched
Telephone Network (PSTN). However, due to differences between
individual PSTNs provided in different countries, the approval
does not, of itself, give an unconditional assurance of successful
operation on every PSTN network termination point.
The modem is designed to work on analogue telephone lines only.
In the event of problems, you should contact your equipment
supplier in the first instance.
1
Advertisement
Table of Contents

Related Manuals for Neopost IJ45


Summary of Contents for Neopost IJ45
- Page 1 This will breach any P.O. Authority licence agreement on the product and may result in P.O. Authority requesting Neopost to remove the product from use. EC DIRECTIVE 1999/5/EC...
- Page 2 IEC EN60950. The peripheral interfaces meet the SELV requirements of that standard, therefore in order to maintain the level of safety provided by the IJ35 and IJ45, the interface of any equipment connected to the IJ35 and IJ45 interfa- ces must also meet the SELV requirements of IEC EN 60950.
- Page 3 Congratulations on choosing the Neopost IJ35/45 franking system. The IJ35/45 is the result of the expertise and innovative capabilities of the worldwide Neopost group and, using ink jet technology, it will integrate into your working environment to enhance your mail processing operation.
- Page 4 The use of a Neopost ink cartridge in any unlicensed machine or other printing device is strictly prohibited and will invalidated any warranty and / or service contract that is offered by your supplier. It may also invalidate your licence to use any franking machine granted by your national postal authority.
-
Page 5: Table Of Contents
CONTENTS 1. GENERAL SPECIFICATIONS ..........9 2. INSTALLATION ..............10 2.1 Introduction ............. 10 2.2 Franking machine ........... 11 2.2.1 Attach the Platform Infill to the Hand Feed Platform ............11 2.2.2 Attach the Platform Infill to the Autofeed (Option)............11 2.2.3 Attach the IJ35/45 to the Hand Feed Platform or Autofeed ............ - Page 6 4.2.6 High Value Selection ........26 4.2.7 Franking an Envelope ........27 4.2.8 To Change a Department ....... 27 4.2.9 To Log Off ............28 5. FRANKING WITH AUTOFEED ..........29 6. FRANKING LABELS ............31 6.1 Filling the Label Dispenser ........31 6.2 Printing a Label ............
- Page 7 11. CLEARING MAIL PATH ............52 12. SERVER RECREDITING ............. 53 12.1 Remote credit setting (for machine with Server Connection) ............53 12.2 ‘INSPECTION DUE - RECREDIT’ Call Server Procedure .............. 55 12.3 Unused or Spoilt Impressions ......... 56 12.4 Application for a new Credit PIN ......56 13.
-
Page 9: General Specifications
GENERAL SPECIFICATIONS IJ35 IJ45 Speed (Items/hr) 3,600 5,400 Thickness (mm) - Automatic - Manual Printer Type Ink Jet Ink Jet Automatic Label Dispenser Automatic Feeder Optional Optional Weigh Platform (2kg) Optional Optional Scale Interface Optional Optional Cost Centre Accounting Job Memories... -
Page 10: Installation
INSTALLATION 2.1 Introduction Your IJ35/45 should be installed on a flat horizontal surface adjacent to easily accessible power and telephone line outlets. Allow sufficient free space as follows: - above the machine to enable opening of the covers. - at the rear of the machine for cooling. The power plug on this equipment is intended to serve as the device for isolation of the mains supply, where possible it is advisable to connect to a switched power outlet. -
Page 11: Franking Machine
2.2 Franking machine 2.2.1 Attach the Platform Infill to the Hand Feed Platform When attaching the Platform Infill to the Hand Feed Platform, ensure that the Tabs and Slots interlock as illustrated. 2.2.2 Attach the Platform Infill to the Autofeed (Option) If an Autofeed is to be fitted, first attach the Platform Infill to the Autofeed ensuring that the slots on the Autofeed fit tightly over the tabs on the Infill Platform as illustrated. -
Page 12: Attach The Ij35/45 To The Hand Feed Platform Or Autofeed
2.2.3 Attach the IJ35/45 to the Hand Feed Platform or Autofeed Lower the IJ35/45 into position so that the slots fit over the tabs as illustrated. 2.2.4 Attach the Weigh Platform & Support (Option) Sufficient cable has been provided with your weigh platform to enable the unit to be placed on the desk adjacent to the franking machine if this is preferred. -
Page 13: Machine Connections
2.2.5 Machine Connections Weigh Platform/Scale Connection (Option) Autofeed Connection (Option) Installation... -
Page 14: Machine Connections (Continued)
2.2.5 Machine Connections (continued) Telephone Connection Power Cord Connection Installation... -
Page 15: Position Receiving Tray
2.2.6 Position Receiving Tray 2.2.7 Fill the Label Hopper Printing Surface Installation... -
Page 16: Controls And Features
CONTROLS AND FEATURES 3.1 Introduction The following pages detail the Controls and Features associated with your IJ35/45 Franking Machine, please take the time to read them carefully. Controls and features... -
Page 17: Machine
3.2 Machine Display presents a visual indication of the machine set up andstatus. Soft Keys keys with functions as depicted on the display. NumericalKeypad & enables the operator to access Function Keys user functions. Start/Stop Button used to Start/Stop the Machine. Envelope Guide adjustable envelope guide. - Page 18 Weigh Platform and Support (optional) Automatic Feeder (Optional) Franking Machine Feed Platform Controls and features...
-
Page 19: Display Panel
3.2.1 Display Panel Text Message Slogan Message Mini Die (1) Date Postage Value Low Credit Ink Level Total Credit Indicator Indicator 0.00 LOW CREDIT LOW INK 50.00 15/01/2002 MARKETING DEPT MODE IMP RINT Department In Use Soft Keys Function Keys Numerical Keypad MENU START... -
Page 20: Function Keys
3.2.2 Function Keys Job Memory Key : Storing and recalling memorised jobs. (please refer to Memory functions) Label Key : Label mode selection. (please refer to Printing labels) Menu Key : Access to Function Menu. Lock : Return to Standby/Locking. Funds Key : Access to Recredit.Server centre if required by P.O. -
Page 21: Franking Your Mail
FRANKING YOUR MAIL 4.1 Introduction In the event that a satisfactory print cannot be achieved due to bulky contents (Max.10mm) the envelope should be treated as a packet and a label used. It is recommended that the IJ35/45 is left powered on at all times. This will assist in maintaining print quality. -
Page 22: Getting Started
4.2 Getting started 4.2.1 Log On (Entering User Mode) To enter USER mode from the Standby screen: SUPERVIS USER Press the key. If the machine is protected by a USER PIN, the following screen will be observed: ENTER USER PIN - - - - ESCAPE Using the numerical key pad enter the USER PIN. -
Page 23: Departmental Operation
If an incorrect PIN is entered for eight or more attempts, the meter will be locked and prompt to call the supervisor (please refer to "Supervisor Settings", and follow the instructions to reactivate the user PIN again). The Default Stamp Value is factory set to a value precognised by P.O. -
Page 24: How To Select A Postage Value
If your department is protected, you will be prompted to enter your Department PIN: ENTER DEPARTMENT PIN - - - - Enter the PIN using the numerical keypad. If the PIN is correct the Department will show in user screen: 0.00 15/01/2002 75.55... -
Page 25: Low Credit (For Machine With Credit Downloaded By A Server)
If an incorrect value is entered, press and enter the correct value. To confirm the value, press , the following display will now be observed. 0.27 15/01/2002 75.55 MARKETING DEPT MODE IMPRINT icon will only be present if the machine is set for departmental operation. -
Page 26: High Value Selection
To ADD CREDIT, please refer to "Credifon Recrediting". 4.2.6 High Value Selection If a value greater than or equal to the High Value setting is selected, the machine will not print unless the high value setting is confirmed. The default High Value Threshold is set at a value fixed by P.O. Authority (To change the High Value setting, please refer to "IJ35/ 45 Machine Setup Menu"). -
Page 27: Franking An Envelope
4.2.7 Franking an Envelope Insert the envelope with the side to be printed facing upwards as illustrated. Press the button, after a short pause the motor will start. Franked envelopes will subsequently be deposited into the receiving tray. For an envelope exceeding 10mm thick, a label must be used, refer to "Franking Labels". -
Page 28: To Log Off
If the PIN is correct the new Department will show in the User screen: 0.27 15/01/2002 75.55 ACCOUNTS DEPT MODE IMPRINT If the PIN is incorrect the prompt to enter the Department PIN will be repeated. 4.2.9 To Log Off From any screen, press the key to go to the Standby screen. -
Page 29: Franking With Autofeed
FRANKING WITH AUTOFEED Used in conjunction with the IJ35/45, the Automatic Feeder permits a large range of envelope sizes and thicknesses to be processed. Envelope feeding Check that all envelopes have been sorted into stacks of same size with the address facing upwards and the top edge of the envelopes all the same side of the stack. - Page 30 Press the button, after a short pause the motor will start. Franked envelopes will subsequently be deposited into the receiving tray. Envelopes exceeding 6mm in thickness should be hand fed, for an envelope exceeding 10mm thick, a label must be used, refer to "Franking Labels". Franking with autofeed...
-
Page 31: Franking Labels
DO NOT force too many labels into the Dispenser or push labels in without operating the release lever. Close the top cover. Neopost Approved Labels are supplied in boxes of 1000. Please refer to "Contacting Neopost" for information on ordering Neopost approved supplies. -
Page 32: Printing A Label
6.2 Printing a Label First select the postage value required, then the slogan, text and mini die. To frank a single label press the label key . The following screen will be observed: PLEASE ENTER NO. OF LABELS Press The printed label will be deposited in the receiving tray and the Screen will return to Ready Mode. - Page 33 If during the label printing process the following display is observed: 0.27 15/01/2002 75.55 ACCOUNTS CONTINUE First replenish the label dispenser as detailed on "Franking La- bels", then press to complete the label printing process. Take up the franked label, peel off the backing sheet and affix the label to the parcel or packet.
-
Page 34: Franking With Weigh Platform
Setting of values for printing is automatic. When postal rates change, your machine may be updated by installing a Rate Card which can be obtained from Neopost or Neopost Representative. For information relating to the installation of new postal rates, please refer to "Memory Cards". -
Page 35: How Do I Calculate The Correct Postage And Rate
7.2 How do I calculate the correct postage and rate? To change the RATE setting press , the RATE screen will be observed: RATES 1 Le tter 2 La rge e nv. CANCEL SELECT A list of Postage Rates currently available will now be displayed. To return to the previous screen with Rate setting unchanged, press Using the keys, or the appropriate number key,... - Page 36 For some rates you may be prompted to scroll down and make further selections for example: DESTINATION will require in this case a choice between 1 Ireland 2 Britain 3 Europe 4 World. FORMAT will require in this case a choice between 1 Priority 2 Economy.A service can be added to the selected rate by pressing then...
- Page 37 If you wish to accept the Postage displayed, press to return to Ready Mode with the postage value selected. Alternatively, press to accept the postage value displayed and frank the postage value on to your envelope or label. YOU ARE NOW READY TO FRANK YOUR MAIL AT THE CORRECT POSTAGE VALUE If you wish to reject the Postage displayed, press , you will be...
-
Page 38: Printing Options
In Normal (Postage) mode, you can print postage, select a message from a number of pre-loaded or customised slogans (when ordered from Neopost), in addition to a Slogan, you can compose and print your own Text Message, you can also select from a number of pre-loaded Mini Dies. -
Page 39: Print Mode Selection (Depending Of P.o. Specification)
* A Pre-loaded slogan can be overwritten by a customised slogan. To download a customised slogan, please refer to Supervisor Settings on "Memory Cards". 8.2 Print mode selection (depending of P.O. Specification) From Ready Mode, press the key, the MODE selection screen will be observed: Current Mode will be displayed. -
Page 40: Modifying The Imprint
8.3 Modifying the imprint The IMPRINT menu is used to modify the setup of the imprint as follows: From Ready Mode, press the key the following screen will be observed: IMPRINT SLOGAN Good ne w s MINI DIE As Re que ste d TEXT DATE ADVANCE 15/01/02... -
Page 41: Date Advance (For Pre Dated Mail) In Accordance With P.o.specification
Using the keys, or the appropriate number, make your selection from the list e.g. 1 SLOGAN and press to confirm, the SLOGAN screen will be observed. If a slogan is already selected, that slogan will be highlighted: SLOGAN YOUR SLOGAN 1 YOUR SLOGAN 2 Air M a il First Cla ss... - Page 42 From the IMPRINT screen select DATE ADVANCE, the following screen will be observed: DATE ADVANCE 1 15/01/02 2 16/01/02 3 17/01/02 4 18/01/02 5 19/01/02 Next, using the keys, select from the list the date on which you wish to post your mail. Press to confirm and return to the IMPRINT screen.
-
Page 43: Maintaining Print Quality
MAINTAINING PRINT QUALITY Under normal operating conditions, your IJ35/45 postage meter will produce excellent quality prints. However, if lines are missing from the stamp or the machine has remained unused for several days it will be necessary to clean the print-head. -
Page 44: Making A Test Print
9.2 Making a Test Print Select the TEST PRINT option from the CARTRIDGE menu and press to confirm. CARTRIDGE TEST PRINT CLEAN REMOVE The prompt to produce a Test Print will now be displayed. PRESS START & INSERT ITEM 15/01/2002 To make a Test Print, insert a blank envelope or card and press Inspect the Test Print to ensure that all lines are clear and present. -
Page 45: Low Ink
ENTER STRAIGHTEST LINE NO. PRESS START Press to confirm, you will be returned to the CARTRIDGE menu screen. If any lines are missing, repeat the cleaning and test print process up to three times, if this process fails to restore print quality, fit a new ink cartridge as detailed on "Replacing an ink cartridge". -
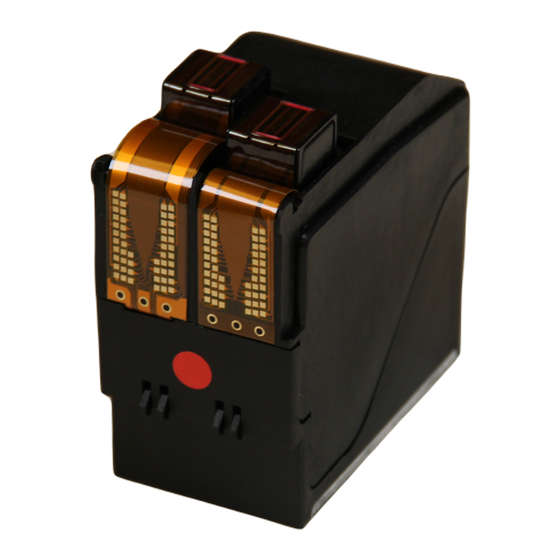
Page 46: Replacing An Ink Cartridge
9.5 Replacing an Ink Cartridge From Ready Mode, press the key. Using the keys, or the appropriate number key, move the cursor to CARTRIDGE and press to confirm. Select the REMOVE option from the CARTRIDGE menu: CARTRIDGE TEST PRINT CLEAN REMOVE Press to confirm. - Page 47 Carefully withdraw the used Ink Cartridge and discard. Remove the new Ink Cartridge from its packaging and carefully remove the tape seals. Do NOT touch or remove the copper strip on Ink Cartridges. Place the new Ink Cartridge into its holder. Hold the Cartridge down with light pressure on the top and firmly push the Cartridge rearwards (see arrow) until it clicks into position.
- Page 48 15/01/2002 Please refer to Making a Test Print. Your IJ35/45 is supplied with a cartridge. You should order your next standard cartridge from Neopost or Neopost representative. THE USE OF INK CARTRIDGES IN UNLICENSED METERS OR OTHER PRINTERS IS PROHIBITED.
-
Page 49: Meter Registers
10. METER REGISTERS Your franking machine is equipped with a series of electronic registers to monitor franking transactions. A number of departments are available in which separate registers showing postage used and items printed are stored. The values of these registers may be displayed and printed as follows. -
Page 50: Printing A Register
e.g. DEPARTMENT REGISTERS: DEPARTMENT REGISTERS DEPT NAME MARKETING TOTAL 25.67 ITEMS LAST RESET 15/01/02 PRINT Current Department Displayed. If no department has been set up, this register will show DEPT NAME USER. 10.2 Printing a Register To print a register press , if the method of print is set to Internal, the following screen will be observed: REPORTS... -
Page 51: Printing With External Printer
If after a short wait, you are returned to the register screen your method of print may be set to External Printer, please refer to Printing with External Printer below. The method of print (Label or External Printer) is set in Supervisor Mode, please refer to "Reports". -
Page 52: Clearing Mail Path
11. CLEARING MAIL PATH In the unlikely event of an envelope misfeed, and an item of mail is in the mail path, the following procedure must be followed: From Ready Mode, press the key, the MAIN MENU screen will be observed: MAIN MENU REGISTERS CARTRIDGE... -
Page 53: Server Recrediting
12. SERVER RECREDITING 12.1 Remote credit setting (for machine with Server Connection) Credit may be purchased from Neopost Server, using the Server re- setting system, in accordance with P.O. Authority. Check that the Telephone Cable is connected to the Telephone Socket at the rear of the machine and the other end to an adjacent telephone line outlet. - Page 54 Using the numerical key pad, enter the credit amount you wish to purchase (e.g. 50). Press: to confirm. You will now be asked to verify the amount before proceeding. CONFIRM AMOUNT 50.00 If amount incorrect, press and start again from the Enter Amount screen (step 2).
-
Page 55: Inspection Due - Recredit' Call Server Procedure
If for any other reason the re-credit transaction is aborted before the transfer has been completed, the following MESSAGE will be observed: RECREDIT FAILED TRY AGAIN MODE IMPRINT Press to return to Ready Mode, then wait for approximately two minutes before attempting to try again. If a re-credit transaction is aborted the value is automatically reset to that previously selected for any subsequent retry. -
Page 56: Unused Or Spoilt Impressions
12.4 Application for a new Credit PIN If you lose or forget your Credit PIN you must apply for a new PIN in writing on your company headed paper to Neopost or Neopost representative. If you find your old Credit PIN at a later date, it must be destroyed immediately. -
Page 57: Memory Functions
13. MEMORY FUNCTIONS Frequently used print combinations may be pre-programmed as a memory function, five preset memory slots are available for selection. 13.1 Saving a Memory Function Setup your preferred print combination, then press and hold the key for approximately 5 seconds until the following screen is observed: MEMORY SAVE EDIT... -
Page 58: Recalling A Memory Function
To delete a character press To enter a number in the Memory Name use the numeric keypad. To return to the previous screen with the Memory Name unchanged press To confirm your entry press This operation will overwrite the previous memory name. To return to Ready Mode press 13.2 Recalling a Memory Function From Ready Mode, press and release the... -
Page 59: Supervisor Settings
14. SUPERVISOR SETTINGS 14.1 Introduction In Supervisor Mode, the supervisor can access all machine functions, except franking. Navigation procedure from screen to screen is the same as in the user mode, except that the supervisor mode includes a number of extra configuration function keys. By definition, the supervisor has free access to all the departments and as such he/she is not prompted by the machine to enter any code after the Supervisor Code has been entered. -
Page 60: Entry To Supervisor Mode
14.2 Entry to supervisor mode To enter SUPERVISOR mode from the Standby screen: SUPERVIS USER Press the key. Or from the MENU key in USER Mode by pressing SUPERVISOR and The prompt to ENTER SUPERVISOR PIN will be observed: ENTER SUP ERVIS OR P IN - - - - Enter the Supervisor PIN. -
Page 61: Security & Dept
14.3 Security & Dept In Non-Departmental Operating mode, all values are assigned to User. In Departmental mode IJ35 has 35 departments, whilst IJ45 has 45 departments, available for assignment by the supervisor. From the SUPERVISOR menu, move the cursor to option 1 SECURITY &... - Page 62 Press to confirm. The following screen will now be observed: SECURITY & DEP T DEPARTMENT MODE DIS ABLED SET UP DEP T DEPARTMENT SELECTION P ICK FROM LIS T LAST RESET ALL 00/00/00 US ER PIN 1234 The following functions may be accessed directly from the SECURITY &...
-
Page 63: Changing The User Pin
14.3.1 Changing the User PIN From the "Security & Dept" screen, using the keys, or the appropriate number key, move the cursor to 5 USER PIN and press to confirm, the following screen will be observed: USER PIN - - - - To return to the previous screen with the User PIN unchanged, press To change the User PIN, enter the new 4 digit value, then press... -
Page 64: To Assign A Department
Using the keys, or the appropriate number key, make your selection and press to confirm. To return to the SUPERVISOR screen press To reactivate the user PIN select 2 OPEN, then to confirm. Press once to return to the Supervisor main menu, or twice to return to Standby "Sleep"... - Page 65 The following screen will be observed: SET UP DEPT DEPT DEPT DEPT DEPT DEPT Again using the keys, or the appropriate number key, move the cursor to the Number you wish to set and press to confirm, the DEPT SETTINGS screen for the selected department will be observed: DEPT SETTINGS DEPT NAME...
- Page 66 A department name is limited to 16 characters including spaces. To return to the previous screen with the Department Name unchanged press until the screen changes to the previous one. To confirm your entry press To Change a Department Name, select DEPT NAME as described above.
- Page 67 To change the Department PIN, enter the new value, then press to confirm. To return to the previous screen with the Department PIN unchanged, press To Change the Department Status, move the cursor to STATUS and press to confirm, the following screen will be observed: STATUS CLOSED OPEN...
-
Page 68: Ij35/45 Machine Setup Menu
14.4 IJ35/45 machine setup menu The SETUP menu, provides access to the following supervisor functions : 1. High Value A High Value Warning will be displayed in User Mode when a value exceeding or equal to the High Value threshold is selected, this value may be changed (Default High Value set to the P.O. - Page 69 Enables the supervisor to define a default postage value (Default Stamp Value set to the P.O. Specification). 8. Telephone Settings The telephone numbers of the Neopost Credit Re-setting Centre and Helpdesk are stored in the postage meter. If required, the telephone numbers may be changed. Such a...
- Page 70 MACHINE SETUP From the SUPERVISOR menu, move the cursor to the SETUP option. Press to confirm. The following screen will now be observed: SETUP HIGH VALUE 1.00 LOW CREDIT 50.00 TIM E 09:50 SLEEP M ODE MOTOR TIM E OUT LONG High Value From the SETUP screen select HIGH VALUE and press...
- Page 71 To return to the previous screen with the original value unchanged, press To change the Low Credit Threshold, enter the new value (with no point or comma, e.g. 5000 corresponds to 50.00), then press to confirm. To return to the Supervisor screen press twice.
- Page 72 To change the Time Out period, enter the new value (with no point or comma, e.g. 5 corresponds to 5 minutes), then press confirm. To return to the Supervisor Ready screen press twice. Motor Timeout From the SETUP screen select MOTOR TIMEOUT and press to confirm, the following screen will be observed: MOTOR TIMEOUT LONG...
- Page 73 Modification of the telephone number is permitted only by the supervisor. Such a setting may be necessary in case of modifica- tion of your telephone network (for example a new prefix for an external line), or if you are advised that the Neopost Center number has changed. Supervisor settings...
- Page 74 Telephone Number Change From the SETUP screen select TELEPHONE SETTINGS and press to confirm, the following screen will be observed: TELEPHONE SETTINGS SERVER NO. 09063420342 HELPDESK NO. 01708714111 REMOTE NO. NONE PREFIX NONE PAUSE ESCAPE If you are advised of a telephone number change, move the cursor to the number to be changed (e.g.
-
Page 75: Texts
Using the keys, or the appropriate number key, move the cursor to make a selection and press to confirm, the following typical screen will be observed: PREFIX NONE Using the numerical key pad enter your prefix and press confirm. Or, to return to the TELEPHONE SETTINGS screen with the prefix unchanged press 14.5 Texts Starting from the SUPERVISOR menu, move the cursor to the... - Page 76 Using the keys, or the appropriate number key, move the cursor to the message you wish to set and press to confirm, the TEXT screen will be observed: TEXT B C D E F G H I J K L M N O P Q R S T U V W X Y Z - # &...
-
Page 77: Memory Cards
14.6 Memory Cards The following memory cards are currently available from Neopost or Neopost representative: Message/Slogan Cards (one message per card) Rate Card (when postal rates change) in accordance with P.O. Specification Town Card (if you move to a different postal area) in accordance with P.O. -
Page 78: How To Replace Data Using A Memory Card
Press to initiate the downloading operation: On completion of the downloading process the following screen will be observed: LOADING FROM MEMORY CARD LOADING COMPLETE Once all slogan memory locations are full, you will be asked to select a file to replace. 14.6.2 How To Replace Data Using a Memory Card Repeat operations 1 and 2 then: Press... -
Page 79: Reports
On completion of the downloading process the following screen will be observed: LOADING FROM MEMORY CARD LOADING COMPLETE To return to the Supervisor screen press twice. 14.7 Reports Supervisor Reports can be printed using your franking machines own printer (printed on self adhesive labels) or by connection to an approved external printer. - Page 80 The following screen will now be observed: REGISTERS MAIN REGISTERS SET UP DEPARTMENT REGISTERS EVENTS Using the keys, or the appropriate number key, select a register option from the list and press to confirm. e.g. DEPARTMENT REGISTERS: DEPARTMENT REGISTERS NAME ACCOUNT TOTE LAST RESET...
-
Page 81: Setting The Report Destination
If the method of print is set to EXTERNAL PRINTER, please refer to Printing with External Printer below. To change the method of print please refer to Setting the Print Destination below. Press to return to the REGISTERS screen. To return to Supervisor screen press twice. - Page 82 Alternatively connect a serial to parallel converter to the IJ35/45 and then connect a parallel printer to the converter. (Suitable printers and converters can be purchased from Neopost Ltd.) Please use the following Printer settings. Baud Rate...
-
Page 83: Trouble Shooting
15. TROUBLE SHOOTING PROBLEM SOLUTION IJ35/45 will not start: Is the IJ35/45 connected to the power supply? Is the main power outlet switch set to Is the machine Top Cover properly closed? Check plug fuse (5A) if there is one. Check machine fuse (1.6A). - Page 84 & RETRY”. connected to the rear of the ma- chine. The telephone line may not be available. Try another telephone line (ana- logue only). Call Neopost or Neopost representative if the above actions do not solve the problem. Trouble shooting...
-
Page 85: Clearing A Mail Jam From The Autofeeder
In the unlikely event of an error message being displayed, the following procedure must be followed: ERROR MESSAGES REMEDY Error 1 to Error 43 Press until back to User screen. If the Error does not clear, please call our Customer Care Centre. (please see Telephone No.on "Contacting Neopost") Trouble shooting... -
Page 86: Quick Reference Guide
17. QUICK REFERENCE GUIDE Quick reference guide... - Page 87 4128500V/C 23/09/2009...
Need help?
Do you have a question about the IJ45 and is the answer not in the manual?
Questions and answers