Table of Contents
Advertisement
Quick Links
Advertisement
Table of Contents

Related Manuals for iWave iW-RainboW-G24M Arria10 SoC FPGA SOM


Summary of Contents for iWave iW-RainboW-G24M Arria10 SoC FPGA SOM
- Page 1 Arria10 SoC/FPGA SOM Development Platform iW-RainboW-G24D Quick Start Guide...
- Page 2 Disclaimer iWave Systems reserves the right to change details in this publication including but not limited to any Product specification without notice. No warranty of accuracy is given concerning the contents of the information contained in this publication. To the extent...
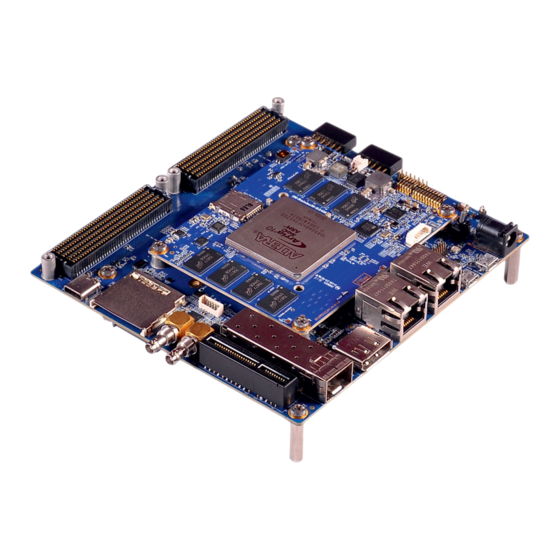
- Page 3 Development Platform from the packed box. Development Platform Description The iW-RainboW-G24D Arria10 SoC/FPGA SOM Development platform incorporates with iWave's Arria10 SoC/FPGA based SOM and High Performance carrier board with all necessary interface connectors for developing an embedded application based on Intel Arria10 SoC/FPGA.
-
Page 4: Environmental Compliance
Safety Environmental Compliance iW-RainboW-G24D-Arria10 SoC/FPGA S O M D ev e l o p m e n t P l a t f o r m i s designed by using RoHS and REACH c o m p l i a n t c o m p o n e n t s a n d manufactured on lead free production process. -
Page 5: Quick Start Steps
Quick Start Steps Step 1 - Unpacking Remove the Development platform from antistatic cover and place it above the ESD free area. Use anti-static pad/mat with proper grounding to place the Development Platform. Don't touch inside surface of the circuit board. Avoid using board in extreme dust, humidity and temperature conditions. - Page 6 Step 2 - What's Inside The Box ? Make sure that, below deliverables are received without any physical damage. Development Platform Arria10 SoC/FPGA SOM Development Platform iW-RainboW-G24D Quick Start Guide 12V,5A Power Supply USB OTG Cable JTAG Cable...
- Page 7 Step 3 - Download FTP Contents All the technical resources of iW-RainboW-G24D Arria10 SoC/FPGA SOM Development platform is available in iWave FTP server. FTP Folder Structure iW-RainboW-G30D iW-RainboW-G30D Hardware Hardware Software+FPGA Datasheet-UserGuides MPSoC Name QuickStartGuide SOM Part Number SOM-HardwareUserGuide Qaurtus Version...
- Page 8 Step 4 - Read Documents Before moving to next step, one must go through all the documents including Hardware User Guides and get familiar about iW-RainboW-G24D Development platform. Development Platform Documents: ■ Quick Start Guide (This document) ■ SOM Hardware User Guide ■...
-
Page 9: Top View
Step 5 -Quick View-SOM TOP View 1. Arria10 SoC/FPGA 2. Micro SD Connector 3. Configuration Selection switch 4. FAN Header 5. AS Programming Header 6. JTAG Header BOTTOM View 7. PMIC Programming Header 8. Board to Board connector 1 9. Board to Board connector 2... - Page 10 Step 6 - Quick View-Carrier Board TOP View 01. PMOD Connector 2 02. Board to Board Connector 1 03. PMOD Connector 1 04. JTAG Header 05. Board to Board Connector 2 06. GPIO Header 07. RESET Switch 08. ON/OFF Switch 09.
- Page 11 Step 7 - On Board Switch Setting Make sure that On-SOM FPGA Configuration Select Switch (SW1) is set for PS & FPP (Configuration via HPS) configuration scheme as shown in below image. (1 0) 1 - ON 0 - OFF...
-
Page 12: Step 8 - Debug Port Setting
Step 8 - Debug Port Setting Connect TypeA end of USB cable to PC and MicroB end of USB cable to Development platform's Debug USB MicroAB Connector (J5) as shown below. Install the driver for Debug Port in Host PC/Laptop using the below link. -
Page 13: Step 9 - Micro Sd Card Insertion
Step 9 - Micro SD Card Insertion Make sure that the micro SD card with bootable image is inserted in the SOM as shown below. Note: This step is not applicable for the SOMs where MicroSD is not used as boot device. - Page 14 1. Do not try to connect any other power supply other than supplied along with the Development platform. 2. Do not plug or remove the Arria10 SoC / FPGA SOM from carrier board with live power. 3. Contact iWave if power LEDs are not glowing.
- Page 15 Step 11 - Test Environment setup Once power is applied to the Development Platform as explained in the previous section, boot messages being displayed in the debug terminal of the PC/Laptop which is connected to the Development platform. Press any key in terminal immediately to see the command prompt of the Boot loader or wait until OS boots.
-
Page 16: Jtag Connection
JTAG JTAG Connection iW-RainboW-G24D Arria10 SoC/FPGA SOM Development platform support JTAG interface for FPGA Programming and debugging. Use the JTAG cable which is shipped with the development platform to connect SOM and USB Blaster. Example USB Blaster which is tested with this Platform is mentioned below. - Page 17 Heatsink Heat Sink Integration iW-RainboW-G24D Arria10 SoC/FPGA SOM Development platform comes with Heatsink+Fan attached to it. Makesure to power up the platform only with Heatsink+Fan attached. Below is the Heatsink+Fan integration procedure for reference. Heatsink + Fan Peel off Thermal pad sticker Connect the Fan to SOM Fan Header Paste the heatsink in to...
- Page 18 Product Name: Zynq US+ MPSoC (4/5/7-EV/EG/CG) SOM Processor: Xilinx’s Zynq US+ MPSoC (4/5/7-EV/EG/CG) RAM: 4GB PS DDR4* 1GB PL DDR4* Application: Industrial Motor Control & IoT, Sensor Fusion, ADAS/Embedded Vision, Data Centor, Medical Endoscopy RAM size is expandable. Contact iWave team for further details...
-
Page 19: Need More Help
Contact iWave to enable Live Chat support. Phone Call us on : +91-80-26683700, 26781643, 26786245 Warranty & RMA Warranty support for Hardware: 1 Year from iWave or iWave's EMS partner. For Warranty terms & Registration, scan the QR code or go to : https://www.iwavesystems.com/support/... - Page 20 Headquarters: INDIA JAPAN UNITED STATES iWave Systems Tech. Pvt. Ltd. iWave Japan, Inc. iWave USA 7/B, 29th Main, BTM Layout 2nd Stage, 8F-B, Kannai Sumiyoshi Building, 1692 Westmont Ave., Campbell, Bengaluru-560076,India. 3-29, Sumiyoshi-cho, Naka-ku, Yokohama, CA95008 USA Ph: +91-80-26683700, 26781643 Kanagawa, Japan.
Need help?
Do you have a question about the iW-RainboW-G24M Arria10 SoC FPGA SOM and is the answer not in the manual?
Questions and answers