Advertisement
Quick Links
Questions, problems, missing parts?
Before returning to your retailer, our exceptional customer service is available.
English & Spanish speaking.
Email
cservice@welltraveled.net
Live Chat
www.balkenehome.com
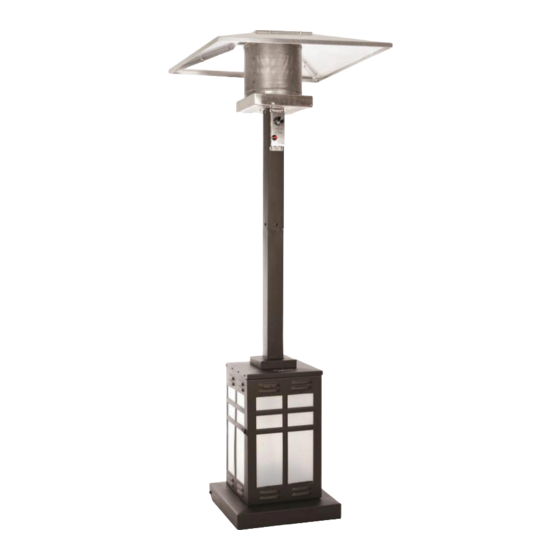
Outdoor Patio Heater
ITM./ART. 924792
LIP-10-TGG A2 LED
Model #
60951
ASSEMBLY AND/OR CARE & USE INSTRUCTIONS
IMPORTANT, RETAIN FOR FUTURE REFERENCE: READ
CAREFULLY.
DANGER
FOR YOUR SAFETY: If you smell gas:
1. Shut off gas to the appliance.
3. If odor continues, keep away from the
appliance and immediately call your gas
DANGER
DANGER indicates an imminently
hazardous situation which, if not avoided,
will result in death or serious injury.
DANGER
Failure to comply with the precautions and
instructions provided with this heater can result
in death, serious bodily injury and property
loss or damage from hazards of fire, explosion,
burn, asphyxiation, and/or carbon monoxide
poisoning. Only persons who can understand
and follow the instructions should use or service
this heater.
9 a.m. – 9 p.m., EST, Mon - Fri
WARNING
Do not store or use gasoline or other
of this or any other appliance. An LP cylinder
not connected for use shall not be stored in
the vicinity of this or any other appliance.
WARNING
Improper installation, adjustment,
alteration, service or maintenance can
cause property damage, injury or death.
Read the installation, operation and
maintenance instructions thoroughly before
WARNING
FOR OUTDOOR USE ONLY!
ATTENTION
weight/sand box, it is strongly recommended that you
the bottom of the heater. In windy conditions, store
the heater in a protected area or otherwise secure it.
Unsecutred heaters can be blown over in moderate to
high wind. Damage due to weather or acts of God is
not covered under warranty.
ATTACH YOUR
RECEIPT HERE
Keep a copy of your proof of purchase or
need to contact us about warranty coverage.
Serial No.
Purchase Date
12012021
Advertisement

Related Manuals for Fire Sense LIP-10-TGG A2 LED 60951


Summary of Contents for Fire Sense LIP-10-TGG A2 LED 60951
- Page 1 Outdoor Patio Heater ITM./ART. 924792 LIP-10-TGG A2 LED Model # 60951 ASSEMBLY AND/OR CARE & USE INSTRUCTIONS IMPORTANT, RETAIN FOR FUTURE REFERENCE: READ CAREFULLY. WARNING DANGER Do not store or use gasoline or other FOR YOUR SAFETY: If you smell gas: 1.
-
Page 2: Table Of Contents
BEFORE YOU BEGIN TABLE OF CONTENTS Before You Begin Page 2 Safety Information Page 3 Package Contents Page 4 Hardware Contents Page 4 Assembly Page 5 9 Operating Instructions Page 10 3 Care and Maintenance Page 4 Troubleshooting Page 5 Page 16 Specifications/Table of Injector Replacement Parts List... -
Page 3: Safety Information
SAFETY INFORMATION DANGER DANGER WARNING DANGER indicated an imminently • This product is fueled by propane gas. CARBON MONOXIDE HAZARD hazardous situation which, if not avoided, • This heater is a combustion appliance. Propane gas is invisible, odorless, and will cause death or serious injury. All combustion appliances produce carbon flammable. -
Page 4: Package Contents
PACKAGE CONTENTS PART DESCRIPTION QUANTITY 5pcs packed in 2 inner cartons Head and Upper Post Assembly Gas Hose 1 attached to Head Assembly Regulator Lower Post Post Support Plate 1 packed under Tank Housing Assembly Tank Housing Assembly* Tank Housing Support Bar 1 contains 2-M4x10 countersunk screws Tank Housing Door Pre-assembled on Tank Housing... - Page 5 ASSEMBLY PREPARATION Before beginning assembly of this appliance, make sure all parts are present. Compare all parts with package contents list and hardware contents as listed on page 4 of this manual. If any part is missing or damaged, do not attempt to assemble this product.
- Page 6 ASSEMBLY Attach the Lower Post to the Post Support Plate using 4 M8x16 Bolts and 4 M8 Washers. (Note: Turn the post and support plate upside down to secure the bolts.) Align the Post Support Plate with the holes in the Lower Post, and insert 1 M8x16 Bolt through 1 M8 Washer and through the aligned holes.
- Page 7 ASSEMBLY Carefully route the Gas Hose that comes attached to Head and Upper Post Assembly completely through the Lower Post/Post Support Plate Assembly . (Hint: Control knob on Head Assembly should be located over the Tank Housing Door.) Attach Head Assembly and Upper Post Assembly the Lower Post by aligning the 4 small holes located on the Upper Post with the 4 small holes located on the Lower...
- Page 8 ASSEMBLY While supporting heater, tilt the Head and Upper Post Assembly and screw in the 3 M8x66 Stud Bolts into the holes on top of the Head Assembly. Slide the assembled over the 3 Stud Bolts that now extend from the Head Assembly.
- Page 9 ASSEMBLY Connect the hose and regulator to the LP cylinder and place the tank into the tank housing. LP cylinder is sold separately. Warning: check the compatibility with the 3.Mounting the Regulator onto the Gas Cylinder connections of equipment’s fitted upstream (i.e. Ensure all taps on the gas appliances are closed.
-
Page 10: Operating Instructions Page 10
OPERATING INSTRUCTIONS Technical Data Gas Type: Propane • Do not store a spare LP-gas Maximum Inlet Pressure: 16bar cylinder under or near this Nominal Outlet Pressure: 30/37mbar appliance. Capacity: 1.5kg/h Temperature Limitation: -20℃to 50℃ 80 percent full. Inlet connection: Quick connection G59 •... - Page 11 OPERATING INSTRUCTIONS LEAK TEST BEFORE TURNING GAS SUPPLY ON: WARNING 1. Make 2-3 oz. of leak test solution 1. Your heater was designed and • Perform all leak tests outdoors. approved for OUTDOOR use • only. Do NOT use it inside a detergent and three parts water).
- Page 12 OPERATING INSTRUCTIONS LIGHTING WARNING NOTE: For initial start or after any cylinder change, hold the control knob in for 2 FOR YOUR SAFETY minutes to purge air from all gas lines Be careful when attempting to manually ignite this heater. Holding in the control before proceeding.
- Page 13 OPERATING INSTRUCTIONS OPERATION CHECKLIST: WARNING For a safe and pleasant heating experience, perform this check before each use: FOR YOUR SAFETY Heater will be hot after use. Handle with extreme care. BEFORE OPERATING: I am familiar with entire owner’s manual and understand all precautions noted.
-
Page 14: Care And Maintenance
CARE AND MAINTENANCE To enjoy years of outstanding performance from your heater, make sure you WARNING perform the following maintenance activities on a regular basis: FOR YOUR SAFETY • Do NOT touch or move heater for at least KEEP EXTERIOR SURFACES CLEAN. 45 minutes after use. -
Page 15: Troubleshooting
TROUBLESHOOTING PROBLEM POSSIBLE CAUSE CORRECTIVE ACTION Gas valve may be off Turn gas valve ON Fuel tank may be empty Refill LPG tank Orifice blocked Clean or replace orifice Purge air from lines. Open gas lines and depress control Air in supply system knob for 2-3 minutes. -
Page 16: Specifications/Table Of Injector
SPECIFICATIONS / TABLE OF INJECTOR Specifications • Dimensions (H x W x D): 220.2 x 80 x 80cm Model Pressure (mbar) Country of Qn(Hs) Maximum Categories Destination Consumption Nominal Reduced (g/h) Heat Input Heat Input LIP-10-TGG G30: BE, CH, CY 12.5 kW 5.05 kW 982 g/h... - Page 17 PACKAGE CONTENTS PACKAGE CONTENTS PART DESCRIPTION QUANTITY Reflector Panel and Center Cap 5pcs packed in 2 inner cartons Head and Upper Post Assembly Gas Hose 1 attached to Head Assembly Regulator Lower Post Post Support Plate 1 packed under Tank Housing Assembly Tank Housing Assembly* Tank Housing Support Bar 1 contains 2-M4x10 countersunk screws...
- Page 18 Hartspring Lane FABRIQUÉ EN CHINE Watford, Herts HECHO EN CHINA WD25 8JS United Kingdom 01923 213113 www.costco.co.uk Fire Sense ® , Mojave Sun ® , and Well Traveled Living ® are registered trademarks of Well Traveled Imports, Inc ® . All assembly instruction presentations are the property of Well Traveled Imports, Inc.
Need help?
Do you have a question about the LIP-10-TGG A2 LED 60951 and is the answer not in the manual?
Questions and answers