
Subscribe to Our Youtube Channel
Related Manuals for JCROffroad BR6RMP


Summary of Contents for JCROffroad BR6RMP
- Page 1 TA BL E OF CONT E NTS 4 D O O R 6TH GE N B RO NCO R E AR WIN DOW MOL LE PAN EL .....2 2 D O O R 6TH GE N B RO NCO R E AR WIN DOW MOL LE PAN EL ..
-
Page 2: Install Instructions
Be sure to check out the install video on the product page, if available. Thank you for purchasing from JcrOffroad! Checkout our website, www.jcroffroad.com for other great off-road products. Be sure to rate and review our product online. If you have any questions or are missing parts, please... -
Page 3: I Nclu D E D Hardware
I NCLU D E D HARDWARE 1/4"-20 X 3/4" 25mm M8 Button Head Button Head 1/4"-20 Serr. Flange Nut... -
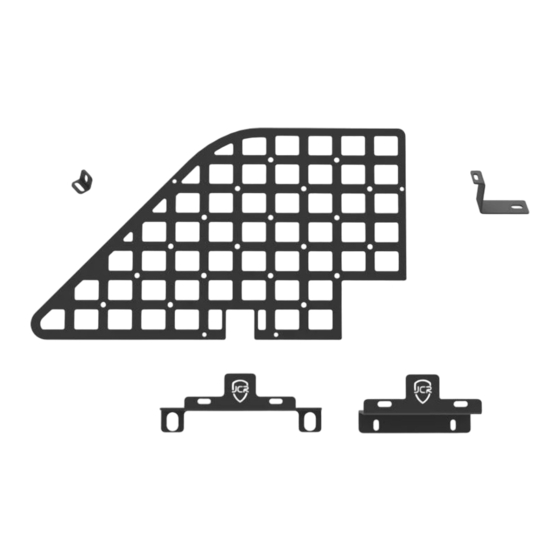
Page 4: Included Parts
INCLU DE D PARTS HARD TOP ONLY SOFT TOP ONLY... - Page 5 AS SE M BLY Start by popping the small plastic panel beneath the rear window out of place. Then, detach the nearest seat belt from its mounting point. To do this, pop the plastic cover off of it by pulling out on the top edge of it. Doing this will expose a bolt.
- Page 6 ASSE M BLY Next, loosely mount the panel to the mounts using the four 1/4”-20 X 3/4” button head bolts and 1/4”-20 serr. flange nuts. Once all bolts are loosely in place, adjust the position of the panel in the window until you are happy with it.
- Page 7 Be sure to check out the install video on the product page, if available. Thank you for purchasing from JcrOffroad! Checkout our website, www.jcroffroad.com for other great off-road products. Be sure to rate and review our product online. If you have any questions or are missing parts, please...
- Page 8 I NCLU D E D HARDWARE 1/4"-20 X 3/4" 25mm M8 Button Head Button Head 1/4"-20 Serr. Flange Nut...
- Page 9 I NCLU D E D PARTS...
- Page 10 AS SE M BLY Start by loosely installing all the mounts to the inside of the rear window. The three small L shaped brackets get installed into the hardtop mounting points on the bottom of the window using the factory hardware. The longer leg of the bracket is the one that gets mounted to the vehicle.
- Page 11 ASSEMBLY Once all the mounts are loosely installed, mount the MOLLE panel to them using the 1/4”-20 X 3/4” button head bolts and 1/4”-20 serr. flange nuts. Once the panel is loosely installed, tighten the mounts into place. Then, adjust the position of the panel until it is where you want it and then tighten it into place.
Need help?
Do you have a question about the BR6RMP and is the answer not in the manual?
Questions and answers