Table of Contents
Advertisement
Quick Links
JT
U NDE R SE AT M OL L E
STORAG E BASK ET
IN S TAL L I NSTRU C TIO NS
Please read the mounting instructions below carefully before attempting to install.
Be sure to check out the install video on the product page, if available.
Thank you for purchasing from JcrOffroad! Checkout our website, www.jcroffroad.com for other great off-road
products. Be sure to rate and review our product online. If you have any questions or are missing parts, please
don't hesitate to call us at 269-353-1184!
Advertisement
Table of Contents

Subscribe to Our Youtube Channel
Related Manuals for JCROffroad JT


Summary of Contents for JCROffroad JT
- Page 1 Be sure to check out the install video on the product page, if available. Thank you for purchasing from JcrOffroad! Checkout our website, www.jcroffroad.com for other great off-road products. Be sure to rate and review our product online. If you have any questions or are missing parts, please...
- Page 2 INCLU DE D H AR DWAR E 1/4”-20 X 3/4” 1/4”-20 X 1” Button Head Hex Head 1/4” Washer 5/16”-18 X 1” Hex Head 1/4” USS Washer 5/16” USS Washer 5/16”-18 Flanged Nylock Nuts 1/4”-20 Serr. Flange Nut 1/4”-20 Flanged Nylock Nuts...
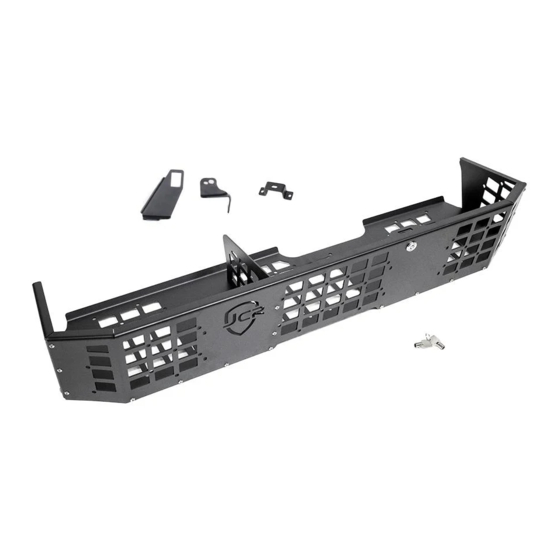
- Page 3 I NCLU D E D PARTS 1L/1R...
- Page 4 A SS EM BLY Start by attaching the lock to the front panel of the basket. Simply insert the lock through the hole, making sure it is right side up, and then put the nut on the other side to secure it in place. Next, attach the small bracket that goes behind the lock using two 1/4”-20 X 3/4”...
- Page 5 ASSEMBLY Next, Mount both side panels to the sides of the front panel using three 1/4”-20 X 3/4” bolts, 1/4” washers and 1/4”-20 serr. flange nuts on each side. Leave the bolts a little loose for now in order to make attaching the bottom panel easier.
- Page 6 AS SE M BLY With the basket assembled, you can now decide if you want to use the divider. If you decide you do want to use it, there are several mounting locations for it. It can go in any of the long thin slots on the bottom panel. Once you decide where you want it, slip the tabs in the bottom of the divider into the slots in the bottom panel and then attach it to the front panel using two 1/4”-20 X 3/4”...
- Page 7 AS SE M BLY Next, place the basket in the Gladiator, lining the factory holes up with the mounting slots in the basket, and mount the basket using the factory hardware. Leave it a little loose for now in order to make mounting the latches easier.
Need help?
Do you have a question about the JT and is the answer not in the manual?
Questions and answers