
Related Manuals for Titan Fitness PT 1690


Summary of Contents for Titan Fitness PT 1690
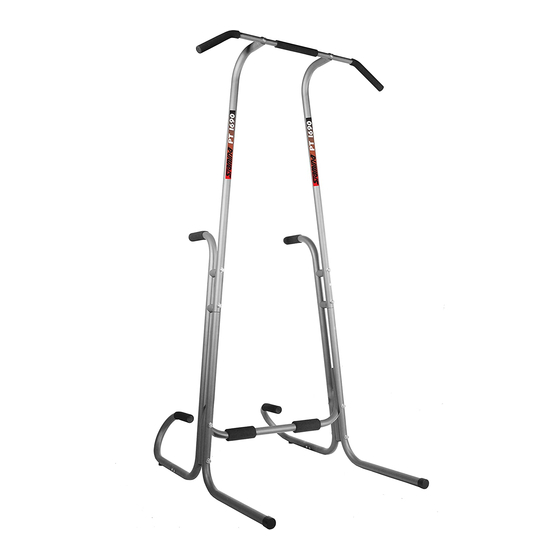
- Page 1 PT 1690 POWER TOWER Pull-Up Bar Foam Tube Upright Upright Foam Grip Spacer Tube Dip Stand Caution Label Main Stand Foam Grip Cross Bar Left Push-Up Bar Endcap Foam Pad Dip Stand Right Push-Up Bar MPN: PT1690 SKU: 400610 UPC: 765857422800...
- Page 2 PT 1690 PARTS LIST DIAGRAM NO. PART NUMBER DESCRIPTION (PN) P400610-1 Main Stand P400610-2 Upright P400610-3 Pull-up Bar P400610-4 Cross Bar P400610-5 Dip Stand P400610-6 Left Push-up Bar P400610-7 Right Push-up Bar P400610-8 Foot Stand P400610-9 Foam Grip P400610-10 Foam Pad...
-
Page 3: Hardware Identification Chart
HARDWARE IDENTIFICATION CHART Illustration is used to help identify the hardware used for assembly. Place the washers or the ends of the bolts or screws on the circles to check for the correct diameter. Use the small scale to check the length of the bolts and screws. - Page 4 PT 1690 PARTS DRAWING Keep others including children & pets away from equipment when in use. BEFORE BEGINNING THIS OR ANY EXERCISE PROGRAM, CONSULT YOUR PHYSICIAN. THIS IS ESPECIALLY IMPORTANT FOR PERSONS OVER THE AGE Failure to comply with these warnings could result OF THIRTY-FIVE OR WITH PREEXISTING HEALTH PROBLEMS.
- Page 5 STEP 1 Bolt the MAIN STAND(1), CROSS BAR(4), and DIP STAND(5) together with HEX BOLTS (M10x1.5x130mm)(21), ARC WASHERS(M10)(26), and NYLOCK NUTS(M10x1.5)(23). Repeat on other side. STEP 2 There is an “L” decal on the LEFT PUSH-UP BAR(6), and an “R” decal on the RIGHT PUSH-UP BAR(7).
- Page 6 STEP 3 Insert the two UPRIGHTS(2) onto the MAIN STANDS(1). Place a ARC WASHER(M10)(26) onto a HEX BOLT(M10x1.5x130mm)(21). Slide a SPACER TUBE(11) between the UPRIGHT(2) and the DIP STAND(5), then insert the bolt through all these tubes and bolt them together with a ARC WASHER(M10) (26) and a NYLOCK NUT(M10x1.5)(23).
Need help?
Do you have a question about the PT 1690 and is the answer not in the manual?
Questions and answers