
Subscribe to Our Youtube Channel
Related Manuals for Titan Fitness Pro Series


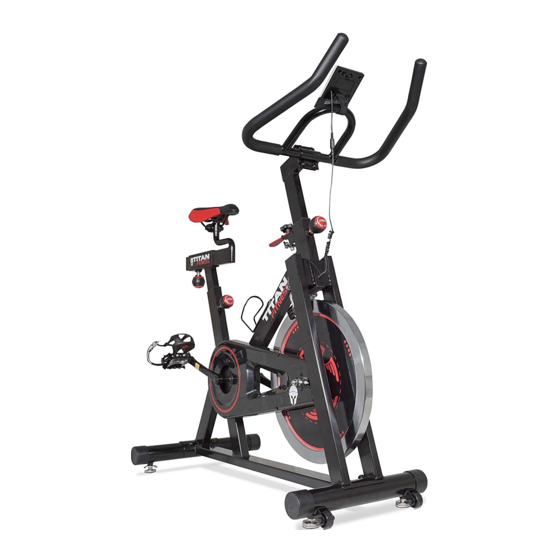
Summary of Contents for Titan Fitness Pro Series
- Page 1 Pro Series Indoor Cycle Owner’s Manual MPN: CYCLE40 SKU: 402602 UPC: 049008261204...
-
Page 2: Table Of Contents
TABLE OF CONTENTS BEFORE YOU BEGIN...................….. 2 IMPORTANT SAFETY NOTICES..............…. HARDWARE PACK………..…..............…. COMPONENTS FOR ASSEMBLY................5 ASSEMBLY INSTRUCTIONS................…..6-12 COMPUTER OPERATIONS…………………………………………………………..13-14 CARE, MAINTENANCE, AND STORAGE………………………………………… EXERCISE GUIDELINES……………………………………………………………. .16-17 EXPLODED DIAGRAM....................18 PARTS LIST..................……....19 BEFORE YOU BEGIN Thank you for selecting the CYCLE 40. For your safety and benefit, read this manual carefully before using the bike. -
Page 3: Important Safety Notices
IMPORTANT SAFETY NOTICE PRECAUTIONS This exercise cycle is built for optimum safety. However, certain precautions apply whenever you operate a piece of exercise equipment. Be sure to read the entire manual before you assemble or operate your cycle. In particular, note the following safety precautions: 1. -
Page 4: Hardware Pack
HARDWARE PACK NOTE: The following parts are not drawn to scale. Please use your own ruler to measure the size. φ10×R33 Arc Washer x 4 φ10 Spring Washer x 4 M10×20 Allen Bolt x 4 φ8 Spring Washer x 4 φ8 Washer x 4 M8×15 Allen Bolt x 4 ST4.2×15 Phillips Screw x 2... -
Page 5: Components For Assembly
COMPONENTS FOR ASSEMBLY Rear Stabilizer x 1 Main Frame x 1 Front Stabilizer x 1 Handle Post x 1 Saddle Support Bracket x 1 Saddle Post x 1 Saddle x 1 M16×1.5 Knob x 1 Handle x 1 Console Support x 1 Pedal (L&R) x 1 Console x 1 Water Bottle Holder x 1... -
Page 6: Assembly Instructions
ASSEMBLY INSTRUCTION • NOTE: It is strongly recommended that two or more people assemble this bike to avoid possible injury. STEP-1 1. Attach the Front Stabilizer (2#) to the Main Frame (1#) using 2 x M10×20 Allen Bolts (61#), 2 x φ10 Spring Washers (63#) and 2 x φ10×R33 Arc Washers (64#). - Page 7 STEP-2 1.Attach the Left Pedal (31L#) to the Left Crank (30L#) and secure it in the direction as shown in the diagram. 2.Attach the Right Pedal (31R#) to the Right Crank (30R#) and secure it in the direction as shown in the diagram.
- Page 8 Insert the Saddle Post (4#) into the Main Frame (1#) and secure it with M16×1.5 Knob (15#). STEP-4...
- Page 9 1. Attach the Saddle Support Bracket (5#) to the Saddle Post (4#) and secure with M16×1.5 Knob (15#). 2. Attach the Saddle (9#) to the Saddle Support Bracket (5#) and secure with a multi wrench. STEP-5...
- Page 10 1. Insert the Handle Post (7#) to the Main Frame (1#) and secure with M16×1.5 Knob (15#). 2. Attach the Handle (8#) to the Handle Post (7#) using 4 x M8×15 Allen Bolts (58#), 4 x φ8 Spring Washers (59#) and 4 x φ8 Washers (60#). STEP-6...
- Page 11 Attach the Water Bottle Holder (16#) to the Main Frame (1#) using 2 x ST4.2×15 Phillips Screws (69#). STEP-7...
-
Page 12: Computer Operations
1. Fix the Console Support (6#) to the Handle (8#) using ST4.2×20 Dome Head Phillips Screw (68#). 2. Attach the Console (17#) to the Console Support (6#), and connect the Console (17#) with the Console Wire (18#) in the way as shown in the diagram. Computer Operation... - Page 13 Functions and operations Display Function Scan/Time/Speed/ Distance/ Calorie Mode/Reset ⚫ MODE: This key lets you select and lock on to a particular function which you want. Press to Choose SCAN or LOCK, if you do not want the scan mode, press the Mode key until the pointer is next to the “flashing”...
- Page 14 Computer Operation Specification Auto Scan Every 4 Seconds 0.0 – 99.9 Km/h Speed 0.0 – 999.9 Km Distance Function 00:00 – 99:59 (Minute: Second ) Time 0.0-999.9 Km Odometer 0.0 – 999.9 Kcal Calories 2 x SIZE – AA Battery type Operation Temperature 0℃...
-
Page 15: Care, Maintenance And Storage
CARE, MAINTENANCE AND STORAGE 1. Inspect and tighten all parts each time you use the bike. Replace any worn parts immediately. 2. The bike can be cleaned using a damp cloth and mild non-abrasive detergent. Do not use solvents. 3. Store the bike INDOORS. Excess moisture and water would cause rust on the frame. 4. -
Page 16: Exercise Guidelines
EXERCISE GUIDELINES Using your Bike will provide you with several benefits, it will improve your physical fitness, tone muscle and in conjunction with calorie controlled diet help you lose weight. 1. The Warm Up Phase This stage helps get the blood flowing around the body and the muscles working properly. It will also reduce the risk of cramp and muscle injury. -
Page 17: Exploded Diagram
MUSCLE TONING To tone muscle while on your Pro Series Indoor Cycle you will need to have the resistance set quite high. This will put more strain on our leg muscles and may mean you cannot train for as long as you would like. If you are also trying to improve your fitness you need to alter your training program. -
Page 18: Parts List
PARTS LIST... - Page 19 Part# Description Part# Description Main Frame Transport Wheel Front Stabilizer End Cap Rear Stabilizer End Cap Saddle Post Crank End Cap Saddle Support Bracket End Cap Console Support Chain Handle Post 6001 Bearing Handle 6203 Bearing Saddle Axle Sleeve Lock Knob Fly Wheel Sleeve Brake Knob Fly Wheel...
- Page 20 NEED HELP? CONTACT US FIRST 1(800)-605-8241 team@titan.fitness / www.titan.fitness Business hours: Monday - Friday • 8am - 5pm Central...
Need help?
Do you have a question about the Pro Series and is the answer not in the manual?
Questions and answers