Table of Contents
Advertisement
Quick Links
Advertisement
Table of Contents

Related Manuals for XAG P40


Summary of Contents for XAG P40
- Page 1 P40 Agricultural UAS User Manual Version 1.1...
- Page 2 To User Dear user, thank you for choosing XAG products. For safety purposes and better user experience, it is highly recommended that you read this manual carefully and strictly follow the instructions hereof. Contact Us If you have any questions about this document, please contact our Technical Support team via email:...
-
Page 3: Safety Guidelines
Safety Guidelines • Please make sure that the drone operator has passed the drone operation training programme and obtained a drone pilot certificate prescribed by laws and regulations where the product is used in advance. Never operate the drone without permission unless otherwise provided. •... -
Page 4: List Of Items
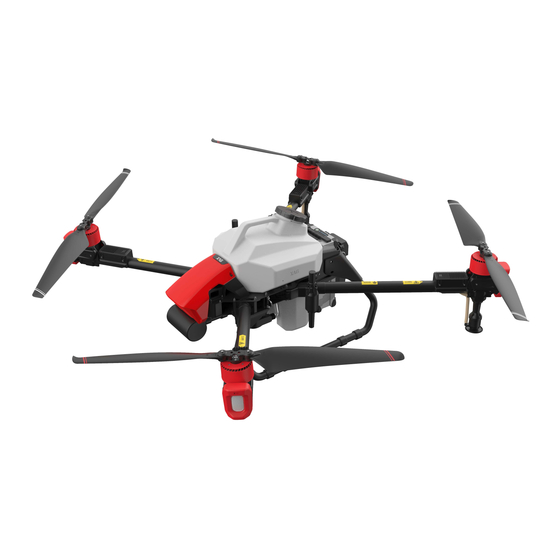
List of Items Please check that the following items are all present when unpacking the box. Should there be any item missed, please contact your dealer. Airframe No.4 Arm No.3 Arm No.2 Arm No.1 Arm ×1 Module Module Module Module ×1 ×1 ×1... - Page 5 About P40 Agricultural UAV The main components of P40 Agricultural UAV are as follows: ① ② ⑱ ③ ④ ⑰ ⑤ ⑥ ⑯ ⑮ ⑦ ⑭ ⑧ ⑬ ⑫ ⑨ ⑪ ⑩ (Above) Figure 1: Airframe Module Structure 1 (Below) Figure 2: Airframe Module Structure 2 ㉔...
- Page 6 Arm No. Arm No. ㉕ ㉖ ㉘ ㉗ Arm No. Arm No. (Below) Figure 3: Airframe Module Structure 3 ① Head Cover ⑪ Peristaltic Pump ㉑ RealTerra System ② PSL Camera ⑫ Landing Gear ㉒ Flight Status Indicator ③ Propeller ⑬...
- Page 7 Airframe Assembly Preparation Remove Spraying Hub Housing Remove Spraying Hub Housing by unscrewing its 6 screws (2 on the top and 2 on both left side and right side ) Remove Central Cabin Cover and Arm Bracket Pull off the Liquid Tank Sensor Cable on the Spraying Hub. Liquid Tank Sensor Cable www.xa.com/en...
- Page 8 Remove 8 Arm Brackets and Central Cabin Cover. www.xa.com/en...
- Page 9 Arms Assembly Put the wire into the Arm. By matching the Arm Position Number to the Airframe Position Number, insert the Arm into the Airframe and fit the Arm Bracket. www.xa.com/en...
-
Page 10: Cable Connection
Cable Connection Connect ESC Power Cables Upon Arms assembly, push the ESC Power Cables of Arm No.1 & No.2 into the hole of the Bottom Central Compartment and connect to those of arm No.3 & No.4. (The red connector fits only to the other red connector while the black one connects to the other black one). - Page 11 Tighten connectors on both sides with cable ties upon the connection between Power Cables of Arm No.1 & No.2 in the Bottom Central Compartment. (The red connector fits only to the other red connector while the black one connect to the other black one) Connect Signal Cable of Flight Indicator and Sprayer Pull the Flight Indicator Signal Cables of Arm No.1 and Arm No.2, plus those of the lights and sprayers of Arm No.3 and Arm No.4 through the hole on the Spraying Hub to the Bottom Central Compartment.
- Page 12 Connect Male and Female Connectors of Flight Indicator Before connecting the Flight Indicator Signal Cables, match the Female Connector of Arm No.1 to the Male Connector of Arm No.4 and match the Female Connector of Arm No.2 to the Female Connector of Arm No.3.
- Page 13 Connect ESC Signal Cable Connect ESC Signal Cable inside the Arm to ESC hub. ESC for Arm No.3 ESC for Arm No.4 ESC for Arm No.2 ESC for Arm No.1 Warning NEVER swap the ESC Signal Cables between M1 and M2, M3 and M4, as incorrect connection may cause flight accidents Connect Liquid tube Pull the Liquid Tube inside Arm No.3 &...
- Page 14 Reassembly of Removed Parts Fit the Spraying Hub Housing and Central Cabin Cover. When fitting the Central Cabin Cover, put the Liquid Tank Sensor Cable correctly and connect it to the Spraying Hub. (Please refer to Page 4 for the exact place). Liquid Tank Sensor Cable www.xa.com/en...
- Page 15 Unfold Propeller After unfolding all the propellers, check whether the model of propeller, which could be seen between clamp and blade, corresponds to the Arm Number. CW Propellers correspond to Arm No.1 & No. 3, while CCW Propellers correspond to Arm No.2 & No.4. Arm No.2 Arm No.1 Arm No.3...
- Page 16 RealTerra Installation Insert the RealTerra into the RealTerra Slot until hearing a clicking sound. www.xa.com/en...
- Page 17 Smart Battery Preparation About Indicator / Button There are 1 power button and 6 indicators on the smart battery screen. Solid: Normal Slow Flash: Overcooled Fast Flash: Overheated Double Flash: Error Battery Level Indicator Battery Status Indicator Power Button Switch On/Off Battery Long-press twice to switch on/off the battery.
- Page 18 Charge with Intelligent SuperCharger Check Battery Level When the battery is OFF, short-press the power button once to check the battery level. When the battery is ON, the battery level indicators will be on solid. Check Battery Status When the battery is on, check the battery status on the screen. LED Behaviour Status Description...
- Page 19 Smart battery should be fully charged and used in strict accordance with instructions preceding UAV operation. Battery should be charged with the charging device specified by XAG. Otherwise, user shall assume all the economic and legal responsibilities arising therefrom. Intelligent SuperCharger is available to purchase separately. If necessary, please contact your local dealer.
- Page 20 • Please make sure the battery is fully charged prior to each operation. NEVER operate at full capacity preceding completion of charging. • NEVER use batteries provided by manufacturers other than XAG, or to dismantle/replace the battery without permission. If necessary, please contact XAG or the authorized dealer. For the battery incidents, technical faults or other accidents caused by using a battery or accessories provided by non-XAG manufacturers, the user shall be held responsible for all the consequences arising therefrom.
- Page 21 Liquid Tank Infusion Twist the Cap counterclockwise to open the tank. Upon infusion, screw the Cap clockwise till tight. Warning To protect the parts from chemical splash damage, direct pesticide infusion is NOT allowed when the tank is installed on the UAV. Tank Removal/Installation Pick up with force/put down with care to remove/install the Liquid Tank.
-
Page 22: App Interface Introduction
APP Interface Introduction "Field" Tab (Main) Functions Device List Map Layers Focus on Aircraft Focus on Operator Measure Operator Aircraft "Operation" Tab "Field" Tab "My Account" Tab Device List: Full device list Focus on Operator: Centre screen on Operator: Operator's location operator "Field"... -
Page 23: "Operation"Tab
"Operation"Tab Tap on “Operation” tab to view the operation options. Map Layers Return Focus on Aircraft Focus on Operator Measure Aircraft Operator Volume Required Operation Area Flights Required Spraying Settings Flight Settings Start Operation Return: Return to “Field” Tab (Main) Flights Required: Estimated flights required Operation Area: Area of selected field for current operation... - Page 24 Appendix Wiring Quick Guide Warning The guideline in this page is applicable for all the connections of P40 Agricultural UAV. www.xa.com/en...
- Page 25 Description of Status Indicator Super X4 Intelligent Control System Indicator Get to know the current status of the drone by checking Super X4 Intelligent Control System Indicator. Details are as follows: RTK Indicator Description Flashing Green Light Normal (slow) Flashing Green Light (rapid) Flashing Red Light RTK timeout exceeding 10s...
-
Page 26: Flight Indicator
Flight Indicator There are one Flight Indicatoron the side of each motor mount, Details are as follows. Flight Status Indicator Get to know the current status of the drone by checking the Flight Status Indicators (Tail Lights). Details are as follows. Tail Lights Description Red/Green Light... -
Page 27: Specifications
Specifications P40 Agricultural UAV Model 3WWDZ-20BH Flight Control System Super X 4 Symmetrical Motor Wheelbase 1560mm Dimensions 1286×1279×555mm Empty Weight 29.2kg Rated Takeoff Weight 48.1kg Maximum Takeoff Weight 48.1kg Protection Rating IP67 Flight Parameters Operating Frequency 2.4000GHz-2.4835GHz Maximum Thrust-Weight Ratio: RTK Enabled: ±10cm (horizontal), ±10cm (vertical) -
Page 28: Propulsion System
Lens FOV 112° 2.7mm/16.8mm (35mm Equivalent) Mechanical Shutte 1/200-1/2000s Image Format Power Optimum Operating Temperature 10~40℃ PSL Camera Dimensions 50 x 36.7 x 29mm Video Resolution 720P/1080P Video Coding Format H.264 Frame Rate 30fps Focal Length 2.75mm Image Sensor 1/2.95inch 2M CMOS Sensor Obstacle Sensing &... -
Page 29: Power System
Rated Current 0.5A@50V No Load Speed 400° /second Communication & Control System ACS2(B) Smart ControlStick XAG® V40 Agricultural UAV, XAG® P40 Agricultural UAV, XAG® Compatible with P80 Agricultural UAV Operating Frequency 2.4GHz Power Consumption 4W (without RTK module), 8-9W (with RTK module) Ambient Operating Temperature -20~60℃... - Page 30 06. To the maximum extent permitted by law, XAG shall not be liable for all losses caused by your improper operation. Also, XAG shall not be liable for any indirect, consequential, punitive, accidental, special or exemplary damages, including any loss incurred as a result of your purchase, use, or inability to use the product (even if you have been advised of the possibility of such loss).
- Page 31 Contents concerning XAG App in this document will be refined and updated on a regular basis in electronic form. Please scan the QR code to read or download the latest version of "P40 Agricultural UAS User Manual" www.xa.com/en...
- Page 32 @XAGofficial @XAG_official @XAG Official This Manual is subject to update without prior notice. ©Guangzhou Xaircraft Technology CO., LTD. All Rights Reserved. All information of this User Manual (including but not limited to any text description, illustrations, photos, methods and processes, etc.) belongs to Guangzhou Xaircraft Technology CO., LTD and is protected by copyright law.
Need help?
Do you have a question about the P40 and is the answer not in the manual?
Questions and answers