Table of Contents
Advertisement
Quick Links
Advertisement
Table of Contents

Related Manuals for XAG P100 Pro


Summary of Contents for XAG P100 Pro
- Page 1 XAG P100 Pro Type: 3WWDZ-50AH Pilot’s Operating Handbook Version AU V1.0...
-
Page 3: Disclaimer And Warnings
This User Manual / Pilot Operating Handbook The Company reserves the rights for final interpretation ("Handbook") is provided for the XAG P100 Pro and revision of the Terms and conditions herein to ("Product") by XAG ("Company"). The Product is not a the extent permitted by law. - Page 4 Data Transmission: Prior to take-off, ensure your regulated context or causes harm. phone is connected to the remote controller’s WI- For the safe, reliable, and lawful operation of your XAG Transmission Quality: Utilize the XAG One APP to Agricultural Drone, adhere strictly to these guidelines.
- Page 5 Aircraft Airframe Propulsion System ⚠ WARNING ⚠ WARNING PROPELLERS: PORT AND CONNECTOR INTEGRITY: ⚠ ⚠ Port Compliance: All ports on the aircraft body Mandatory Inspection: Prior to every flight, conduct a rigorous assessment of the propellers. Any must be utilized in strict accordance with their designated specifications.
- Page 6 ⚠ Manual Oversight: Despite the capabilities of the and subsequent short circuits. dynamic radar and the XAG One APP, operators must maintain vigilant control over the aircraft. Relying solely on automated systems is strictly discouraged. The aircraft must remain within the Visual Line Of Sight (VLOS) at all times.
- Page 7 O f f i c i a l E q u i p m e n t R e q u i r e m e n t : O n l y t h e Attachment: Make sure the RevoSpray System is designated XAG Smart Battery is permitted for use. tightly attached to the aircraft.
- Page 8 Official Firmware: Utilization of only the official XAG E xc e e d i n g t h e s e l i m i t s c a n l e a d t o s e v e r e firmware is mandated.
- Page 9 ⚠ Application Login: An active internet connection is must have established procedures in place for required to log into the XAG One APP. Ensure you unforeseen incidents. are logged in before commencing operations. Safety Evaluation: A rigorous safety assessment is ⚠...
- Page 10 Weather Conditions and Surrounding Interference with Flight Controller and Environment Communications Ⓝ ⚠ WARNING Notes OPERATIONAL PARAMETERS: OPERATIONAL INTEGRITY: ⚠ ⚠ Weather Constraints: The aircraft is engineered GNSS Signal Strength: Ensure that the GNSS for optimal performance in benign to moderate satellite navigation signal within the designated weather conditions.
- Page 11 Operation Modes, Functions, and Warnings ℹ IMPORTANT ℹ GNSS DEPENDENCY: The RTL function will not Operations Modes operate in the event of weak or absent GNSS signals. Ensure your drone maintains a strong GNSS connection for the proper function of RTL. ⚠...
- Page 12 Storage and Transportation Maintenance ⚠ WARNING Responsible Aircraft Operation UPKEEP AND SAFETY OF COMPONENTS: ⚠ WARNING ⚠ Post-Operation Cleaning: It is imperative to SAFETY AND INTEGRITY OF COMPONENTS: meticulously clean all components of the aircraft after each spraying or spreading operation. For ⚠...
- Page 13 Compliance with Regulations & Flight Limits Flight Limits OPERATIONAL COMPLIANCE: ⚠ WARNING Maximum Altitude: The aircraft should not exceed an altitude of 100 m (328 ft) above ground level. Always be REGULATORY ADHERENCE: cognizant of surrounding obstacles. ⚠ Aircraft Modification: Under no circumstances Distance Limit: should the aircraft be altered or employed for non- agricultural purposes.
-
Page 14: Safety
afety Pesticide Usage • Pesticides are poisonous and pose severe risks to safety. Only use them in strict accordance with their specifications. • Chemicals residues on the equipment caused by splashes or spills during refilling or mixing can irritate your skin, rinse with clean water and seek medical attention accordingly. •... - Page 15 Flight Operation • Pre-flight Calibration and Inspection must be conducted before Operation. • Stand clear and do not approach rotating propellers and motors. • Operate within the specified max take-off weight to avoid potential safety risks which may result in serious injury to yourself and/or others, damage to your Products, and/or other objects in the vicinity.
- Page 16 Please be aware that the use of third-party parts or accessories in the maintenance, repair, or operation of your XAG aircraft may lead to the immediate voiding of your warranty. XAG's warranty is designed to cover our products when used as intended, with parts and accessories that have been expressly approved by XAG Australia.
- Page 17 Abide Local Laws and Regulations Visit - Know Your Drone - for a safe and responsible flight You must not fly your drone You must keep your drone Remember, you must not higher than 120 metres (400 at least 30 metres away operate your drone in a way feet) above ground level.
-
Page 18: Table Of Contents
Content Disclaimer and Warnings Safety P100 Pro Agricultural RPA Product Profile List of Items – P100 Pro Overview – P100 Pro Wiring Guide Status Indicator Status Indicator – SuperX4 FC Status Indicator – Arm (Operation Mode) ® RevoSpray P3 Overview – RevoSpray P3... - Page 19 Hover / Pause Flight RTL (Return-to-Land) Optimal Transmission Zone Networking Mode Aircraft Response to Lost Connection with ARC3 Pro Joystick Calibration Calibration via XAG One APP Calibration via ARC3 Pro Take-off / Landing Take-off / Starting Motors Landing / Stopping Motors Smart Battery Overview –...
- Page 20 Battery Status Indicator GNSS RTK Module Console Equipment Positioning Mode XAG One APP Download App – XAG One XAG One APP User Interface APP UI – Accounts Menu App UI – Device Details (Aircraft) APP UI – Operation (In Flight)
- Page 21 Install the Battery Turning the Aircraft ON/OFF Add Device – Aircraft Link Device – Remote Controller Set as Operation Device Setting Up the Aircraft’s Positioning System Calibration – RevoSpray P3 Calibration – RevoCast P3 Pre-Flight Checklist Operation Mode – Autonomous Mode Field Planning Import Field / HD Map Importing Pix4D Shapefile (KML / SHP)
- Page 22 Commence Operation Operation Mode – AB Mode Selecting Operation Mode Setting Operation parameters Manual Take-off and Setting Boundaries Commence Operation Concluding the Operation Operation Mode – Manual Operation (Auxiliary Mode) Selecting Operation Mode Setting Operation parameters Manual Take-off Engaging Auxiliary Mode Commence Operation Concluding the Operation Emergency Control...
-
Page 23: P100 Pro Agricultural Rpa
The XAG P100 Pro Agricultural Drone is not just an agricultural tool, but a testament to the future of farming. Unparalleled in flight automation and efficiency, it's more than just a drone – it's a pro in every flight. -
Page 24: List Of Items - P100 Pro
List of Items – P100 Pro Please check that the following items are all present when unpacking the box. Should there be any item missing, please contact your dealer. Airframe Tool Kit ×1 ×1 Optional Payload System ® ® RevoSpray P3 ®... -
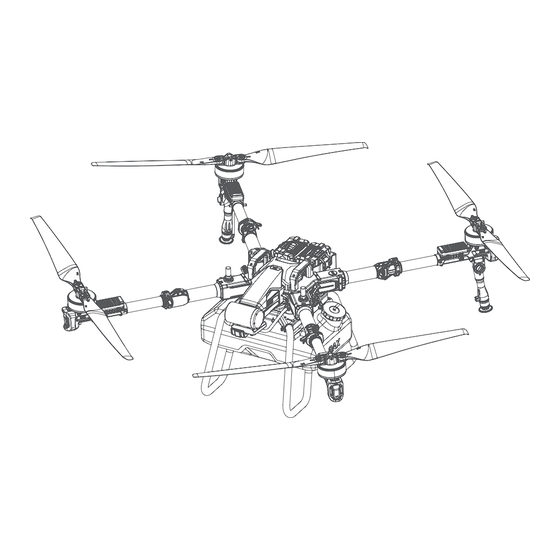
Page 25: Overview - P100 Pro
Overview – P100 Pro Front Bottom View Rear View Propeller Arm Fastener Motor RTK Antenna Spraying Bar 4D Imaging Radar Forward PSL Camera Foldable Arm Terrain Radar Airframe Hasp Downward PSL Camera Liquid Tank UPS Module Landing Gear Liquid Tube... -
Page 26: Wiring Guide
Wiring Guide XAG AUSTRALIA... - Page 27 XAG AUSTRALIA...
-
Page 28: Status Indicator
Cloud Communication connected Slow Flash – Red Cloud Communication disconnected FC Indicator – Wi-Fi Description Slow Flash – Red Disconnected from Wi-Fi module Slow Flash – Green Connected to Wi-Fi module Slow Flash – Orange Flight controller's Wi-Fi hotspot enabled XAG AUSTRALIA... - Page 29 Flight in safe mode Double Flashing Green Manual GPS mode; good GPS signal Flashing Red & Green Weak GPS signal Triple Flashing Red Low voltage Triple Flashing Green Auto GPS mode; good GPS signal Red/Green/Blue Alter-nating Flashing Unlocking XAG AUSTRALIA...
-
Page 30: Status Indicator - Arm (Operation Mode)
Red Light ON for 2s Update failed Green Light ON for 2s Updated Flashing Cyan (Slow) ESC updating Flashing Cyan (Fast) ESC requesting to be updated Flashing White (Fast) Updating Updates detected by underlying controller; Illuminating Blue waiting for the update XAG AUSTRALIA... -
Page 31: Overview - Revospray P3
Xag ® r Pray Overview – RevoSpray P3 Landing Gear Frame Hook Liquid Tank System Cable Liquid Tank cap Liquid Tube Connector Boss alignment Peristaltic Pump Liquid level sensor XAG AUSTRALIA... -
Page 32: Assembling Revospray P3
Airframe and the RevoSpray System are tightly connected for optimal performance and safety. Next, connect the Airframe's payload system cables to the RevoSpray's System cable. After establishing the connection, fasten the cable securely to the cable holder. Hole Hole Boss XAG AUSTRALIA... - Page 33 This procedure helps to ensure system accuracy and optimal performance. ℹ Calibration should also be conducted after the swapping of any Task system, such as RevoCast or RealTerra, to ensure proper system operation and to prevent potential errors. XAG AUSTRALIA...
-
Page 34: Disassembling Revospray P3
This step will prevent residue leakage during transportation that could potentially damage other items. Using a damp rag, wipe and clean the exterior of the aircraft and the Liquid Tank to remove any stains and foreign objects. XAG AUSTRALIA... - Page 35 Unsecure the System Cables from the cable holder, then disconnect the System cable connecting the payload system to the Airframe. Disconnect the two liquid tubes from the Peristaltic pumps. Unlock the two Airframe Hasps, then remove the Airframe from the RevoSpray. XAG AUSTRALIA...
-
Page 36: Overview - Revocast P3
Xag ® r Overview – RevoCast P3 Material container cover Material container Boss alignment Quick Assembly unit Hasp Residual sensor Spreader Motor Cable (L) Frame Hook Spreader Motor Cable (R) System cable Spreader Disc Spreader Motor XAG AUSTRALIA... -
Page 37: Assembling Revocast P3
This proactive measure helps prevent any possible damage to these assemblies during the spreading operation. Follow the instructions below for detailed steps on how to safely remove the spray bar assemblies: XAG AUSTRALIA... - Page 38 After proper alignment, tighten the spray bar knob to fasten it securely in place. To conclude the installation, gently insert the spray head signal wire into the wire harness receptacle. XAG AUSTRALIA...
- Page 39 Airframe and the RevoCast System are firmly secured to prevent any misalignment during operation. Finally, connect the payload system cables from the Airframe to the RevoCast System's cable. After the connection, affix and securely fasten the cable to the cable holder. XAG AUSTRALIA...
- Page 40 Calibration should also be conducted after the swapping of any Task system (like RevoSpray or RealTerra) or the Spiral Feeder. This step helps to maintain the proper operation of the new system and prevents any potential operational errors. XAG AUSTRALIA...
-
Page 41: Changing The Spiral Feeder
Spreader Motor Cable, ensuring the cable is firmly connected to prevent any loose connections. Finally, conduct a thorough calibration to confirm the RevoCast System is functioning as intended. Please refer to the 'Calibration - RevoCast' section of this manual for a detailed guide on this procedure. XAG AUSTRALIA... - Page 42 Always verify that the Spiral Feeder model aligns with the specifications of your RevoCast System. ⚠ Both the Spiral Feeder and Quick Assembly Unit must align accurately with their corresponding fittings. Misalignment could cause granule leakage, leading to inefficient spreading and potential equipment damage. XAG AUSTRALIA...
-
Page 43: Remote Controller - Arc3 Pro
– arc3 P Product Profile XAG Agricultural Remote Controller 3 Pro (ARC3 Pro), a screen-free, hands-on tool engineered specifically for modern farming. Equipped with a dedicated RTK positioning module, the ARC3 Pro unlocks high-precision mapping for unprecedented accuracy. It boasts four user-friendly knobs and multiple buttons tailored for XAG agricultural drones, simplifying farm equipment operation. -
Page 44: Overview - Arc3 Pro Remote Controller
RTK Module Power Button Phone Holder Charging Port Joystick Neck Strap Ring Fn Button Pause/Resume L2 Button USB-C Port L1 Button SIM1 Card Slot F1 Knob F3 Knob F2 Knob F4 Knob SIM2 Card Slot R1 Button R2 Button XAG AUSTRALIA... -
Page 45: Status Indicator
Battery level: 51% - 100% 1 Light Flashing Quick Charging Mobile Network Indicator Mobile Network Description SIM Card not detected Solid Red Communication error Solid Yellow Communication normal (LNT) Solid Green Communication normal (LAN) Flash Green LAN/WAN Communication XAG AUSTRALIA... - Page 46 Function Indicator A Function Indicator A Description Mode – Autonomous Solid Green Mode – Manual Flash Green Mode – Auxiliary Flash Yellow RTL / Emergency landing Manual flight mapping Solid Yellow (Compatible Aircraft Only) Solid Red Joystick error, Calibration required XAG AUSTRALIA...
-
Page 47: Remote Controller Alert
When any key is long-pressed, or when the remote Double short Beeps controller is binding, calibrating, or charging Triple short Beeps (Continuous) Aircraft’s System or Payload System Warning Triple long Beeps (Continuous) Low battery warning / Remote controller abnormal XAG AUSTRALIA... -
Page 48: Using The Remote Controller
Your ARC3 Pro RTK Module is now ready for use. Always remember to handle the module and the remote controller with care to prevent any damage. And always double-check to make sure your RTK Module is securely attached before starting your drone operations. XAG AUSTRALIA... -
Page 49: Install Phone Holder
Insert the phone holder into the designated slot on the remote controller. Make sure it's oriented correctly for proper installation. Once the phone holder is in the slot, rotate the adjacent knob clockwise to tighten it. Ensure the holder is securely fastened to prevent your mobile device from falling during operation. XAG AUSTRALIA... -
Page 50: Charging The Remote Controller
Remote Controller at least once every three months. When the Remote Controller is stored for an extended period, the battery will slowly deplete. Regular charging and discharging help maintain the battery's capacity and prevent potential damage. XAG AUSTRALIA... -
Page 51: Powering The Remote Controller On/Off
Press and Hold the Power Button until all the indicators flash simultaneously. Release the Power Button and then press and hold it again until all indicators are off. This signifies that the remote controller is now turned OFF. XAG AUSTRALIA... -
Page 52: Operating The Aircraft
Mode 1, Mode 2, or Mode 3. To adjust the Joystick Mode, first launch the "XAG One" application. Then, navigate to the "Remote Controller Details" section and select the "Joystick Settings" option. By doing this, you will be able to customize the joystick controls to better suit your preferences and improve the overall operation of your aircraft. - Page 53 Control the aircraft's Roll Right Stick Push Left: Fly towards the Left Push right: Fly towards the Right Center: Hovers Note: For a greater roll angle and faster lateral flight, push Roll Stick the stick further from the centre. XAG AUSTRALIA...
-
Page 54: Button Functions
F3 Knob Short Press Toggle One-Nozzle/Two-Nozzle Spraying Long Press Toggle Constant/Variable Rate Spraying Spraying: Adjust Flow Rate Twiddle Spreading: Adjust Dosage Rate F4 Knob Short Press Disable – Spraying / Spreading Long Press Enable – Spraying / Spreading XAG AUSTRALIA... - Page 55 Short Press (Auxiliary Mode) Turn around to Left row Long Press (Auxiliary Mode) Move/Shift to Left row Short Press Toggle PSL Upward/Downward Short Press (Auxiliary Mode) Turn around to Right row Long Press (Auxiliary Mode) Move/Shift to Right row XAG AUSTRALIA...
-
Page 56: Hover / Pause Flight
Always keep in mind that, safety is paramount when operating drones, so do not hesitate to use the RTL function if you ever find yourself in a situation where you're unsure of the drone's position or if it's in any potential danger. XAG AUSTRALIA... -
Page 57: Optimal Transmission Zone
If the signal weakens, consider repositioning the antennas or operating the aircraft in an area with fewer obstacles or Wi-Fi interferences for optimal performance. Remember to always follow local regulations and guidelines when flying your drone, and maintain line-of-sight with your drone at all times during flight. XAG AUSTRALIA... -
Page 58: Networking Mode
Networking Mode �� PREREQUISITE ARC3 Pro and the Aircraft needs to be added to your XAG One APP account before Networking Mode can be conducted. Should you encounter a lack of 4G network availability or an unstable connection, the remote controller can be linked to the aircraft using a local network. -
Page 59: Aircraft Response To Lost Connection With Arc3 Pro
Aircraft Response to Lost Connection with ARC3 Pro The P100 Pro is designed to respond to lost connection with the Remote Controller in two different ways, depending on the mode it's currently operating in: Autonomous Mode and Manual Mode. Autonomous Mode: Should your P100 Pro drone be operating in Autonomous Mode and experience a lost connection with the Remote Controller, it's pre-programmed to persist with its ongoing task. -
Page 60: Joystick Calibration
For regular users, it's recommended to perform joystick calibration every 3-4 weeks. However, if you use your drone infrequently, it's best to calibrate your joystick before every manual flight to ensure your drone responds accurately to your commands. Calibration via XAG One APP Open XAG One APP. - Page 61 XAG AUSTRALIA...
-
Page 62: Calibration Via Arc3 Pro
(forward, backward, left and right) simultaneously. Left and Right Joysticks Short press the Stop button, and you will hear a beep from the buzzer, with all six indicators getting back to normal. The calibration is now completed. Stop Button XAG AUSTRALIA... -
Page 63: Take-Off / Landing
Therefore, always be prepared to push the throttle stick upwards immediately after completing the CSC. Starting Motor Take-off Throttle Stickleft (Left stick in Mode 2) XAG AUSTRALIA... -
Page 64: Landing / Stopping Motors
Power Down Sequence: Drone Before Controller! Once your drone has safely landed, always ensure to switch off the drone prior to turning off the remote controller. This sequence is crucial for maintaining the integrity of your device and ensuring its longevity. XAG AUSTRALIA... -
Page 65: Smart Battery
Overview – B13960S Battery Structure Handle Indicator Panel Battery Clip Max. Water Level Air Outlet Min. Water Level Air Inlet Indicator Panel Solid: Normal Slow Flash: Overcooled Fast Flash: Overheated Double Flash: Error Battery Level Indicator Battery Status Indicator Power Button XAG AUSTRALIA... -
Page 66: Using The Battery
ℹ DO NOT use Batteries with abnormal conditions such as swollen, leaking, or deformed batteries. Contact XAG After-sales Support for further assistance. ℹ DO NOT use Overheated Battery exceeding 40° C, may lead to fire or an explosion. -
Page 67: Battery Status
Connect the battery to a device, then press the Power button once for at least 1 second until all the indicator lights flashes, then press and hold the power button again for at least 1 second until you hear a beep from the battery. Repeat Step 02 to turn OFF the Battery. XAG AUSTRALIA... -
Page 68: Battery Storage
ENSURE the Batteries are recharge every 90 days to maintain battery health. ℹ DO NOT Store Batteries with less than 30% Power. ℹ DO NOT store Batteries for an extended period, otherwise it may damage the battery or impact battery life. XAG AUSTRALIA... -
Page 69: Battery Charger
Overview – CM13600 CM13600 Charger 15A Power Cord ×1 ×1 Main Components Output Indicator Module Indicator Input Indicator Handle Power Input Charger Connector Vent Hole XAG AUSTRALIA... -
Page 70: Status Indicator
Solid Yellow Normal Flash Yellow Module Abnormal Input Indicator Description Solid Green Normal Flash Green No Grounding – Risk Charging Device Failure Solid Red Protection Triggered – Output OFF Device Overheated Flash Red Protection Triggered – Output OFF XAG AUSTRALIA... -
Page 71: Battery Charging
DO NOT exceed 60 minutes for heat Dissipation, or Battery will be damage. ℹ DO NOT store Batteries with less than 30% Power or for an extended period, otherwise it may damage the battery or impact battery life. XAG AUSTRALIA... -
Page 72: Gnss Xrtk4 Mobile Station
List of Items – GNSS XRTK4 Mobile Station GNSS RTK Module Toolbox × 1 GNSS XRTK4 Module Power Supply Cable × 1 × 1 GNSS RTK Battery B4100 Battery Extension Rod × 1 GNSS RTK Mobile Station Package Balance Plate Tripod × 1 × 1 XAG AUSTRALIA... -
Page 73: Overview - Gnss Xrtk4 Mobile Station
Overview – GNSS XRTK4 Mobile Station The XRTK4 Mobile Station is comprised of the GNSS RTK Module, B4100 Battery Extension Rod, Base Plate, and Tripod. GNSS RTK Module B4100 Battery Extension Rod Balance Plate Tripod Battery Extension Rod Console Antenna XAG AUSTRALIA... -
Page 74: Battery Extension Rod Console
Battery Level Indicator LED Description 1 Green Flash 00 – 09 % 1 Solid Green 10 – 24 % 2 Solid Green 25 – 49 % 3 Solid Green 50 – 74 % 4 Solid Green 75 – 100 % XAG AUSTRALIA... -
Page 75: Battery Charging
Normal Temperature is too HOT Red Quick Flash Too HOT Charging / Discharging temporary Disable Temperature is too COLD Red Slow Flash Too COLD Charging / Discharging temporary Disable Battery Malfunction Red Double Flash Anomalous Contact After-sales Support XAG AUSTRALIA... -
Page 76: Gnss Rtk Module Console
Connected, but no available fixed station Solid Yellow nearby (Automatic switch to 24-hour selfcapturing mode). Checking Positioning Status Status Positioning Status Indicator Not connected Blue Light OFF Single Blue Single Flash Float Blue Double Flash Blue Triple Flash XAG AUSTRALIA... -
Page 77: Equipment Positioning Mode
RTK inactivity √ Very High Accuracy Requires Additional Equipment 1-2cm √ Real-Time Positioning Correction Requires Station Setup Requires Internet √ No Additional Equipment CORS 1-10cm Subscription Fees √ Improved Accuracy Slightly less accurate than RTK XAG AUSTRALIA... -
Page 78: Xag One App
Xag o The XAG One Mobile Application is a powerful, multifunctional tool meticulously designed to maximize the utility of compatible XAG Agricultural RPA (Remotely Piloted Aircraft) systems. This user-friendly app provides a comprehensive view of real-time statuses, including those of the aircraft, task systems such as RevoCast 2 and RevoSpray 2, the Remote Controller, and the RTK Station. -
Page 79: Xag One App User Interface
XAG One APP User Interface APP UI – Accounts Menu XAG AUSTRALIA... - Page 80 Personal and Device Records: records, and upload any missing information to the cloud for safekeeping. Device Menu Users can add and manage their XAG devices through this Device Management: menu. By tapping on individual devices, users can access detailed Detailed Options: information and additional options for configuration and control.
-
Page 81: App Ui - Device Details (Aircraft)
The communication interface showcases crucial information about the aircraft's data link status. It includes options to diagnose the network health and manually adjust the Carrier Settings. Note that Carrier Settings are reserved for professional adjustment to achieve optimal communication latency. XAG AUSTRALIA... - Page 82 It also houses the Return-to-Land (RTL) settings, enabling the pilot to preset when the aircraft will return upon battery reaching the set percentage. It is recommended to check these settings before initiating flight operation. XAG AUSTRALIA...
- Page 83 Task System. Propulsion The propulsion interface displays crucial information about the Propulsion System. It offers options for pilots to conduct calibration, ground & flight tests to ensure all the motors are functioning correctly. XAG AUSTRALIA...
- Page 84 The sensor interface exhibits information and current settings of the sensor module available on the Aircraft, primarily with Terrain Radar, Obstacle Avoidance, and PSL Camera. It also provides the option for pilots to turn the searchlight ON/OFF for low visibility conditions. XAG AUSTRALIA...
-
Page 85: App Ui - Operation (In Flight)
APP UI – Operation (In Flight) XAG AUSTRALIA... - Page 86 Tap & Go: Command RPA to move to location specified by Pilot. Follow Terrain: Enable / Disable Terrain following in Operation route. Obstacle Avoidance: Enable / Disable Obstacle Avoidance. Task Status Bar Shows the Completion rate of the Aircraft’s Task. XAG AUSTRALIA...
- Page 87 Tap to expand the menu for the measurement tool. Height Shows the altitude of the Aircraft in relation to the ground. Speed Shows the movement speed of the selected Aircraft. Location (Aircraft) Shows the approximate location of the Aircraft. XAG AUSTRALIA...
-
Page 88: Preparing The Equipment
The green flashing lights indicate that the device is now in pairing mode and ready to connect with other devices. Now, on your mobile device, open the XAG One (ensure you're running version 4.6.21 or higher). Navigate to the Accounts Menu and proceed to the (Device Menu. - Page 89 A confirmation message reading "setup success" will appear on the screen, indicating that the setup process is complete. You can now see the newly named ARC3 Pro controller listed on your Device page in the XAG One app. XAG AUSTRALIA...
-
Page 90: Prepare The Xrtk4 Mobile Station (Optional Add-On)
The XAG GNSS XRTK4 Mobile Station, specifically designed to provide centimetre precision for flight operations, is a part of the versatile range of Real-Time Kinematic (RTK) options available for XAG Agricultural Drone Product series. This ensures precision in farming operations, leading to better productivity and outcomes. - Page 91 Balance Plate. Ensure the Rover is seated correctly within the hole. Secure the Rover: Close the buckle to lock the Rover into place, finalizing the assembly of the Mobile Station. Double-check the entire assembly to ensure all components are securely connected and ready for operation. XAG AUSTRALIA...
- Page 92 Station is level. A perfectly level Station is critical for achieving accurate and reliable results from your operations. Always confirm the RTK Mobile Station is level before starting any operations. This preventative measure can significantly reduce the risk of erratic Aircraft behaviour, enhancing the safety and efficiency of your operations. XAG AUSTRALIA...
-
Page 93: Link Device - Xrtk4 Mobile Station
The previously yellow flashing light on the controller will now be off. Ⓝ Notes Even though the controller and base station are paired, you still need to add the base station to your device page on the XAG One app. XAG AUSTRALIA... -
Page 94: Add Device - Xrtk4 Mobile Station
Add Device – XRTK4 Mobile Station �� INSTRUCTION Open the XAG One and navigate to the Accounts Menu From there, proceed to the Device Menu. and tap on the located in the top right corner. On the XRTK4 base station, find the F3 button located beneath the XRTK4's module. Press and hold this button until the base station emits a beep, indicating it has entered pairing mode. - Page 95 XRTK4 base station. After naming the XRTK4 to your liking, press "next" to continue. A new window will appear displaying a message of " Added ", confirming the successful addition of the base station to your device page. XAG AUSTRALIA...
- Page 96 After completing these steps, you should be able to see your XRTK4 listed as 'online' on the device page. If it does not appear, try restarting the XAG One App and ensure you're connected to your ARC3 Pro's WIFI network. This connection is essential for enabling communication between the devices.
-
Page 97: Datum Setup
Activate the RTK Base Station: Power on your RTK Base Station and patiently wait for the "F1" indicator light to illuminate a solid red colour. This is a sign that the device is ready for operation. Access the Device Menu on XAG ONE APP: Open the and navigate to the... - Page 98 Wait for RTK4 to Reach the Correct Mode: Monitor the RTK Positioning status and patiently wait for it to enter the "Normal (FIX)" Mode. This mode signifies that the RTK4 is functioning optimally and is ready for the next steps. XAG AUSTRALIA...
-
Page 99: Prepare The Aircraft
Unlock the fasteners of Arm No.2 and No.3. Spread out Arm No.3 and No.2. Securely lock the fasteners on the Arm No.2 and No.3. Ensure each fastener is correctly engaged and firmly in place to guarantee the aircraft's safety and operational readiness. XAG AUSTRALIA... -
Page 100: Unfold Spray Bar
② ① �� INSTRUCTION To unlock, turn the knob in a counter-clockwise direction until it is released. Extend the spraying bar fully, then secure it by rotating the knob in a clockwise direction until it is tightly fastened. XAG AUSTRALIA... -
Page 101: Unfold Propellers
Arm No.1 and No.3, while the CW Propeller corresponds to Arm No.2 and No.4. Adherence to these guidelines ensures the safe and optimal operation of your equipment. Arm No.2 - CCW Propeller Arm No.1- CW Propeller Arm No.3- CW Propeller Arm No.4 - CCW Propeller XAG AUSTRALIA... -
Page 102: Install The Battery
Before initiating the power-up sequence, double-check to confirm that the battery is fully inserted into the battery compartment. Failure to securely position the battery could lead to unfortunate flight accidents during operation. Therefore, always ensure the battery is properly installed to guarantee safe and stable flight conditions. XAG AUSTRALIA... -
Page 103: Turning The Aircraft On/Off
1 second until a beep from the battery is heard. At this point, both the Battery Indicator and Aircraft Flight Status (ESC) Indicator will switch off, signalling that the battery can now be safely removed or replaced as necessary. XAG AUSTRALIA... -
Page 104: Add Device - Aircraft
�� INSTRUCTION Begin the setup by powering on the P100 Pro device. Make sure the device is positioned outdoors with a clear and unobstructed view of the sky for optimal signal reception. Patiently wait and observe the P100 Pro's ESC (Electronic Speed Controller) indicators. Only proceed once these indicators flash green three times, signalling readiness for the next step. - Page 105 Upon successful QR code scanning or S/N input, a new window will appear allowing you to assign a unique name to your P100 Pro. After naming your P100 Pro, press "next" to continue. A new window will display a message indicating successful addition of the P100 Pro device. This confirmation serves as an assurance that your P100 Pro is now registered in the system.
-
Page 106: Link Device - Remote Controller
Before proceeding with the pairing process, ensure that both the ARC3 Pro controller and the P100 Pro UAV have been successfully added to your account on the XAG One app. This is a crucial step to ensure seamless connectivity between your devices. - Page 107 Once you've selected the P100 Pro, you'll be directed to the 'General' page under device details. On this page, look for and select the option 'remote controller bound'. A list of available controllers will appear. From this list, select your ARC3 Pro controller and press 'Bind' to initiate the pairing process.
-
Page 108: Set As Operation Device
INSTRUCTION This section provides a step-by-step guide on how to establish a connection between your controller and the UAV. Start by tapping on the in your app. Here, select the Device Menu option to open the Device Menu. XAG AUSTRALIA... - Page 109 Once you've selected the P100 Pro, you'll be directed to the 'General' page under device details. On this page, look for and select the option 'remote controller bound'. A list of available controllers will appear. From this list, select your ARC3 Pro controller and press 'Bind' to initiate the pairing process.
-
Page 110: Setting Up The Aircraft's Positioning System
Setting Up the Aircraft’s Positioning System �� INSTRUCTION Start by tapping on the in your app. Here, select the Device Menu option to open the Device Menu. Next, tap on the desired aircraft from the list displayed to access its Device Detail page. XAG AUSTRALIA... - Page 111 Base Station, and wait for “RTK Status” to become Active. VRTK Positioning: Wait for “RTK Status” to become Active. GPS Positioning: Wait for “RTK Status” to become Active. Once RTK Status is displaying "Active," the Aircraft is now ready to fly. XAG AUSTRALIA...
-
Page 112: Calibration - Revospray P3
XAG One app and navigate to the Accounts Menu. From there, proceed to Device Menu. From the list of available devices, select your P100 Pro UAV. Tap the to enter the Spray System interface -> select " Calibration" -> select Liquid Tank capacity. - Page 113 After the S1 nozzle calibration is complete, follow the App interface prompts again to add an appropriate amount of clear water to the Liquid Tank. Place the container under the S2 nozzle, check the box for "An empty container has been placed under the S2 nozzle", and tap "S2 Start Calibration". XAG AUSTRALIA...
- Page 114 This calibration should be performed using either clean water or the specific pesticides that will be used in operation. XAG AUSTRALIA...
-
Page 115: Calibration - Revocast P3
Before performing the calibration, the spreading disc units on both sides must be removed (take the left one as an example): �� INSTRUCTION Disconnect the spreading disc motor cables. Unscrew the four screws holding the spreading disc unit in place to remove it. XAG AUSTRALIA... - Page 116 Open the XAG One app , tap on , then , then select and Tap on the aircraft to enter the Device Details page. Tap on the to enter the Spreading System page. Tap on "Spread Type", then the the upper right corner to create a new granule entry. Enter the name of the granules to be calibrated, and tap on "Confirm”.
- Page 117 Calibration", select the current Spiral Feeder model, and tap on "Confirm". Add the granules to be calibrated into the granule container, filling at least 60% of the volume. Check the option “Sufficient pellets loaded,” then tap on “Next.” XAG AUSTRALIA...
- Page 118 Fill in the actual weight (in grams) into the App and tap on "Submit" to complete the calibration. 08After the spreading calibration is completed, reinstall the left and right spreading disc units according to their markings ("L" for left and "R" for right), and reconnect the two spreading disc motor cables. XAG AUSTRALIA...
-
Page 119: Pre-Flight Checklist
Assure that the power sockets are immaculate and intact, and that the batteries have been correctly installed. Ensure that the Firmware of each component and the XAG One APP is current and up to date. Confirm sufficient battery levels for the operation, which includes the aircraft batteries, remote controller, and RTK extension rod. - Page 120 Conduct the Spray/Spread calibration followed by the system idle test (Motor, Spray/ Spread). Ensure that the payload loaded on the RevoSpray 3 or RevoCast 3 system does not exceed the 50kg threshold. Ensure the take-off location is a flat, sand and rock-free surface. XAG AUSTRALIA...
-
Page 121: Operation Mode - Autonomous Mode
This Section will provide step by step instructions on how to Import a Field/ HD Map and create a new field for Aerial Survey & Aerial Operations Import Field / HD Map This section is primarily for previous XAG Pilots to access Fields that had been previously planned and Maps that XAG’s related survey equipment had surveyed. Ⓝ... - Page 122 Alternatively, the user may choose to search for the fields as well. Select 1 or Several fields, then confirm to start importing the field to this Smart Device. After the field is imported, please refresh the List and find the imported field is now available. XAG AUSTRALIA...
-
Page 123: Importing Pix4D Shapefile (Kml / Shp)
Check the boxes for both boundary and obstacle, then click "Continue." Choose "Do not pre-fill grid cells" and click "Continue." Adjust cell size and orientation to suit your field, then click "Preview." Confirm by selecting "Create operation layer." XAG AUSTRALIA... - Page 124 Select "Farmland" on the left side of the screen. Click "Upload" and select your operation Layer KML File. Choose the XAG One option and confirm. Open the XAG One app on your operation device to ensure the field has been uploaded correctly. XAG AUSTRALIA...
-
Page 125: Create A New Field
Aircraft. The pilot should be cautious with the possible deviation between the satellite map and the RTK Position based aircraft. Open XAG One APP. Tap on to expand the Options menu, then Tap on Create a new field. - Page 126 Alternatively, the User can use the crosshair to add boundary, obstacles, and Restricted Zone. Adding Point via APP: Press on APP Removing Point via APP: Press on APP Review the Map and the points added, then Tap “Confirm”. Enter & Insert Field Information, then Tap “Complete” to Save. XAG AUSTRALIA...
- Page 127 The field has now been created. Tap on to review the List of Field / HD Map / Device. The field is now available for Route Planning. XAG AUSTRALIA...
-
Page 128: Mapping Via Remote Controller
Controller. Configuring Positioning Mode Open the XAG One App (ensure its version 4.6.21 or later) and navigate to the Accounts Menu. From there, proceed to Device Menu. Select and Tap on the Remote Controller from the list of devices to enter the "Detail Details". - Page 129 Tap on "Positioning Services" to access Positioning Options Press and hold the "Fn" button on the ARC3 Pro controller to initiate the mapping mode. Mapping mode is activated when the buzzer emits two beeps and the 4th indicator transition to a solid green. XAG AUSTRALIA...
- Page 130 Wait for “RTK Status” to become Active. GPS Positioning: Wait for “RTK Status” to become Active. The ARC3 Remote Controller 4th indicator (External Device) light should be solid green indicating Remote Controller is now ready to start Mapping. XAG AUSTRALIA...
- Page 131 New Field ". Tap the located in the upper right corner to position the map to your current location. Tap the in the bottom right corner to expand the options for Available Remote Controller. XAG AUSTRALIA...
- Page 132 Press L2 Button on Remote Controller After mapping the operating area, tap "Save" in the upper right corner of the app screen. Alternatively, you can also long press the L1 Button on the ARC3 Pro to save the Field. XAG AUSTRALIA...
- Page 133 "Fn" button on the ARC3 Pro controller. Once you have exited Mapping Mode, you can proceed with normal flight operations. Always remember to switch out of Mapping Mode when you intend to pilot the aircraft manually. This is a critical step to ensure proper control and safety during operations. XAG AUSTRALIA...
-
Page 134: Mapping Via Flight
ARC3 Pro. Follow these steps to use this feature: �� INSTRUCTION Launch the XAG One App: On your device, open the XAG One App. Navigate to the "Field" page, then tap the located in the upper right corner of the screen. Select "New Field". -
Page 135: Manage Fields
Manage Fields Open XAG One APP, and tap on the for the Listing. Within the List of Fields, find and tap on the corresponding fields for additional options. Additional options include Aerial Flight, Aerial Survey, Manage fields, Share Field and more…... -
Page 136: Edit Fields
Tap on the points, then select “Delete Point” Restricted Zone Add Points: Tap once between the segments and drag the to add Points Move Points: Drag the points to the appropriate location Delete Points: Tap on the points, then select “Delete Point” XAG AUSTRALIA... -
Page 137: Route Pre-Planning
This is more flexible and allows the user to customize the Custom Route: flight path according to specific needs or challenges in the field. It is particularly useful in irregularly shaped fields, or fields with a large number of obstacles or non-treatable areas. XAG AUSTRALIA... - Page 138 (like trees or power lines). This safety distance Obstacle Safety Distance helps prevent collisions with obstacles that could potentially damage the drone. It's essential to properly mark these obstacles during the field setup phase. XAG AUSTRALIA...
-
Page 139: Operation (Spraying / Spreading)
Operation (Spraying / Spreading) This section provides comprehensive instructions for conducting spraying or spreading operations using the "XAG One" App with your agricultural drone. Follow these step-by-step guidelines to ensure a successful and safe operation. Selecting Operation Mode �� INSTRUCTION Open the "XAG One"... - Page 140 Choose “Autonomous Operation” from the menu, then close it to return to the Operation View screen. XAG AUSTRALIA...
-
Page 141: Selecting The Field
Tap on the to expand the "Map Pages" section, and then verify that the "Field" option under the My Map section is enabled. Tap the to expand the Field list, then select the desired Field from the list. XAG AUSTRALIA... - Page 142 If fields are created using the VRTK Positioning service, an "Offset Correction" option may be available, or a notification may advise that Offset Correction is recommended. To align the aircraft's internal mapping system with the actual field layout, follow the instructions in the Offset Correction section below. XAG AUSTRALIA...
-
Page 143: Offset Correction
Depending on your preference and the specific conditions of the operation, Offset Correction can be conducted using one of the following methods: XAG AUSTRALIA... -
Page 144: Offset Correction On Ground
Start the aircraft and remotely control it to fly to the boundary points of the fields. Align: Tap on "Offset Correction" on the map, and the settings page will appear. Confirm Alignment: Tap on "Align with aircraft's current position", and the app page will display "Aligned" to confirm that Offset Correction is completed. XAG AUSTRALIA... -
Page 145: Setting Operation Parameters
Setting Operation parameters After completing the Offset Correction and aligning the Fields, the Operations parameters become available for customization. Review and adjust the settings as needed (Refer to Page 146 – 149 for specific Spray/Spread and Route Settings). XAG AUSTRALIA... -
Page 146: Operation Parameters - Task Modules
It's useful for navigation or repositioning without applying any materials. Low Liquid Level RTL & Auto Triggers Return to Land (RTL) mode when liquid levels are low and automatically drains the remaining liquid. Drain Mode XAG AUSTRALIA... - Page 147 - Freed Spreading Mode When enabled, this mode allows the maximum route spacing for spreading to be 100 meters. It provides greater flexibility in the application of granular material, accommodating larger distances between passes and potentially increasing efficiency in certain scenarios. XAG AUSTRALIA...
-
Page 148: Operation Parameters - Route Settings
- Boundary Safety clearance Sets a safety buffer around the boundaries of the operation area, preventing accidental intrusion or overspray. - Obstacle Safety Distance Determines the minimum distance the equipment must maintain from the marked obstacles, enhancing safety and preventing collisions. XAG AUSTRALIA... - Page 149 Relying solely on the obstacle radar without proper vigilance may lead to unexpected risks. Enable Activates obstacle avoidance. Disable Weactivates obstacle avoidance. Route Optimization for Reloading Enable Activates route optimization for efficient reloading. Disable Deactivates route optimization, following the standard route. XAG AUSTRALIA...
-
Page 150: Commence Operation
Complete the Start Operation Checklist, then swipe “Start” to initiate the flight. The App will now upload the Flight Route and Flight Parameters to the Drone and perform a Self-Check. Upon successful completion of the Self-Check, the Drone will automatically take off within approximately 5 seconds. XAG AUSTRALIA... -
Page 151: Operation Mode - Ab Mode
Route L' or Route R'. This section provides comprehensive instructions for conducting operations using the "AB Operation Mode" with the "XAG One" App and your agricultural drone. Follow these step-by-step guidelines to ensure a successful and safe operation. -
Page 152: Selecting Operation Mode
Choose “AB Operation” from the menu, then close it to return to the Operation View screen. Setting Operation parameters Adjusting Settings: Tap on Spraying settings and Route settings to Review and adjust the operation parameters for your task. XAG AUSTRALIA... -
Page 153: Manual Take-Off And Setting Boundaries
Short press the L1 Button to set the first Boundary (A). Ⓝ Notes Monitor the added points by checking the at the bottom of each icon. Tap "Undo" if you need to modify the boundary point or its direction. XAG AUSTRALIA... - Page 154 Setting Route Direction: Adjust the drone's heading to select the route direction by yawing left or right. Confirm your choice with a short press of the L1 button. Setting Last Boundary (B): Fly the drone to its final Boundary point (B) and confirm with a short press of the L1 Button. XAG AUSTRALIA...
-
Page 155: Commence Operation
Commence Operation Starting the Operation: After defining the boundaries, a field will be generated. Tap "Start Operation", and the drone will fly to point A to initiate its task. XAG AUSTRALIA... -
Page 156: Concluding The Operation
Remember, this action can only be executed after the drone has landed. Saving the Field: To save the field for future operations, tap "End and save as field". Choose your boundary safety clearance, input the field details, and then tap "Complete". XAG AUSTRALIA... - Page 157 Using the Saved Field: The saved field can now be accessed and sprayed under an autonomous operation mode. XAG AUSTRALIA...
-
Page 158: Operation Mode - Manual Operation (Auxiliary Mode)
CSC, you'll have 3 seconds to push the throttle stick upwards to lift the drone off the ground. If you don't do this within the 3 seconds, the motors will automatically shut down. Navigate the drone to the intended operating field. XAG AUSTRALIA... -
Page 159: Engaging Auxiliary Mode
Pause/Resume button and the Fn (Function) button simultaneously. While RTL is in progress, Function Indicator A will flash yellow. This serves as a visual confirmation that the RTL command has been activated and the aircraft is enroute to its home point. XAG AUSTRALIA... -
Page 160: Emergency Control
These following Control could be found in “MORE” Land: Command the Dronte to land at its current location Return: Command the Drone to Return and Land Tap & Go: Command the Drone to move to location specificed by Pilot Fn Button Pause/Resume XAG AUSTRALIA... -
Page 161: After-Flight Maintenance & Care
If the drone is to be transported to a new location or is not going to be used for an extended period, it is necessary to empty the Liquid Tank and ensure all liquid within the system is completely drained. XAG AUSTRALIA... - Page 162 Once the quick-release units and the material container are dry, reinstall the left and right quick-release units in their original positions. Perform a manual spreading test before the next spreading operation to ensure that the RevoCast system is functioning properly. XAG AUSTRALIA...
- Page 163 ℹ If the hasps of the quick-release units cannot be securely locked, it may indicate improper installation of the quick-release units. In this scenario, remove the quick-release units and reinstall them after proper alignment. XAG AUSTRALIA...
-
Page 164: After-Flight Inspection
Ensure the aircraft is properly folded and that the propeller is safely fastened with the propeller holder before transportation. Prior to transportation, make sure all residues within the Aircraft and its container are fully drained. This is crucial to prevent residual damage to the RevoSpray/RevoCast system or any other equipment during transportation. XAG AUSTRALIA... -
Page 165: Transportation Guidelines
This is to ensure the safety of all individuals involved in the transportation process. ℹ Maintain Air Circulation: It is essential to maintain proper air circulation during transportation. This is to prevent the inhalation of any residual pesticides, which can be harmful to health. XAG AUSTRALIA... -
Page 166: Maintenance Guide
Tail Frame Every 300 ha securely attached to the main body. Ensure the Battery Socket Housings are intact, provide a Battery Socket Housing Every 300 ha secure fit for the batteries, and show no signs of wear or damage. XAG AUSTRALIA... - Page 167 Every 2 Months damage, and ensure connectors are clean and securely fastened. Ensure all Screws are securely in place, free from rust, and Screws Every 2 Months not stripped. Periodically tighten any screws that may have become loose over time. XAG AUSTRALIA...
-
Page 168: Maintenance Cycle - Electronics Modules
Ensure the ESC Connectors are not melted or damaged. Every 200 ha Ensure the ESCs are securely installed with all screws in place. Ensure the ESCs’ heat dissipation area is clean and free from any chemicals or foreign objects. XAG AUSTRALIA... -
Page 169: Maintenance Cycle - Propulsion
Propeller Gasket Weekly excessively worn. Test by swaying the propeller blade tip to (CW / CCW) check for any wobbling. Clamp Bracket Pin Ensure the Pin Bushings are in good condition and not Monthly Bushing excessively worn or damaged. XAG AUSTRALIA... -
Page 170: Maintenance Cycle - Revospray P3
Check the insulation of any cables for potential issues. Examine the Level Detector for functionality. Ensure it Liquid Container Level Monthly provides accurate readings and is free from corrosion, Detector damage, or blockages that might affect its performance. XAG AUSTRALIA... -
Page 171: Maintenance Cycle - Revocast P3
Ensure the Spreader Motor functions efficiently and without disruptions. Examine the motor for signs of wear Spreader Motor Monthly or damage and ensure the cable connection is clean and securely fastened. Periodically test the motor's speed and responsiveness to ensure consistent performance. XAG AUSTRALIA... -
Page 172: Technical Specifications
Technical Specifications P100 Pro Agricultural RPA Model 3WWDZ-50AH Flight Control System SuperX4 Pro (Online RTK) IP Rating IPX6K Arm Material Glass Fibre + Carbon Fibre Material Diagonal Wheelbase 2094mm XAG AUSTRALIA... - Page 173 Max. Flying Height 100m Max. Configurable Flight Radius 1,000m Max Service Ceiling Above Sea Level 2,000m Max. Wind Resistance 10m/s Recommended Operating Temperature 0°C to 40°C GPS: L1/L2 GLONASS: L1/L2 RTK / GNSS Operating Frequency BDS: B1/B2 Galileo: E1/E5b XAG AUSTRALIA...
- Page 174 4G Max. Transmit Power Class 3 (24dBm) for LTE-TDD bands PSL Camera Model RD24412 Forward PSL: Operating Voltage Downward PSL: Resolutions 720P / 1080P Frame Rate 30fps Coding Format H.264 Focal Length 3.2mm Image Sensor 1/2.9-inch CMOS-RGB Image sensor XAG AUSTRALIA...
- Page 175 Terrain Sensor Model TR24S100 Voltage Power 1.5W Sensing Mode Millimeter-wave Operating Frequency 24GHz Altitude detection range 0.5 ~100m (Relative Height from Vegetation) Fixed Height Range 1.0 ~ 30m (Relative Height from Vegetation) Max. Gradient 45° (Flight Speed ≤ 2m/s) XAG AUSTRALIA...
- Page 176 Spray Bar Length 151 mm Rotational speed of Spray disc 1000RPM ~ 16000RPM Spray Swath 5m – 10m Droplet Size 60µm – 500µm Peristaltic Pump Quantity Voltage 0.5L ~ 11.0L/min (Single Pump) Flow Rate 1.0L ~ 22.0L/min (Both Pump) XAG AUSTRALIA...
- Page 177 1059mm x 728mm x 651mm Net Weight 14.00Kg Rated Capacity Rated Load 50Kg Spray Swath 3m – 7m Optimal Operating Temperature 0° C to 40° C Storage Temperature 0° C to 40° C Applicable granule Size 1-6mm (Dry Solid Granule) XAG AUSTRALIA...
- Page 178 (With strong RTK Signal) Horizontal: < 5.0cm + 1ppm (RMS) Max Transmission Distance 1000 Meters (Unobstructed, free of interference) Operating Frequency 2.4000GHz – 2.4835GHz, 5.725GHz – 5.850GHz 2.4GHz: ≤20 dBm (SRRC) Transmission Power (EIRP) 5.8GHz: ≤33 dBm (SRRC) XAG AUSTRALIA...
- Page 179 Band 1, 3, 5, 7, 8 ANATEL: Band 1, 3, 4, 8, 25, 26, 28, 39, 40, 41 MIC: Band 1, 3, 5, 8, 18, 19, 26, 28, 41 4G Max. Transmit Power Class 3 (23dBm±2dBm) for LTE-TDD bands XAG AUSTRALIA...
- Page 180 E1 / E5a / E5b QZSS L1 / L2 / L5 RTK Positioning Accuracy Horizontal ±10mm+1ppm (RMS) Vertical ±15mm+1ppm (RMS) Initialization time Typical <10 seconds Initialization Reliability >99.9% Maximum 20 Hz (Raw data) Data update rate Maximum 20 Hz (Positioning data) XAG AUSTRALIA...
- Page 181 Dimensions (Diameter x Height) 45mm x 1166mm Capacity 7500mAh 99Wh Input 12.0 V/1 A (Type-C port) Output 14.4V/1A Operating temperature -10° C to 45° C Power Button × 1, Type-C Port × 1, Port/Panel Battery Level/Status Display Panel × 1 XAG AUSTRALIA...
- Page 182 10° C to 40° C Storage Temperature 10° C to 30° C IP Rating IP65 XAG V40 2021 XAG P40 2021 Compatible Aircraft XAG P100 2022 XAG P100 Pro 2023 CM12500P Compatible Chargers GC4000+ Charging Voltage 56.55V Battery Charging Time XAG AUSTRALIA...
- Page 183 [7] The remote controller's battery performance might be affected when the ambient temperature for operating is lower than -5° C. [8] This is the result of tests conducted outdoors (with no obstruction or interference) in line with FCC standards. It is not necessarily the actual effective range and is for reference only. XAG AUSTRALIA...
- Page 184 The copyright of all information in this user manual (including but not limited to any text description, illustrations, photos, methods, processes, etc.) belongs to XAG Australia and is protected by copyright law. No individual or organization may imitate, extract, translate, distribute or reproduce or quote all the contents of this manual...
Need help?
Do you have a question about the P100 Pro and is the answer not in the manual?
Questions and answers