
Subscribe to Our Youtube Channel
Related Manuals for Lilin CMD6182X


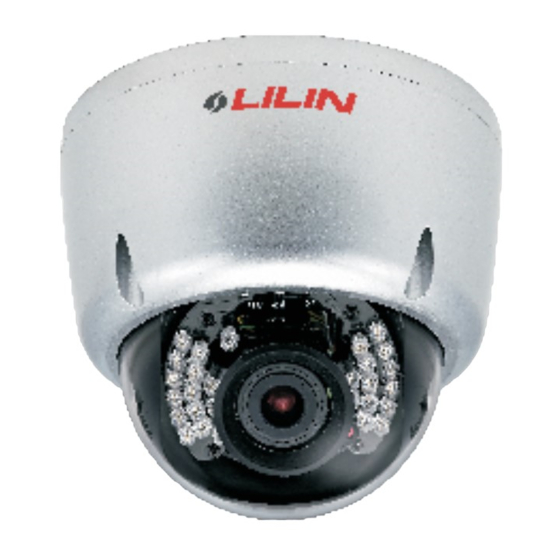
Summary of Contents for Lilin CMD6182X
- Page 1 All manuals and user guides at all-guides.com D/N VANDAL RESISTANT ATR 700TVL VARI-FOCAL DOME CAMERA CMD6182X/6186X3.6 N/P D/N VANDAL RESISTANT ATR 700TVL VARI-FOCAL IR DOME CAMERA CMR6182X/6186X3.6 N/P INSTRUCTION MANUAL...
-
Page 2: Important Safeguards
All manuals and user guides at all-guides.com IMPORTANT SAFEGUARDS CAUTION RISK OF ELECTRIC SHOCK DO NOT OPEN CAUTION: TO REDUCE THE RISK OF ELECTRIC SHOCK, DO NOT REMOVE COVER (OR BACK) NO USER SERVICEABLE PARTS INSIDE. REFER SERVICING TO QUALIFIED SERVICE PERSONNEL. -
Page 3: Part Description & Dimension
All manuals and user guides at all-guides.com PART DESCRIPTION & DIMENSION 145.0 10.0 78.7 130.0 (CMD6182X/6186X3.6N/P) 145.0 10.0 78.7 130.0 Unit: mm (CMR6182X/6186X3.6N/P) BOTTOM CHASSIS TOP COVER BOTTOM HOLE SIDE HOLE INNER COVER DOME COVER LENS HOLE PLUG... -
Page 4: Installation
FIG.1 2. Using screw drive to untighten the 3 screws on the camera module (FIG.2 & FIG.3). FIG.2 FIG.3 (CMD6182X/6186X3.6N/P) (CMR6182X/6186X3.6N/P) 3. Fix the safety rope on the bottom chassis with screw driver (FIG.4). Put the provided screws (M3.0x25, wooden screw) through the holes marked as “a”, and fix the bottom ... - Page 5 All manuals and user guides at all-guides.com FIG.4 66mm 120° FIG.5 FIG.6 4. Firstly, put video cable and power cable through a pipe with 1/2" PT at one end (FIG.7), and then screw the pipe to the side hole or bottom hole (FIG.8, please make sure the ...
- Page 6 All manuals and user guides at all-guides.com FIG.9 FIG.10 (CMD6182X/6186X3.6N/P) (CMR6182X/6186X3.6N/P) 6. Plug and fix the power cable to the jack or terminal block and plug the video cable to video output of the camera (FIG.11 & FIG.12). For the safety reason, when plug video cable to ...
- Page 7 All manuals and user guides at all-guides.com 7. Take down the inner cover from the camera module (FIG.14, CMD6182X/6186X3.6N/P), and then adjust the direction of the lens through the adjustable Pan/Tilt bracket and rotatable round bracket for Azimuth (FIG.15 & FIG.16).
- Page 8 9. Put on the inner cover (FIG.19, CMD6182X/6186X3.6N/P). Adjust the position of the inner cover inside the dome cover, so that the opening of the inner cover align with the direction ...
- Page 9 All manuals and user guides at all-guides.com Alternative Cabling positions 1. Untighten the hole plug on the bottom hole of the bottom chassis and screw it to the side hole. 2. Put the video cable and power cable through the bottom hole. Then connect them to ...
-
Page 10: Configuration Of The Menu
All manuals and user guides at all-guides.com CONFIGURATION OF THE MENU SETUP LENS AUTO TYPE DC - MENU MANUAL MODE AUTO OPEN CLOSE - SPEED(000~255) SHUTTER/ AUTO HIGH LUMINANCE MODE AUTO IRIS/ SHUT+AUTO IRIS SHUT(NOTES*2) (NOTES*1) BRIGHTNESS(000~255) LOW LUMINANCE MODE AGC OFF -... - Page 11 All manuals and user guides at all-guides.com PRIVACY AREA SEL 1/8~8/8 - [000~244(NTSC), 000~288(PAL)] BOTTOM [000~244(NTSC), 000~288(PAL)] LEFT [000~474(NTSC), 000~468(PAL)] RIGHT [000~474(NTSC), 000~468(PAL)] COLOR(1~8) - TRANSP 0.00 0.50 0.75 1.00 MOSAIC OFF ON - - NR MODE Y/C OFF/ Y/ C Y LEVEL(000~015) C LEVEL(000~015) CAMERA ID...
-
Page 12: Setting Menu And Function
All manuals and user guides at all-guides.com SETTING MENU AND FUNCTION TO Open and Exit the Menu screen 1. Press "SET" button. The Menu screen appears on the monitor. Check the current settings on the menu. ... - Page 13 All manuals and user guides at all-guides.com SPECIFICATIONS D / N VA N D A L R E S I S TA N T AT R 7 0 0 T V L VA R I - F O C A L D O M E C A M E R A M o d e l N o .
- Page 14 All manuals and user guides at all-guides.com D / N VA N D A L R E S I S TA N T AT R 7 0 0 T V L VA R I - F O C A L I R D O M E C A M E R A M o d e l N o .
- Page 15 All manuals and user guides at all-guides.com MERIT LILIN ENT. CO., LTD http://www.meritlilin.com 66-CMR618CSE...
Need help?
Do you have a question about the CMD6182X and is the answer not in the manual?
Questions and answers