Advertisement
Available languages
Available languages
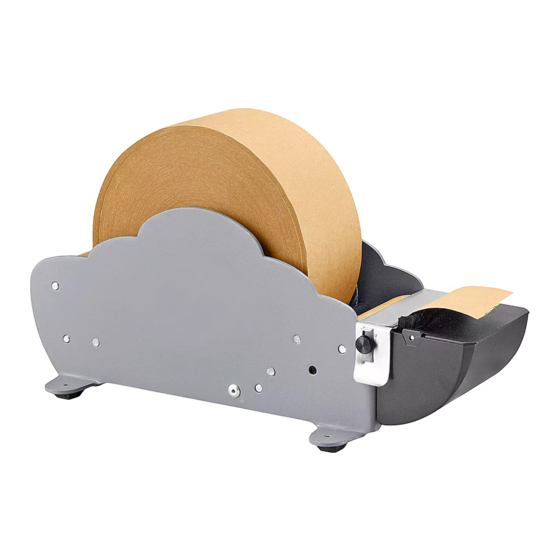
H-801
PAPER TAPE DISPENSER – 3"
FILLING TANK
1.
Remove screws and bridge from dispenser.
(See Figure 1)
Figure 1
2. Remove and thoroughly wash brush in warm, soapy
water before initial use. (See Figure 2)
Figure 2
Brush
Tank
3. Fill tank to 1/2" from top.
NOTE: To remove tank, first remove bridge, then
lift tank off of the dispenser
4. Replace brush and close lid on tank.
5. Reattach bridge to dispenser with previously
removed screws.
PAGE 1 OF 6
INSTRUCTIONS
Bridge
1-800-295-5510
uline.com
LOADING TAPE
1.
Unroll 15 inches of tape.
2. Adjust tape divider to width of tape. Place tape in
cradle. (See Figures 3-4)
NOTE: Unwound portion of tape should be on
bottom of roll off the back and with adhesive
side facing up.
Figure 3
Tape Divider
3. Insert tape end in back of two rollers. Push tape
through the underside of the dispenser until the end
comes out in front of the tape cradle. (See Figure 5)
Figure 5
Para Español, vea páginas 3-4.
Pour le français, consulter les pages 5-6.
Figure 4
Adhesive Side
of Tape
0522 IH-801
Advertisement
Table of Contents

Related Manuals for U-Line H-801


Summary of Contents for U-Line H-801
- Page 1 Para Español, vea páginas 3-4. Pour le français, consulter les pages 5-6. H-801 1-800-295-5510 uline.com PAPER TAPE DISPENSER – 3" INSTRUCTIONS FILLING TANK LOADING TAPE Remove screws and bridge from dispenser. Unroll 15 inches of tape. (See Figure 1) 2. Adjust tape divider to width of tape. Place tape in cradle.
-
Page 2: Operation
INSTRUCTIONS CONTINUED 4. Thread tape end through the bridge and pull out OPERATION over the brush. (See Figure 6) Pull tape out in a slightly downward direction to ensure thorough moistening. (See Figure 8) Figure 6 Figure 8 SETTING FOR MULTIPLE TAPE ROLLS Lift forward end of tape divider plate from slot and the rear portion of the dispenser and place in the desired slot that corresponds with the width of rolls of... - Page 3 H-801 800-295-5510 uline.mx DESPACHADOR PARA CINTA DE PAPEL – 3" INSTRUCCIONES LLENADO DEL TANQUE CARGA DE LA CINTA ADHESIVA Retire los tornillos y el puente del despachador. Desenrolle 38 cm (15 pulgadas) de cinta. (Vea Diagrama 1) 2. Ajuste el separador de cinta al ancho de la cinta.
-
Page 4: Mantenimiento
CONTINUACIÓN DE INSTRUCCIONES 4. Pase el extremo de la cinta a través de la base y FUNCIONAMIENTO jálelo sobre el cepillo. (Vea Diagrama 6) 1. Jale la cinta en una dirección ligeramente hacia abajo para asegurar que se humedezca bien. Diagrama 6 (Vea Diagrama 8) Diagrama 8... -
Page 5: Remplissage Du Réservoir
H-801 1-800-295-5510 uline.ca DÉVIDOIR DE RUBAN ADHÉSIF EN PAPIER – 3 PO INSTRUCTIONS REMPLISSAGE DU RÉSERVOIR INSTALLATION DU RUBAN ADHÉSIF Retirer les vis et le pont du dévidoir. (Voir Figure 1) Déroulez 15 pouces de ruban. 2. Ajustez le séparateur de ruban à la largeur du... -
Page 6: Entretien
INSTRUCTIONS SUITE Enfilez l'extrémité du ruban à travers le pont, puis FONCTIONNEMENT ressortez-la en la passant par-dessus la brosse. 1. Tirez le ruban dans une direction légèrement (Voir Figure 6) descendante pour assurer une humidification complète. (Voir Figure 8) Figure 6 Figure 8 RÉGLAGE POUR PLUSIEURS ROULEAUX DE RUBAN Soulevez l'extrémité...
Need help?
Do you have a question about the H-801 and is the answer not in the manual?
Questions and answers