Table of Contents
Advertisement
Available languages
Available languages
Quick Links
H-800, H-1037
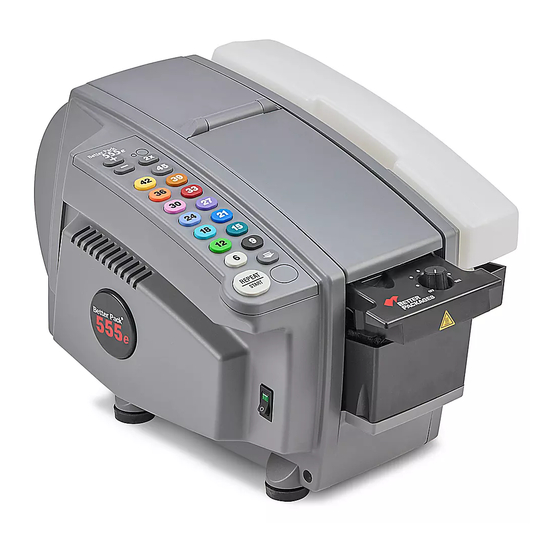
BETTER PACK ELECTRONIC
555eS KRAFT TAPE
DISPENSER
PAGE 1 OF 36
1-800-295-5510
uline.com
TECHNICAL DATA
Dimensions of machine: 20 x 12½ x 12"
Weight of machine: 29 lbs.
Electrical power: 115V-4 Amps
Dispensing velocity: 45" / sec.
Length: min. 6" / max. 45" (90" if using 2x button)
TAPE
Types of gummed tape: All
PAPER FEATURES
Width: min. 1½" / max. 3"
Maximum roll diameter: 10"
Para Español, vea páginas 13-24.
Pour le français, consulter les pages 25-36.
IMPORTANT!
Read this manual thoroughly and
familiarize yourself with ALL controls
and operating features. Keep this
manual for future reference and
maintenance.
Unpacking: Check the machine
for damage. If damage is found,
return to Uline.
0521 IH-800
Advertisement
Table of Contents

Related Manuals for U-Line BETTER PACK 555eS


Summary of Contents for U-Line BETTER PACK 555eS
- Page 1 Para Español, vea páginas 13-24. Pour le français, consulter les pages 25-36. H-800, H-1037 1-800-295-5510 uline.com BETTER PACK ELECTRONIC 555eS KRAFT TAPE DISPENSER IMPORTANT! Read this manual thoroughly and familiarize yourself with ALL controls and operating features. Keep this manual for future reference and maintenance.
-
Page 2: Setup Instructions
SETUP INSTRUCTIONS PREPARING THE UNIT FOR OPERATION UNPACKING When you open the top flaps on the box for the tape ADJUSTING THE ROLL GUIDES dispenser, there will be instructions for removing the Roll guides fit into slots in the front and bottom panels tape dispenser from its packaging. -
Page 3: Loading The Tape
SETUP INSTRUCTIONS CONTINUED ADJUSTING THE ROLL GUIDES CONTINUED NOTE: The front part of the top cover is attached to the rear part with plastic pivot points. To • Set the space between the guides to just larger than attach or detach the front part to or from the the width of the tape. -
Page 4: Attaching The Power Cord
SETUP INSTRUCTIONS CONTINUED INSTALLING THE BOTTLE AND WATER TANK from building up in the brushes, bottle, and water tank. These deposits can lead to poor Insert the brush assembly in the water tank. The tape adhesion. Penetron® helps the water brush assembly must be tilted toward the dispenser more quickly penetrate into the adhesive for so that the cotter pin will clear the retaining bracket... -
Page 5: Adjust The Setting On The Heater Assembly
SETUP INSTRUCTIONS CONTINUED ATTACHING THE POWER CORD CONTINUED TURN THE SYSTEM "ON" 2. Attach the female end of the power cord to the Turn the power switch to the "ON" (up) position. The dispenser connector. (See Figure 12) switch will light and the channel will "beep" once. (See Figure 13) Figure 12 Figure 13... -
Page 6: Operation
OPERATION MODEL DESCRIPTIONS The difference between Automatic and Standard Additionally, Automatic mode allows the preset of two lengths using: models is the capability for the Automatic models to dispense the next piece of tape automatically each time a piece is removed. A repeating pattern of up to REPEAT 2 three different lengths can be automatically dispensed REPEAT... -
Page 7: Error Notification
OPERATION CONTINUED TO DISPENSE A RANDOM LENGTH OF TAPE TO DISPENSE TAPE SHORTER THAN THE AMOUNT ON A NUMBER BUTTON: Press and hold the manual feed button (down arrow) Press until the desired length of To dispense 41⁄" tape is dispensed. (one -1/2"... - Page 8 OPERATION CONTINUED TO REPEAT THE LENGTH PREVIOUSLY DISPENSED AUTOMATIC MODE (AUTOMATIC MODEL H-1037) (STANDARD MODEL H-800): In the Automatic Mode, removing a piece of tape from the dispenser causes another piece of tape to be The dispenser "remembers" the last dispensed automatically.
- Page 9 OPERATION CONTINUED AUTOMATIC MODEL H-1037 CHOOSING THE CORRECT TAPE LENGTH TO REPEAT THREE TAPE LENGTHS AUTOMATICALLY In most situations, the correct length of tape is the total length of the seam to be sealed plus a two to three Make sure the memory is clear of any length previously inch overlap on each side.
-
Page 10: Maintenance
MAINTENANCE CLEANING THE SHEAR BLADES There is very little maintenance required to keep your tape dispenser in working condition. What is required When using reinforced tapes laminated with glue or however, is important to perform. resin, this material can accumulate on the blades and Maintenance is basically: interfere with cutting the tape. -
Page 11: Changing The Fuse
MAINTENANCE CONTINUED CLEARING JAMS CONTINUED • If the fuse if blown, replace it with one rated AL T2 250V. Replace the upper tape plate and feed the tape • If the fuse is OK and the system is still not working, back into position when you have cleared the jam. -
Page 12: Technical Specifications
MAINTENANCE CONTINUED CLEANING Exterior surface of the dispenser: Inside this dispenser: • Brush out paper dust. • Brush out paper dust. • Do not use spray cleaners • Do not use spray cleaners TECHNICAL SPECIFICATIONS CHARACTERISTIC MEASUREMENT Tape Width 1.5-3" Maximum Tape Roller Diameter 10"... -
Page 13: Datos Técnicos
H-800, H-1037 800-295-5510 uline.mx BETTER PACK 555eS DESPACHADOR ELECTRÓNICO DE CINTA KRAFT ¡IMPORTANTE! Lea este manual completamente y familiarícese con TODOS los controles y funciones de operación. Guarde este manual para futura referencia y mantenimiento. Desempacar: Revise que la máquina no esté dañada. Si encuentra algún daño, devuelva... -
Page 14: Instrucciones De Configuración
INSTRUCCIONES DE CONFIGURACIÓN PREPARE LA UNIDAD PARA FUNCIONAMIENTO DESEMPAQUE Cuando abra las solapas superiores de la caja del AJUSTE LAS GUÍAS DEL ROLLO despachador de cinta, hay instrucciones para retirar Las guías del rollo caben en las ranuras en los paneles el despachador de su empaque. - Page 15 CONTINUACIÓN DE INSTRUCCIONES DE CONFIGURACIÓN CONTINUACIÓN DE AJUSTE LAS GUÍAS DEL ROLLO NOTA: La parte frontal de la cubierta superior va unida a la parte posterior con unos pivotes de • Ajuste el espacio entre las guías para que sea un plástico.
- Page 16 CONTINUACIÓN DE INSTRUCCIONES DE CONFIGURACIÓN INSTALE LA BOTELLA Y TANQUE PARA AGUA 4. Llene la botella con agua. NOTA: Recomendamos utilizar Penetron® o Inserte el ensamble de cepillo en el tanque para un humectante similar si hay agua dura. Esto agua.
- Page 17 CONTINUACIÓN DE INSTRUCCIONES DE CONFIGURACIÓN CONTINUACIÓN DE COLOQUE EL ENCHUFE ENCIENDA EL SISTEMA 2. Coloque el extremo hembra del cable en el Gire el interruptor a la posición de encendido "ON" (arriba). conector del despachador. (Vea Diagrama 12) El interruptor encenderá y el canal hará "bip" una vez. (Vea Diagrama 13) Diagrama 12 Diagrama 13...
- Page 18 FUNCIONAMIENTO DESCRIPCIONES DEL MODELO La diferencia entre los modelos Automático y Estándar Adicionalmente, el modo Automático permite es la capacidad de los modelos Automáticos para preseleccionar dos largos utilizando: despachar el siguiente tramo de cinta automáticamente cada vez que un tramo sea retirado. Un patrón repetitivo hasta para tres distintos largos pueden despacharse REPEAT REPEAT 2...
- Page 19 CONTINUACIÓN DE FUNCIONAMIENTO DESPACHE UN LARGO DE CINTA ALEATORIO DESPACHE CINTA MÁS CORTA QUE LA CANTIDAD DE UN BOTÓN NUMÉRICO: Presione y sostenga el botón de alimentación manual Presione (flecha hacia abajo) hasta Para despachar 109.2 cm (41⁄") que el largo de cinta deseado sea despachado.
-
Page 20: Modo Automático
CONTINUACIÓN DE FUNCIONAMIENTO DUPLIQUE EL LARGO PREVIAMENTE DESPACHADO MODO AUTOMÁTICO (MODELO ESTÁNDAR H-800): (MODELO AUTOMÁTICO H-1037) En el Modo Automático, retirar un tramo de cinta del El despachador "recuerda" el último despachador ocasiona que otro tramo de cinta sea largo de cinta despachado y REPEAT despachado automáticamente. - Page 21 CONTINUACIÓN DE FUNCIONAMIENTO MODELO AUTOMÁTICO H-1037 ELIJA EL LARGO DE CINTA CORRECTO DUPLIQUE TRES LARGOS DE CINTA En la mayoría de las situaciones, el largo correcto de la AUTOMÁTICAMENTE cinta es el total del largo de la unión a ser sellada más dos a tres pulgadas (5-8 cm) superposición en cada lado.
-
Page 22: Mantenimiento
MANTENIMIENTO LIMPIE LAS NAVAJAS DE CORTE Se requiere muy poco mantenimiento para tener su despachador de cinta trabajando. Sin embargo lo que se Cuando utilice cintas laminadas reforzadas con requiere, es importante llevarlo a cabo. pegamento o resina, este material puede acumularse El mantenimiento es básicamente: en las navajas e interferir con el corte de la cinta. - Page 23 CONTINUACIÓN DE MANTENIMIENTO CONTINUACIÓN DE DESPEJE ATASCOS • Si el fusible está fundido, reemplácelo con uno clasificado como AL T2 250V. Coloque de nuevo la placa superior para cinta y • Si el fusible está bien y el sistema no está funcionando, alimente de nuevo la cinta en posición cuando haya llame a Uline Servicio a Clientes al 800-295-5510.
-
Page 24: Especificaciones Técnicas
CONTINUACIÓN DE MANTENIMIENTO LIMPIEZA Superficie exterior del despachador: Dentro del despachador: • Cepille el polvo de papel • Cepille el polvo de papel • No utilice limpiadores en aerosol • No utilice limpiadores en aerosols ESPECIFICACIONES TÉCNICAS CARACTERÍSTICA MEDIDAS Ancho de Cinta 3.81 à... -
Page 25: Caractéristiques Du Papier
H-800, H-1037 1-800-295-5510 uline.ca ÉLECTRONIQUE BETTER PACK RUBAN KRAFT 555eS DISTRIBUTEUR IMPORTANT! ARRÊT Veuillez lire attentivement ce manuel et apprendre TOUTES les commandes et fonctions. Conservez ce manuel afin d'y faire référence ultérieurement et pour les besoins d'entretien. Déballage : Vérifiez l'état de la machine. -
Page 26: Instructions Pour L'installation
INSTRUCTIONS POUR L'INSTALLATION PRÉPARATION DE L'APPAREIL DÉBALLAGE Lorsque vous ouvrez les rabats sur le haut de la boîte AJUSTEMENT DES GUIDES POUR ROULEAU du distributeur de ruban, vous trouverez des instructions Les guides pour rouleau s'insèrent dans les fentes sur pour sortir le distributeur de ruban de son emballage. -
Page 27: Chargement Du Ruban
INSTRUCTIONS DE CONFIGURATION SUITE AJUSTEMENT DES GUIDES POUR ROULEAU SUITE REMARQUE : la partie avant du couvercle supérieur est fixée à la partie arrière par des • Définissez l'espace entre les guides à une largeur points pivots en plastique. Pour fixer ou détacher supérieure à... - Page 28 INSTRUCTIONS DE CONFIGURATION SUITE INSTALLATION DE LA BOUTEILLE ET REMARQUE : nous recommandons d'utiliser Penetron® ou un agent mouillant semblable DU RÉSERVOIR À EAU si votre eau est dure. Cela empêchera des Insérez l'ensemble des brosses dans le réservoir à dépôts minéraux de se former et les bactéries eau.
- Page 29 INSTRUCTIONS DE CONFIGURATION SUITE FIXATION DU CORDON D'ALIMENTATION SUITE ACTIVEZ LE SYSTÈME 2. Branchez l'extrémité femelle du cordon Mettez le commutateur en position " ON " (vers le haut). d'alimentation dans le connecteur du distributeur. Le commutateur s'allumera et le canal émettra un bip (Voir Figure 12) sonore.
- Page 30 FONCTIONNEMENT DESCRIPTIONS DES MODÈLES De plus, le mode automatique permet de programmer La différence entre les modèles automatiques et deux longueurs en utilisant : les modèles réguliers est la capacité des modèles automatiques à distribuer automatiquement le prochain morceau de ruban chaque fois que le morceau est enlevé.
- Page 31 FONCTIONNEMENT SUITE DISTRIBUTION DE LONGUEURS VARIÉES DE RUBAN POUR DISTRIBUER UN RUBAN PLUS COURT QUE LA QUANTITÉ INDIQUÉE SUR UN BOUTON NUMÉROTÉ : Appuyez et maintenez enfoncé le bouton d'alimentation Appuyez sur manuelle (flèche vers le bas) jusqu'à ce que la longueur de Pour distribuer 105,41 cm (41½...
- Page 32 FONCTIONNEMENT SUITE POUR RÉPÉTER LA LONGUEUR PRÉALABLEMENT MODE AUTOMATIQUE (MODÈLE AUTOMATIQUE H-1037) DISTRIBUÉE (MODÈLE RÉGULIER H-800) : En mode automatique, le fait de retirer un morceau de ruban du distributeur peut entraîner la distribution Le distributeur " se rappelle " de la automatique d'un autre morceau de ruban.
- Page 33 FONCTIONNEMENT SUITE MODÈLE AUTOMATIQUE H-1037 CHOISIR LA BONNE LONGUEUR DE RUBAN POUR RÉPÉTER AUTOMATIQUEMENT TROIS LON- Dans la plupart des cas, la bonne longueur de ruban GUEURS DE RUBAN est la longueur totale du joint à fermer plus un che- vauchement de deux à...
-
Page 34: Entretien
ENTRETIEN NETTOYAGE DES LAMES DE CISAILLE Très peu d'entretien est requis pour garder votre distributeur de ruban en bon état. Cependant, il est Lorsque vous utilisez du ruban laminé renforcé avec de important d'exécuter l'entretien requis. la colle ou de la résine, ce matériau peut s'accumuler sur L'entretien se résume à... -
Page 35: Remplacement Du Fusible
ENTRETIEN SUITE DÉGAGEMENT DES OBSTRUCTIONS SUITE • Si le fusible est brûlé, le remplacer par un fusible AL T2 250 volts. Reposez le plateau à ruban supérieur et faites • Si le fusible est en bon état et que le système ne avancer le ruban lorsque vous avez dégagé... -
Page 36: Spécifications Techniques
ENTRETIEN SUITE NETTOYAGE Surface extérieure du distributeur : Intérieur du distributeur : • Brosser la poussière de papier. • Brosser la poussière de papier. • Ne pas utiliser de nettoyants en vaporisateur • Ne pas utiliser de nettoyants en vaporisateur SPÉCIFICATIONS TECHNIQUES CARACTÉRISTIQUES MESURES...
Need help?
Do you have a question about the BETTER PACK 555eS and is the answer not in the manual?
Questions and answers