
Related Manuals for sauter MFS-3202


Summary of Contents for sauter MFS-3202
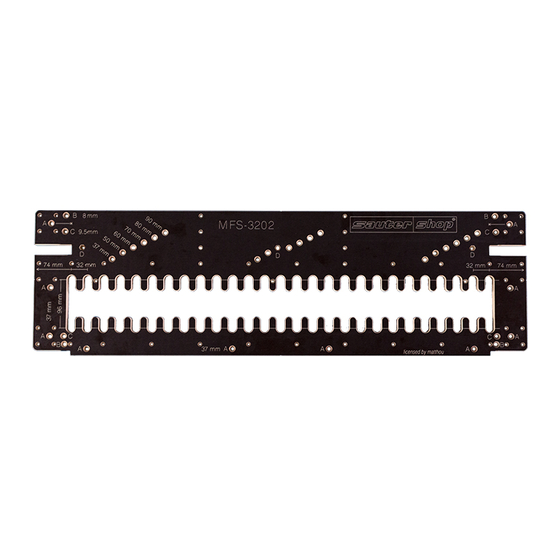
- Page 1 Multi-milling template MFS-3202 Instruction manual Sauter GmbH TEL [+49] 08143 99 129 0 Gewerbepark Inning- Wörthsee FAX [+49] 08143 99 129 29 Neubruch 4 e-mail: info@sautershopcom D-82266 Inning www.sautershop.com...
- Page 2 - at least 2 screw clamps, one-hand clamps or similar clamping tools - Drill or router bit with the required diameter 3. Application examples: The sautershop MFS-3202 milling template is useful in a variety of applications. These include: - Hole lines for shelves - Extension of existing hole lines...
- Page 3 The hole lines must be adjusted accordingly. The sautershop MFS-3202 offers a simple measuring stop for adjusting the distance of the first hole to the edge of the workpiece. With this, the exact...
- Page 4 Abb. 3: The measuring stop is designed in such a way that when using standard ruler, there is sufficient visibility of the workpiece. This allows the distance to be read off easily and precisely. 2. Once the starting position has been found, the template is fixed to the workpiece with a clamp at each end.
- Page 5 4.2 Extension of existing hole lines: 1. With the sautershop MFS-3202 template, you have the possibility of easily extending 5mm hole lines. 2. To do this, place the template on the hole line and position it with a 5mm bolt hole over an existing hole in the existing hole line.
- Page 6 4.3 Drilling holes for drawer runners: Drawer pull-outs, regardless of whether they are telescopic slides with partial or full extension technology, are manufactured and delivered with standardised drill holes. The 32mm system can be found in all current systems. It is advisable to first create a row of holes parallel to the front of the body.
- Page 7 4.4 Creating a corpus connection with simple wooden dowels 1. Clamp the workpiece vertically. 2. Attach the mitre fence to the hole line template.. (the fence is available as an optional accessory) It is fastened by means of three M6 hexagonal bolts and wing nuts. There are 6 selectable standard distances to suit common material thicknesses.
- Page 8 3. Fix the template to the workpiece The templateis fastened to the workpiece by means of two clamps from below. Before final fixation the template must be aligned. The attachment points on the row of tines serve this purpose. First select the front edge of the workpiece (visible edge) as the stop position.
- Page 9 4. Drill the row of holes on the front side. (we recommend a distance of 64 mm, every second tine) This process is repeated on all front sides of the construction shelves. It is important that the stop sides are always the same at the end drillings.
- Page 10 5. Drill the dowel holes The surface drillings are also carried out with the fence attached. In this way, the edge distance of the drill holes remains identical.
- Page 11 6. Now you can assemble the parts By changing the stop positions, the connections are clearly defined. This results in an exactly flush connection. In 15 minutes to the finished body without visible screws!
- Page 12 Multi-milling template MFS-3202 The MFS-3202 Multi-milling template makes it easy to produce absolutely precise holes for a wide range of applications. For this purpose, the templates are manufactured with the help of modern CNC machines with an absolutely precise fit.
Need help?
Do you have a question about the MFS-3202 and is the answer not in the manual?
Questions and answers