Table of Contents

Related Manuals for sauter SU


Summary of Contents for sauter SU
- Page 1 Sauter GmbH Ziegelei 1 Tel.: +49-[0]7433- 9933-0 D-72336 Balingen Fax: +49-[0]7433-9933-149 E-Mail: info@kern-sohn.com Internet: www.sauter.eu Instruction Manual Digital Sound Level Meter SAUTER SU V. 1.3 08/2017 PROFESSIONAL MEASURING SU-BA-e-1713...
-
Page 2: Table Of Contents
V. 1.3 08/2017 Instruction Manual Digital Sound Level Meter Thank you for buying a digital SAUTER sound level Meter. We hope you are pleased with your high quality instrument and its big functional range. Although this Sound Meter is a complex and advanced instrument, its ruggedness will allow many years of use if you will care for an appropriate operating technique and maintenance. -
Page 3: Features
Leq: 30~130dB (10 s, 1 min, 5 min, 10 min, 15 min, 30 min, 1 h, 8 h, 24 h) Ln: 0-100% Resolution: 0.1dB Accuracy: ± 1dB Frequency weighting: “A”, “C”, “F” (Flat) Time weighting: Fast (125ms) Slow (1 second) SU-BA-e-1713... -
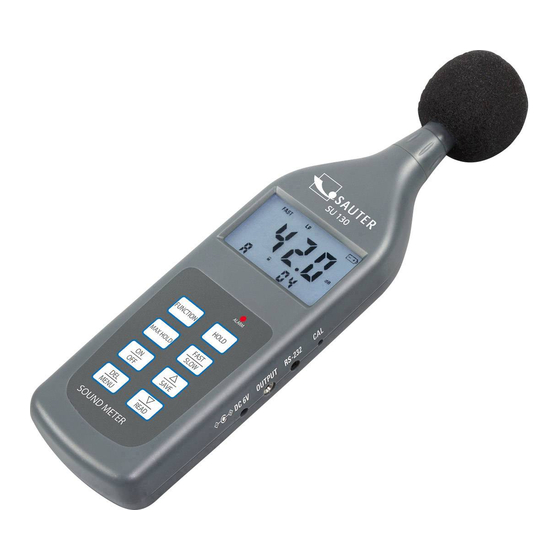
Page 4: Front Panel Description
Instruction Manual Foam cover Optional Accessories: Sound level meter calibrator (ASU-01) Cable and software for RS 232C (ATC-01) 3 Front panel description 3-1 Calibration Mark 3-2 Time Weighting 3-3 Memory state 3-4 Mark for 3-5 Weighting Icon 3-6 Function Mark SU-BA-e-1713... -
Page 5: Measuring Procedure
4.2 It has to be checked whether the function selected is right. If not, it can be changed by pressing the key 3-18. The default setting is Lp, weighting A, Fast. Lp – current sound pressure level Leq – Equivalent Continuous A Sound pressure Level, i.e. arithmetically mean value in a period of time set. SU-BA-e-1713... -
Page 6: Storing And Recalling Readings
Then the key 3-21 has to be pressed. If there appears “Err0” on the display, this indicates that there is no more reading to delete. SU-BA-e-1713... -
Page 7: How To Set The „Leq" Time
(ASU-01) in addition to a small screw-driver. 9.1 Calibration of the device with ASU-01 a) The device has to be turned on. b) It has to be preset in the “A” weighting mode c) It also has to be preset the “SLOW” response mode SU-BA-e-1713... -
Page 8: Calibration Of The Device By The Inbuilt Signal
Important: First start the continuous data logging and then read out the stored data! 1. Connect the SU 130 to the PC (cable is optional available with software ATC 01). 2. Put the SU 130 into the Memory Read Mode (by pressing the READ-button). -
Page 9: Su-Ba-E
5. Select Product: Sound Level Meter. 6. Press Save (A) button and leave this window by Exit (X). 7. Open Data Collection. 8. Press Continue Button- press button on SU 130 (e.g. FAST/SLOW) – Data acquisition Real Time starts SU-BA-e-1713... - Page 10 9. Press READ- button on the SU 130- data in memory. Readout of data starts and ends automatically with the last stored memory. 10. Select data (all which appears after “data in memory”)accordingly and continue processing. SU-BA-e-1713...
Need help?
Do you have a question about the SU and is the answer not in the manual?
Questions and answers