Table of Contents
Advertisement
Quick Links
AVS-301
Aplex Palm-Size System
Intel Celeron J1900 Platform
User Manual
Release Date
Revision
Mar. 2021
V1.0
®2021 Aplex Technology, Inc. All Rights Reserved. Published in Taiwan
Aplex Technology, Inc.
15F-1, No.186, Jian Yi Road, Zhonghe District, New Taipei City 235,Taiwan
Tel: 886-2-82262881 Fax: 886-2-82262883 E-mail:
aplex@aplex.com.tw
URL:
www.aplex.com.tw
Advertisement
Table of Contents

Related Manuals for Aplex AVS-301


Summary of Contents for Aplex AVS-301
- Page 1 Intel Celeron J1900 Platform User Manual Release Date Revision Mar. 2021 V1.0 ®2021 Aplex Technology, Inc. All Rights Reserved. Published in Taiwan Aplex Technology, Inc. 15F-1, No.186, Jian Yi Road, Zhonghe District, New Taipei City 235,Taiwan Tel: 886-2-82262881 Fax: 886-2-82262883 E-mail: aplex@aplex.com.tw URL:...
- Page 2 Revision History Reversion Date Description 2021/03/02 Official Version AVS-301 Machine Vision User Manual...
- Page 3 Electric Shock Hazard – Do not operate the machine with its back cover removed. There are dangerous high voltages inside. AVS-301 Machine Vision User Manual...
-
Page 4: Packing List
Packing List Accessories (as ticked) included in this package are: □ Adaptor □ Driver & manual CD disc □ Other.___________________(please specify) AVS-301 Machine Vision User Manual... -
Page 5: Safety Precautions
◆ Disconnect power when you change any hardware devices. For instance, when you connect a jumper or install any cards, a surge of power may damage the electronic components or the whole system. AVS-301 Machine Vision User Manual... -
Page 6: Table Of Contents
Packing List…………………………………….…………………………………………………....3 Safety Precautions…………………………………….…………….…..……………………....4 Chapter 1 Getting Started 1.1 Features……..…………………..………………………...…………………………..7 1.2 Specifications…..………………...………………………………………………….7 1.3 Dimensions……..…………………..……………………………………………...9 1.4 Brief Description of AVS-301 …………….…..…………………….……10 Chapter 2 Hardware 2.1 Motherboard Introduction……………………..……………………..13 2.2 Specifications…………………………..…………..………………………………13 2.3 Motherboard Dimensions….……..…………..……………………………16 2.4 Jumpers and Connectors Location……….……………………………...17 2.5 Jumpers Setting and Connectors…………..………………………..……19... - Page 7 Figure 1.1: Dimensions of AVS-301…..….……….………….…………………………...9 Figure 1.2: Overview of AVS-301………….…..……..………………………………….11 Figure 2.1: Motherboard SBC-7820NP Dimensions………..…………………..16 Figure 2.2: Jumpers and Connectors Location-Board Top……………………..17 Figure 2.3: Jumpers and Connectors Location-Board Bottom……………….18 Figure 5.1: Wall Mount of AVS-301……….….…..……..……………………………112 AVS-301 Machine Vision User Manual...
-
Page 8: Getting Started
3 x GbE ports by RJ45 with Intel I210AT 1 x USB 3.0(Type A) stack ports 3 x USB 2.0(Type A) stack ports 1 x USB2.0 (Type A) stack port (internal) CR-2032 GPIO/SIM 1 x 8-bit GPIO(4 x DI+4 x DO) AVS-301 Machine Vision User Manual... - Page 9 207 x 130 x 35.5 (DxWxH) Net Weight(unit: Kg) 0.95 Environmental Operating Temperature -20~70 °C Storage Temperature -40~85 °C Humidity 10 to 90% @ 40 °C , non-condensing Certification Operating System Microsoft® Win10 IoT, Linux(TBD) Support AVS-301 Machine Vision User Manual...
-
Page 10: Dimensions
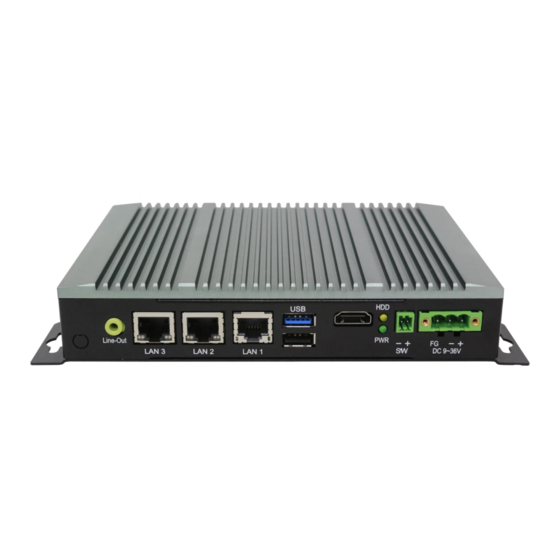
SIM slot for storage use, and 9~36V DC wide-ranging power input. AVS-301 has 1x mPCIE slot for expansion and it is plating titanium gray aluminum heatsink and black steel chassis designed. AVS-301 can be wall mounted, and it works well with our other products and they can provide an absolute easy way to perform control maintenance. - Page 11 Figure 1.2: Front view of AVS-301 Figure 1.3: Rear view of AVS-301 AVS-301 Machine Vision User Manual...
-
Page 12: Chapter 2 Hardware
1 x RS232 DB9 connector 9Pin (COM2) Serial 2 x RS485 DB9 connector 9Pin (COM3/COM4) 1 x RS232 DB9 connector 9Pin (COM5/GPIO, option) 1 x RS232 DB9 connector 9Pin (COM6, option) Audio Line out by Jack AVS-301 Machine Vision User Manual... -
Page 13: Motherboard Dimensions
Infineon’s Trusted Platform Module(TPM2.0, option) Operating: -20℃ to 70℃ Temperature Storage: -40℃ to 85℃ Humidity 10% - 90%, non-condensing, operating Meet CE/FCC Part15 class A EMI/EMS RoHS 2.3 Motherboard Dimension (SBC-7820-NP) (Unit: mm) Figure 2.1: Motherboard SBC-7820-NP Dimensions AVS-301 Machine Vision User Manual... -
Page 14: Jumpers And Connectors Location
2.4 Jumpers and Connectors Location Figure 2.2: Jumpers and Connectors Location- Board Top Figure 2.3: Jumpers and Connectors Location- Board Bottom AVS-301 Machine Vision User Manual... -
Page 15: Jumpers Setting And Connectors
Power on the system again. d) When entering the POST screen, press the <DEL> key to enter CMOS Setup Utility to load optimal defaults. e) After the above operations, save changes and exit BIOS Setup. AVS-301 Machine Vision User Manual... - Page 16 Illegal shutdown has the risk of damaging the operating system or the machine. Repeated switching may affect the service life of the machine. The power switch button interface can be connected with the button switch through the cable. AVS-301 Machine Vision User Manual...
- Page 17 COM cable connection. RS-232(Default) Pin# Signal Name DCD# (Data Carrier Detect) RXD (Received Data) TXD (Transmit Data) DTR (Data Terminal Ready) Ground DSR (Data Set Ready) RTS (Request To Send) CTS (Clear To Send) AVS-301 Machine Vision User Manual...
- Page 18 Pin# Signal Name 422_TX- 422_TX+ 422_RX+ 422_RX- Ground BIOS Setup: Advanced/NCT6106D Super IO Configuration/Serial Port 1 Configuration 【RS-422】 RS-485: Pin# Signal Name 485- 485+ Ground BIOS Setup: Advanced/NCT6106D Super IO Configuration/Serial Port 1 Configuration 【RS-485】 AVS-301 Machine Vision User Manual...
- Page 19 USB cable, speed up to 480Mb/s. (single stack USB type A), Rear USB3.0 connector, it provides up to 2 USB3.0 ports. USB3.0 allows data transfers up to 5.0 Gb/s, support USB2.0 and full-speed and low-speed signaling. AVS-301 Machine Vision User Manual...
- Page 20 If the external USB device current exceeds 2.0A, please separate connectors into different Receptacles. 17. LAN1/LAN2/LAN3: (RJ45 connector), 3 standard 10/100/1000M network interfaces with Intel I210AT network chipset. The use of connecting cables requires compliance with relevant protocols and specifications. AVS-301 Machine Vision User Manual...
- Page 21 (Socket 52Pin), mini PCIe socket, it is located at the top, it supports mini PCIe devices with USB2.0, SIM, SMBUS and PCIe signal. MPCIe card size is 30 x 50.95mm. Function Support ● Mini PCIe4 Signal ● SIM Signal AVS-301 Machine Vision User Manual...
- Page 22 GPIO programming routines are required, please contact your sales window staff or agent. Pin# Signal GPIO Function 5V_GPIO 5V_GPIO 5VDC_OUT Ground Ground GPIO_IN1 6106_GP20 GPIO_IN2 6106_GP21 GPIO_IN3 6106_GP22 GPIO_IN4 6106_GP23 GPIO_OUT1 6106_GP24 AVS-301 Machine Vision User Manual...
- Page 23 LINE_JD LINE-IN-L LINE-IN-R MIC-IN-L MIC-IN-R GND_AUD MIC1_JD 28. SPK1: (2.0mm Pitch 1x4 Wafer Pin Header), support a stereo Class-D Speaker Amplifier with 2 watt per channel output power. Pin# Signal Name SPK_OUTL_P SPK_OUTL_N SPK_OUTR_N SPK_OUTR_P AVS-301 Machine Vision User Manual...
-
Page 24: Bios Setup
Press <DEL> or <ESC> to enter setup. After optimizing, exits CMOS Setup. 3.2 BIOS Setup Utility Press [Delete] key to enter BIOS Setup utility during POST, and then a main menu containing system summary information will appear. AVS-301 Machine Vision User Manual... -
Page 25: Main Settings
F2 : Previous Values F3 : Optimized Defaults System Language [English] F4 : Save and Exit ESC : Exit System Date [TUE 01/01/2021] System Time [00:00:08] Access Leve1 Administrator Version 2.17.1246. Copyright (C) 2021 American Megatrends , Inc. AVS-301 Machine Vision User Manual... - Page 26 Minute : 0 to 59 Second : 0 to 59 System Date: Set the system date, the date format is: Day: Note that the ‘Day’ automatically changes when you set the date. Month: 01 to 12 AVS-301 Machine Vision User Manual...
-
Page 27: Advanced Settings
►CSM Configuration ►SDIO Computing ►USB Configuration ►Platform Trust Technology ►Security Configuration ►Intel(R) i210 Gigabit Network Connection-- ►Intel(R) i210 Gigabit Network Connection-- ►Intel(R) i210 Gigabit Network Connection-- Version 2.17.1246. Copyright (C) 2021 American Megatrends , Inc. AVS-301 Machine Vision User Manual... - Page 28 IO=3F8h ; IRQ=4; Device Settings Change Settings [Auto] [IO=3F8h;IRQ=4] [IO=3F8h ;IRQ=3,4,5,6,7,9,10,11,12 ;] [IO=2F8h ;IRQ=3,4,5,6,7,9,10,11,12 ;] [IO=3E8h ;IRQ=3,4,5,6,7,9,10,11,12 ;] [IO=2E8h ;IRQ=3,4,5,6,7,9,10,11,12 ;] COM1 Mode Selection [RS-232] [RS-485] [RS-422] Serial Port 2 Configuration Serial port [Enabled] [Disabled] AVS-301 Machine Vision User Manual...
- Page 29 3.4.4 Intel® Smart Connect Technology ISCT Support [Enabled] [Disabled] 3.4.5 APM Configuration RTC Power On [Disabled] [Enabled] 3.4.6 CPU Configuration Socket 0 CPU Information CPU Thermal Configuration [Enabled] [Disabled] 3.4.7 PPM Configuration CPU c state Report [Enabled] [Disabled] AVS-301 Machine Vision User Manual...
- Page 30 Super Debug [Disabled] Current Logical Processor [Disabled] Start P-State [P0] Step size [25%] Power Control Setting [CORE offlining] Performance Control Setting [CORE offlining] DPPM [Enabled] 3.4.9 IDE Configuration Serial-ATA(SATA) [Enabled] [Disabled] SATA Test Mode [Enabled] [Disabled] AVS-301 Machine Vision User Manual...
- Page 31 [Disabled] Serial-ATA Port 1 [Enabled] [Disabled] SATA Port1 HotPlug [Enabled] [Disabled] SATA Port 0 Not Present SATA Port1 Not Present 3.4.10 Miscellaneous Configuration High Precision Timer [Enabled] [Disabled] Boot Timer with HPET Timer [Enabled] [Disabled] AVS-301 Machine Vision User Manual...
- Page 32 SCC eMMC 4.5 HS200 Support [Disabled] [Enabled] eMMC Secure Erase [Disabled] [Enabled] SCC SDIO Support [Enabled] [Disabled] SCC SD Card Support [Enabled] [Disabled] SDR25 Support for SDCard [Disabled] DDR50 Support for SDCard [Enabled] MIPI HSI Support [Disabled] [Enabled] AVS-301 Machine Vision User Manual...
- Page 33 LPSS I2C #4 Support [Disabled] [Enabled] LPSS I2C #5 Support [Disabled] [Enabled] LPSS I2C #6 Support [Disabled] [Enabled] LPSS I2C #7 Support [Disabled] [Enabled] I2C touch Device Address [AUTO] [0x4B] [0x4A] LPSS HSUART #1 Support [Disabled] [Enabled] AVS-301 Machine Vision User Manual...
- Page 34 PMIC ACPI OBJECT [Disabled] [Enabled] PNP Setting [Disabled] [AUTO] [AX STEPPING] [BX STEPPING] Witt Setting [Disabled] [Enabled] 3.4.13 Network Stack Configuration Network Stack [Disabled] [Enabled] 3.4.14 CSM Configuration Compatibility Support Module Configuration CSM Support [Disabled] [Enabled] AVS-301 Machine Vision User Manual...
- Page 35 [UEFI only] Option ROM execution Network [Do not launch] [UEFI] [Legacy] Storage [Do not launch] [UEFI] [Legacy] Video [Do not launch] [UEFI] [Legacy] Other PCI devices [UEFI] [Legacy] 3.4.15 SDIO Configuration SDIO Configuration [Auto] [DMA] [PIO] AVS-301 Machine Vision User Manual...
- Page 36 USB Mass Storage Driver Support [Disabled] [Enabled] USB hardware delays and time-outs: USB transfer time-out [1 sec] [5 sec] [10 sec] [20 sec] Device reset time-out [10 sec] [20 sec] [30 sec] [40 sec] Device power-up delay [Auto] [Manual] AVS-301 Machine Vision User Manual...
- Page 37 3.4.17 Platform Trust Technology TPM Configuration FTPM [Disabled] [Enabled] 3.4.18 Security Configuration Intel® TXE Configuration Intel® Anti-Theft Technology Configuration Intel® AT [Disabled] [Enabled] Intel® AT Platform PBA [Disabled] [Enabled] Intel® AT Suspend Mode [Disabled] AVS-301 Machine Vision User Manual...
-
Page 38: Chipset Settings
Version 2.17.1246. Copyright (C) 2021 American Megatrends , Inc. 3.5.1 North Bridge ►Intel IGD Configuration GOP Configuration GOP Driver [Enabled] [Disabled] Intel IGD Configuration Integrated Graphics Device [Enabled] [Disabled] IGD Turbo Enable [Enabled] [Disabled] Primary Display [IGD] AVS-301 Machine Vision User Manual... - Page 39 ISP Enable/Disable [Enabled] [Disabled] ISP PCI Device Selection [Enabled] [Disabled] Vcc,Vnn Configuration for Power state2: Vcc_Vnn Config for Power state2 [Enabled] [Disabled] ►IGD – LCD Control Force Lid Status [ON] [OFF] [AUTO] ALS Support [Enabled] [Disabled] AVS-301 Machine Vision User Manual...
- Page 40 This is to view the memory configuration information. 3.5.2 South Bridge ►Azalia HD Audio Audio Configuration LPE Audio Support [Enabled] [Disabled] Audio Controller [Enabled] [Disabled] Azalia VCi Enable [Enabled] [Disabled] Azalia Docking Support Enable [Enabled] AVS-301 Machine Vision User Manual...
- Page 41 [Smart Auto] USB2 Link Power Management [Enabled] [Disabled] USB 2.0(ENCI) Support [Disabled] USB EHCI debug [Enabled] USB Per Port Control [Enabled] [Disabled] USB Port 0 [Enabled] [Disabled] USB Port 1 [Enabled] [Disabled] USB Port 2 [Enabled] AVS-301 Machine Vision User Manual...
- Page 42 Prefetchable Memory Alignment Reserved I/O PCI Express Port 1 [Enabled] [Disabled] Hot Plug [Enabled] [Disabled] Speed [Auto] Extra Bus Reserved Reserved Memory Reserved Memory Alignment Prefetchable Memory Prefetchable Memory Alignment Reserved I/O PCI Express Port 2 [Enabled] AVS-301 Machine Vision User Manual...
- Page 43 Extra Bus Reserved Reserved Memory Reserved Memory Alignment Prefetchable Memory Prefetchable Memory Alignment Reserved I/O ►COM Port Configuration COM Port Configuration COM1 RS485 Resistance [Disabled] [Enabled] COM2 RS485 Resistance [Disabled] [Enabled] COM3 RS485 Resistance [Enabled] [Disabled] AVS-301 Machine Vision User Manual...
- Page 44 [Disabled] COM10 RS485 Resistance [Enabled] [Disabled] High Precision Timer [Enabled] [Disabled] Restore AC Power Loss [Power off] [power on] [Last State] LCD PWM DC Mode [PWM] [DC] GPIO00-027 Mode [Input] [Output] GPIO00 -027 [High] [Low] AVS-301 Machine Vision User Manual...
- Page 45 Serial IRQ Mode [Quiet] [Continuous] Global SMI Lock [Enabled] [Disabled] BIOS Read/Write Protection [Enabled] [Disabled] AVS-301 Machine Vision User Manual...
-
Page 46: Security Settings
F2: Previous Values In the following range: F3:Optimized Defaults Minimum length F4:Save and Exit ESC Exit Maximum length Administrator Password User Password Version 2.17.1246. Copyright (C) 2021 American Megatrends , Inc. 3.6.1 Administrator Password 3.6.2 User Password AVS-301 Machine Vision User Manual... -
Page 47: Boot Settings
F4:Save and Exit ESC Exit Version 2.17.1246. Copyright (C) 2021 American Megatrends , Inc. Setup Prompt Timeout Bootup Numlock State [On] Quiet Boot [Disabled] Boot Option Priorities Fast Boot [Disabled] New Boot Option Policy [Default] AVS-301 Machine Vision User Manual... -
Page 48: Save & Exit Settings
UEFI:Built – IN EFI Shell Launch EFI Shell from filesystem device Reset System with ME disable ModeMEUD000 Version 2.17.1246. Copyright (C) 2021 American Megatrends , Inc. Save & Exit Setup save Configuration and exit? [Yes] [No] AVS-301 Machine Vision User Manual... - Page 49 Restore the User Defaults to all the setup options? [Yes] [No] Boot Override UEFI:Built – in EFI Shell Launch EFI Shell from filesystem device WARNING Not Found [ok] Reset System with ME disable ModelMEUD000 ---------------------------------------------------------------------------------------------------------- AVS-301 Machine Vision User Manual...
-
Page 50: Chapter 4 Installation Of Drivers
Intel H170, Graphics 530 chipset driver, Audio driver, Intel® management engine interface, and DPTF Driver Installation instructions are given below. Important Note: After installing your Windows operating system, you must install Intel Chipset Software Installation Utility before proceeding with the installation of drivers. AVS-301 Machine Vision User Manual... -
Page 51: Intel H170 Chipset
Intel H170 Chipset To install the Intel H170chipset driver, please follow the steps below. Step1. Select Intel H170 Chipset from the list Step2. Click Next to setup program. AVS-301 Machine Vision User Manual... - Page 52 Step3. Read the license agreement. Click Accept to accept all of the terms of the license agreement. Step4. Click Install to begin the installation. AVS-301 Machine Vision User Manual...
-
Page 53: Intel® Hd Graphics 530 Chipset
Step5. Click Finish to complete the setup process. 4.2 Intel® HD Graphics 530 Chipset To install the Intel® HD Graphics 530 Chipset, please follow the steps below. Step1. Select Intel® HD Graphics 530 Chipset from the list. AVS-301 Machine Vision User Manual... - Page 54 Step2. Click Next. Step3. Choose automatically run function and Click Next to setup program. AVS-301 Machine Vision User Manual...
- Page 55 Step4. Read the license agreement. Click Yes to accept all of the terms of the license agreement. Step5. Click Next to continue. AVS-301 Machine Vision User Manual...
- Page 56 Step6. Here is Intel product improvement program information, you can choose Accept or Decline by your option and installation will go to next step. Step7. Click Next to continue the program. AVS-301 Machine Vision User Manual...
-
Page 57: Realtek Alc269 Hd Audio Driver Installation
Step8. Select Yes, I want to restart this computer now. Click Finish to complete installation. Realtek ALC269 HD Audio Driver Installation To install Realtek ALC269 HD Audio Driver, please follow the steps below. Step1. Select Realtek AL269 HD Audio Driver from the list. AVS-301 Machine Vision User Manual... - Page 58 Step2. Click Next to continue. Step3. Click Yes, I want to restart my computer now. Click Finish to complete the installation. AVS-301 Machine Vision User Manual...
-
Page 59: Intel® Management Engine Interface
Intel® Management Engine Interface To install the Intel® Management Engine Interface, please follow the steps below. Step1. Select Intel® Management Engine Interface from the list Step2. Select setup language you need. Click Next to continue. AVS-301 Machine Vision User Manual... - Page 60 Step3. Choose I accept the terms in the License Agreement and click Next to begin the installation. Step4. Click Next to continue. AVS-301 Machine Vision User Manual...
- Page 61 Step5. Click Finish to complete the installation. AVS-301 Machine Vision User Manual...
-
Page 62: Chapter 5 Mounting Suggestions
Chapter 5 Mounting Suggestions 5.1 Wall Mount 5.1.1 AVS-301 Wall Mount Figure 5.1 Wall Mount of AVS-301 AVS-301 Machine Vision User Manual...
Need help?
Do you have a question about the AVS-301 and is the answer not in the manual?
Questions and answers