Advertisement
Table of Contents
BEFORE BEGINNING
Identify and verify that you have all the parts listed.
Read thru the instructions at least once, familiarizing
yourself with the parts and process before proceeding.
The Deluxe Stair Gauges are designed to fit on framing
squares that have both 2" and 1-1/2" wide legs that are no more
than .095" thick. The brass bolts will not harm the surface of
a steel square, but they can damage an aluminum square. The
Deluxe Stair Gauges will work on stair angles as low as 26º
(approximate rise of 6" and run of 12-1/4", for example).
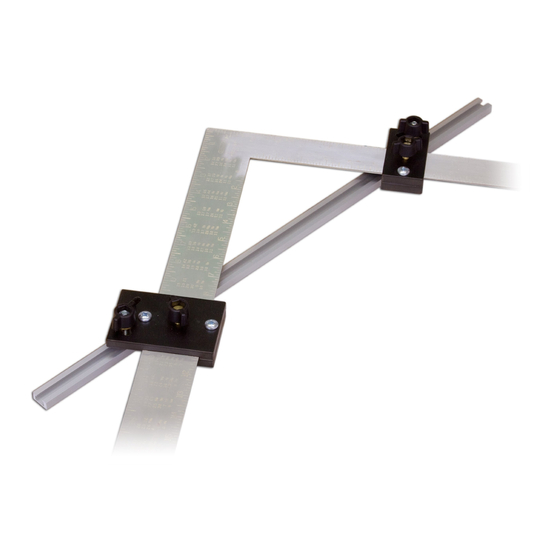
ASSEMBLY
There are two Deluxe Stair Gauge assemblies. Loosen
the knob/brass screw located in the approximate center of
each gauge. Slide the larger Deluxe Stair Gauge (8715B1)
on the 2" wide leg of your framing square and the smaller
one (8715B2) on the 1-1/2" wide leg as shown. See fig. 1
For best accuracy, ALWAYS make sure the top inside
edge of the Deluxe Stair Gauge (located inside the opening
of the Deluxe Stair Gauge and nearest the slotted end)
is pressed against the outside edge of the framing square
that you'll be marking against. See arrows in fig. 1
Loosen the knob on each Deluxe Stair Gauge that
tightens it in position on the square. Reading along the
inside facing edge of each Deluxe Stair Gauge, use the
ruler markings on the outside edge of your square to set the
RISE with the small Deluxe Stair gauge and the RUN with
the large Deluxe Stair Gauge. Position each Deluxe Stair
Gauge where desired, then retighten the knobs. See fig. 1
If you want, you can use the Deluxe Stair Gauges
without attaching the 24" One Track. If you're not using the
One Track, you can also remove the One Track attachment
hardware mounted in each slot of the Deluxe Stair Gauges.
USE
The Deluxe Stair Gauges work by indexing both
inside facing corners (located underneath) against the
work. These corners are in line with the top inside facing
edges of the Deluxe Stair Gauges that you use to set
their locations with on the framing square. See fig. 2
8715
Deluxe Stair Gauges
Owners Manual
Please Read Carefully!
Parts List:
Please identify and verify that you have all of the parts
listed below prior to assembly.
Part
Description . . . . . . . . . . . Quantity
8715B1
2" Deluxe Stair Gauge w/hdw. . . . . . . . . . . . . 1
8715B2
1-1/2" Deluxe Stair Gauge w/hdw.. . . . . . . . . 1
4224
24" One Track . . . . . . . . . . . . . . . . . . . . . . . . . . 1
1
2
Advertisement
Table of Contents

Related Manuals for Woodhaven 8715


Summary of Contents for Woodhaven 8715
- Page 1 8715 Deluxe Stair Gauges Owners Manual Please Read Carefully! Parts List: Please identify and verify that you have all of the parts listed below prior to assembly. Part Description . . . . . . . . . . . Quantity BEFORE BEGINNING Identify and verify that you have all the parts listed.
- Page 2 USING ONE TRACK The One Track is useful to span damaged areas and when marking near the end of a board. It also serves as a fence to help to make your stair layouts more accurate. The One Track also helps to hold the Two Deluxe Stair Gauges in position, preventing them from getting bumped out of adjustment. Rise To attach the One Track to the two Deluxe Stair Gauges, loosen each knob of the knob/bolt attached in the slot near the top of each gauge. Slide the T-slot of the 24" One Track (4224) on to the head of the each bolt, leaving the knobs slightly loose for now. Place the Framing Square/Deluxe Stair Gauges against the edge of the work piece, making sure the bottom inside corner of each Deluxe Stair gauge is resting against the edge of the work. Position the One Track where desired along and against the edge of the work as you hold the Deluxe Stair Gauge corners against the edge of the work, then tighten the two knobs to secure the One Track in place. See fig. 3 USING The Deluxe Stair Gauge top plates overhang the work at a right angle to the blade of the square. These let you mark the adjacent RUN or RISE for a short distance (1 to 1-1/4"), which allows for more accurate repositioning as you slide the framing square/Deluxe Stair Gauges along the work edge to the next position. Rise As you layout each RISE & RUN As you layout each RISE &...
Need help?
Do you have a question about the 8715 and is the answer not in the manual?
Questions and answers